Manually configure the PC and assign an IP address to a Hub
You can manually assign an IP address to the Hub. You would need to do this when your computer and the Hub are both connected to a private network and you do not have a DHCP server.
Prerequisites
-
Access to the Hub from your computer using one of these options:
-
An Ethernet cable must be connected to the Hub and your computer.
-
Both your computer and Hub must be connected to your private network.
-
-
A power supply must be connected to the Hub and the Hub powered on.
-
Determine the IP address that you want to assign to the Hub.
To configure your laptop and assign an IP address to the Hub:
-
On your PC, navigate to the Ethernet network settings dialog.
-
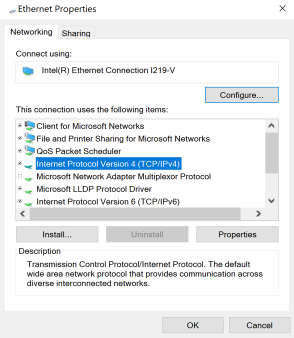
Click the Internet Protocol Version 4 (TCP/IPv4) parameter.
-
Click Properties. The Internet Protocol Version 4 (TCP/IPv4) Properties dialog appears.
-
Select Use the following IP address.
Note IMPORTANT: Make note of the current IP address entries for IP address, Subnet mask, and Default gateway. You will need this information to complete the final step of the process.
-
Configure with the following details:
- IP address for PC: 192.168.210.2
- Subnet: 255.255.255.0
- Gateway: 192.168.210.1

-
Click OK.
-
Open a browser window.
-
Enter the default gateway IP address to access the Hub: 192.168.210.1. The Hub login screen displays.
-
Log into the Hub using the default user name and password. The default user name is admin and the default password is printed on the bottom label of the device and on the loose label included in the package. If the defaults to not work, they may have been changed. Confirm this information with your system administrator.
-
Update the IP address for the device.
-
On your PC, revert the IP address information to the original entries.
-
Return to the Internet Protocol Version 4 (TCP/IPv4) Properties dialog.
-
Enter the original IP address entries for IP address, Subnet mask, and Default gateway.
-
Click OK.
-
 PDF
PDF


