Configuring an OpenVPN server for iOS and Android clients
Goal
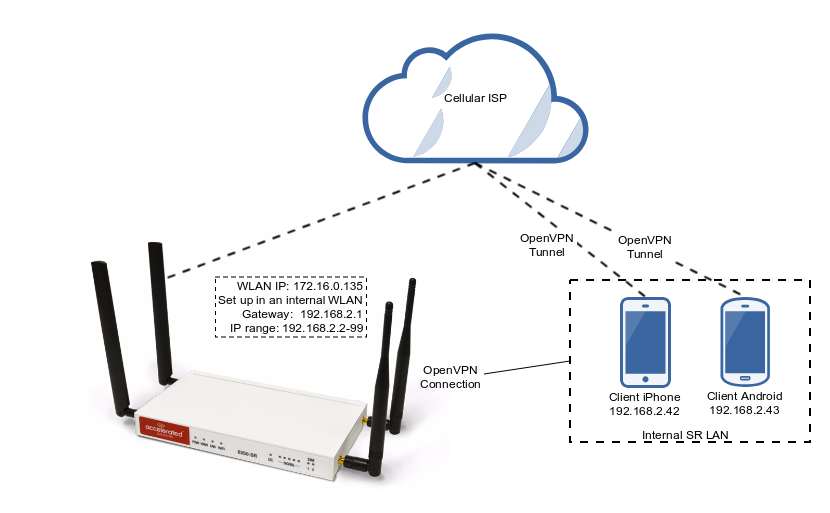
Configuring a simple (username/password authentication only) OpenVPN server instance on an OpenVPN-enabled device. Examples of client connection from an Apple iOS device is included. The steps to connect a Android OS device client to the server are similar.
This enables a road-warrior setup to allow roaming devices (iOS/Android OS devices) to connect into a device serving an OpenVPN TUN-style tunnel connection. For example on how to configure and connect an OpenVPN client on another device, visit the article Configuring an OpenVPN client.
Relevant files
The files used to create this example are attached below:
Setup
This article assumes you have basic understanding of server-authentication, certificates, keys, and the fundamentals of OpenVPN. It also assumes the appropriate private and public certificate (*.crt), key (.*key), and Diffie-Hellman (dh2048.pem) files, as well as the OpenVPN configuration file (*.ovpn) are correctly generated. For more details on generating these files, visit https://www.digitalocean.com/community/tutorials/how-to-set-up-an-openvpn-server-on-ubuntu-16-04.
The client devices (iOS/Android OS devices) require the OpenVPN Connect app from their respective app libraries:
- App Store: https://itunes.apple.com/au/app/openvpn-connect/id590379981?mt=8
- Google Play: https://play.google.com/store/apps/details?id=net.openvpn.openvpn&hl=en
The *.ovpn file will need to be imported into the devices for OpenVPN Connect to use.
Sample
The sample configuration below shows an example network with an iOS device connected via the TUN-style tunnel. References to the Android OS are made.
Sample configuration
Open the configuration page and set the following configurations.
OpenVPN Section Configuration
- In the VPN > OpenVPN > Servers section, specify a name for the new OpenVPN server (for example, ExampleServer) and click Add.
- Ensure Enable is selected.
- Ensure the Device type pull-down menu is selected to be TUN. This is necessary as iOS and Android OS only supports TUN-style OpenVPN tunnels.
- Ensure the Zone pull-down menu is selected to be Internal, as the clients are treated as a LAN devices.
- Set Address to 192.168.2.1/24, this must be a valid gateway in the network of the IP address range.
- Specify the First IP address and the Last IP address of the address range if different from the default values.
- From the Authentication pull-down menu, select option Username/password only.
- Insert the contents of the generated CA certificate (usually in ca.crt file), Public key (for example, server.crt), Private key (for example, server.key), and the Diffie Hellman key (usually in dh2048.pem) in their respective fields. The contents will be hidden when the configuration is saved.
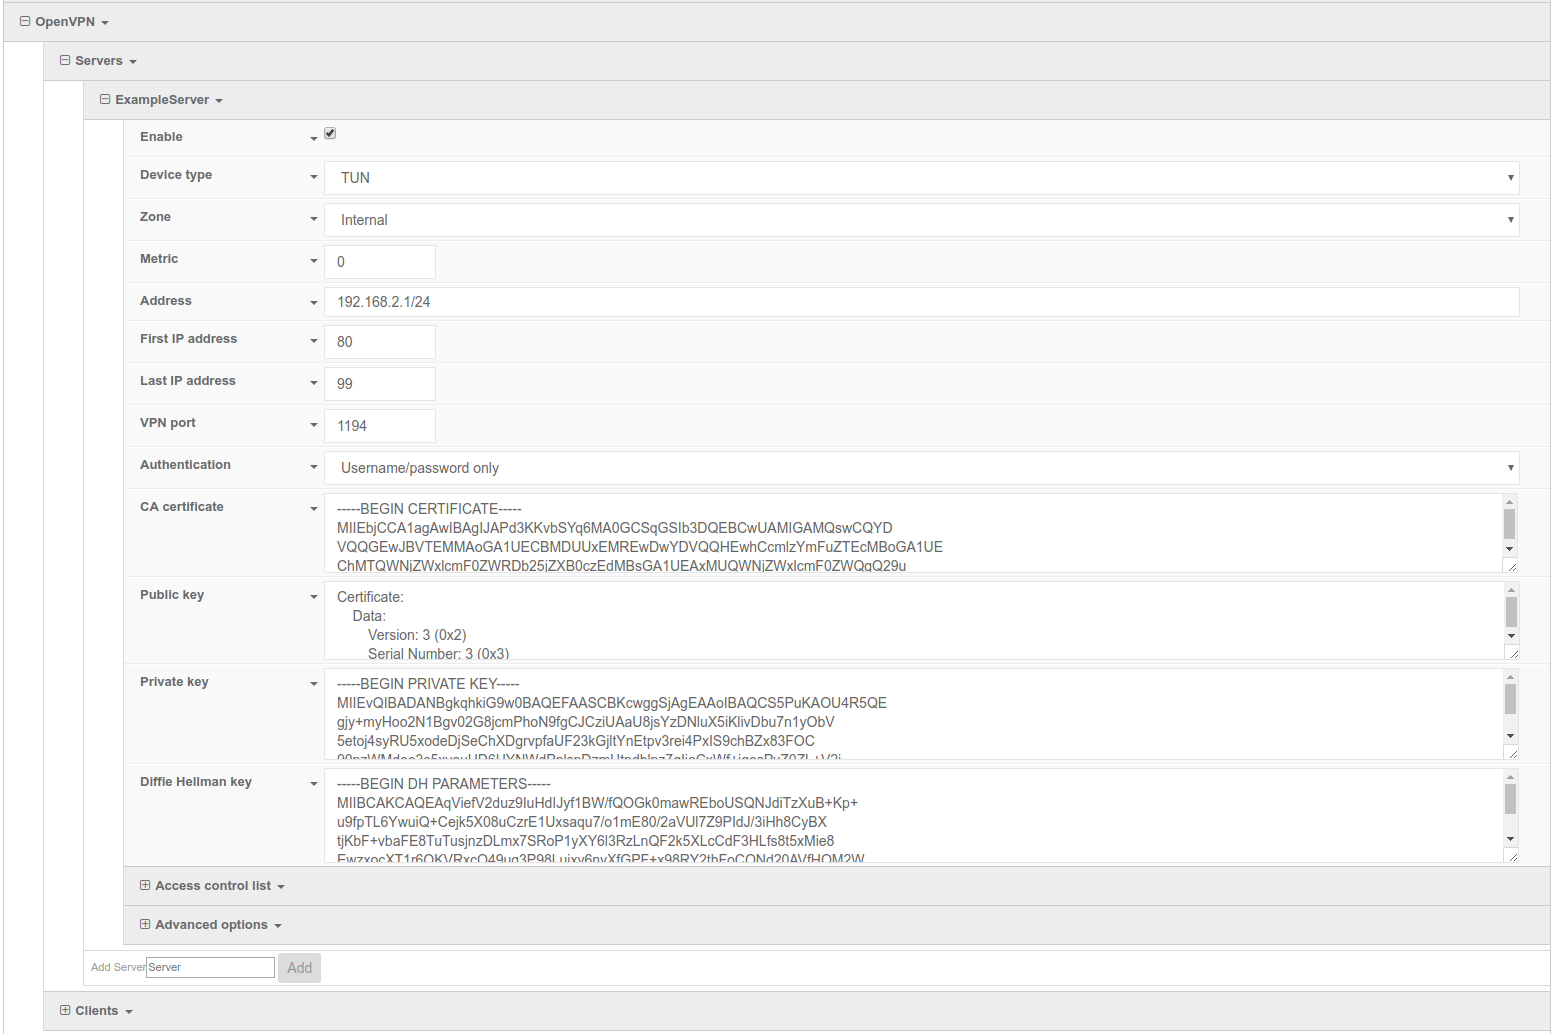
Full files used in this example are attached in the Relevant Files section above.
Authentication Section Configuration
The following configurations add a new user/group to handle OpenVPN access:
- In the Authentication > Groups section, specify a name for the OpenVPN group (for example, egGroup).
- Select OpenVPN access.
- Expand OpenVPN tab, using the pull-down menu next to Tunnel, select appropriate OpenVPN instance, for example, Server: ExampleServer.
- In the Authentication > Users section, specify a name for a new OpenVPN user (for example, egUser).
- In the new egUser user section, ensure Enable is checked, and specify a password for this user (for example, egPassword).
- In the egUser > Groups section, click Add and from the pull-down, select the OpenVPN group you wish to affiliate with this user (e.g. egGroup).
- Press Save at the bottom of the configuration page to save changes.
The OpenVPN server should now be operational. The next step is to connect a roaming device to the server by loading a *.ovpn file in OpenVPN Connect. Below is an example root_default_tun.ovpn file (attached):
client
dev tun
proto udp
remote 172.16.0.135 1194
resolv-retry infinite
nobind
persist-key
persist-tun
remote-cert-tls server
cipher AES-256-CBC
verb 3
auth-user-pass
<ca>
-----BEGIN CERTIFICATE-----
MIIEbjCCA1agAwIBAgIJAPd3KKvbSYq6MA0GCSqGSIb3DQEBCwUAMIGAMQswCQYD
VQQGEwJBVTEMMAoGA1UECBMDUUxEMREwDwYDVQQHEwhCcmlzYmFuZTEcMBoGA1UE
ChMTQWNjZWxlcmF0ZWRDb25jZXB0czEdMBsGA1UEAxMUQWNjZWxlcmF0ZWQgQ29u
Y2VwdHMxEzARBgNVBCkTCnRlc3RzZXJ2ZXIwHhcNMTcxMTAxMDE1MzQxWhcNMjcx
MDMwMDE1MzQxWjCBgDELMAkGA1UEBhMCQVUxDDAKBgNVBAgTA1FMRDERMA8GA1UE
BxMIQnJpc2JhbmUxHDAaBgNVBAoTE0FjY2VsZXJhdGVkQ29uY2VwdHMxHTAbBgNV
BAMTFEFjY2VsZXJhdGVkIENvbmNlcHRzMRMwEQYDVQQpEwp0ZXN0c2VydmVyMIIB
IjANBgkqhkiG9w0BAQEFAAOCAQ8AMIIBCgKCAQEAyVTfVOJNPTTPYDFC0GtGnpky
q9rQthQ/CX+u9wUpsJ8yBenmENqi5Yq3L/DWJXwTmXd4z2PaQFjszHQlDDwoN9pW
W/aPt4ZkC/6ms9Ny3WbEM/XQwgri2LRXra3qpGmjGtUIgCpl2nC8nFtvfqsca8u8
1qAZZtuT3YXAM5FYpsLKEc4TZfgquyJW4I1JwNTIIobVq7Oiqvs8JbpMAFtmBxVv
NYU9LJsAFzwvO1OZkfoXefqz9/uxKK/MzTCNvu7Z64z6Q52EQVJciHYHE2jEMKdy
yyvpFJYii6Hocu3ocHpvGa6ki3Cw/ObeenbqLKTCK8zsIL99JJYXaUKyFq4zsQID
AQABo4HoMIHlMB0GA1UdDgQWBBQIeJbSenktJDlHp6a9lHIbzagE4zCBtQYDVR0j
BIGtMIGqgBQIeJbSenktJDlHp6a9lHIbzagE46GBhqSBgzCBgDELMAkGA1UEBhMC
QVUxDDAKBgNVBAgTA1FMRDERMA8GA1UEBxMIQnJpc2JhbmUxHDAaBgNVBAoTE0Fj
Y2VsZXJhdGVkQ29uY2VwdHMxHTAbBgNVBAMTFEFjY2VsZXJhdGVkIENvbmNlcHRz
MRMwEQYDVQQpEwp0ZXN0c2VydmVyggkA93coq9tJirowDAYDVR0TBAUwAwEB/zAN
BgkqhkiG9w0BAQsFAAOCAQEACjuztAUUOhpw4GUVKDMbw8IrMAVXkDEAxdwpfL+X
bT6mQc9sbZAFCXWxh9q425F5Xll9+TKOjrulZdHzaoominFclsoqwdpu0I+K4I3e
Qap0B+Ns7DGmcwu68I1LsQq6hJAaM03DvEGPFSbbZi/60zJRgQdVWjtGhAbW46by
6litNY64j0vN/UW41IfMjvRXeg8Zgyb7gICRTWUAvaV9CXlhHK0GWzCKCrIl225x
zfvsmuPERPYKFopPhfqV+xE/62Q/TcAcuJgaGfMipY3IXkRhqikj5pZS3g4gAVjZ
Z65upCz8o5CEngtwOQ/fSPUxo73ycpkLPxJF/QwXUJA/kw==
-----END CERTIFICATE-----
</ca>
OpenVPN Connect on a mobile device may not require the auth-user-pass option. If the option is used, make sure there is no argument passed (i.e. pass.txt) as the application will try to search for the file locally.
Also ensure the correct static IP address and port is inserted in the "remote" line.
Example Client Device SetUp
The following example is taken from an iOS device. The steps are similar for an Android OS device:
- Download and install OpenVPN Connect from App Store.
- Transfer the *.ovpn file to the iOS device. One way is to send it via an email attachment, open it in the Mail app and select Copy to OpenVPN.
- In the OpenVPN app, insert the appropriate credential for the server as it was set up during the certificate/key file creation phase. Save the credential as desired.
- Select the switch beneath Disconnected to initiate the connection.

If the configuration is set up correctly, the OpenVPN Connect app will show all the active connection details.
Note Android OS users: Step 2—locating and opening the *.ovpn file can be quite different from an iOS device. You will need to apply the correct steps to load the ovpn file into OpenVPN Connect on Android.


