

Most embedded devices provide a JTAG interface for debugging purposes. However, if left unprotected, this interface can become an important attack vector on the system. The i.MX6QP series System JTAG Controller (SJC) allows you to regulate JTAG access with different security modes using OTP (One Time Programmable) eFuses:
-
Enabled: This mode does not provide any security since JTAG is accesible. This is the default mode of operation.
-
Secure: This mode provides high security. JTAG use is regulated by a 56-bit secret key-based challenge/response authentication mechanism.
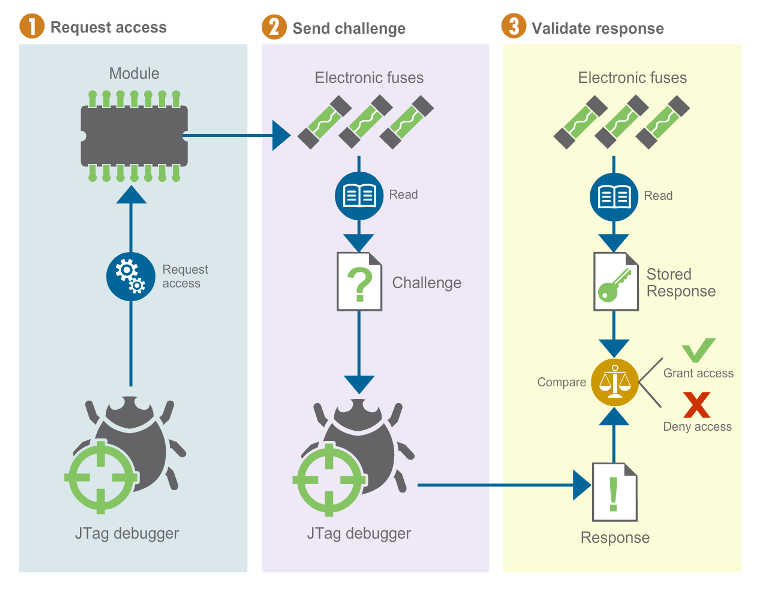
The response key must be programmed in the target and configured in the debug tool.
-
Disabled:
-
Disabled debugging: This mode disables debugging but leaves the boundary scan functionality enabled.
-
Disabled JTAG: This mode provides maximum security at the cost of renouncing to JTAG debug abilities. All security-sensitive JTAG features are permanently blocked, preventing debug.
This mode disables boundary scan, which is used by Digi in the manufacturing process. Disabling JTAG completely could affect the RMA procedure.
-
Secure JTAG key management
Key management is an important consideration when configuring the secure JTAG mode. The response key can be:
-
A unique key for all devices. Compromising this key would make all deployed devices subject to attack.
-
A key per device.
-
The keys and device identification, such as the serial number or MAC address, must be kept in a secure database.
-
A secure algorithm can be used to generate a response key from the device identification such as the serial number or MAC address. In this case, compromising the algorithm would make all deployed devices vulnerable.
-
| Key management implementation is customer-dependent. |
Program JTAG security mode
JTAG functionality is enabled by default. Digi’s U-Boot provides the trustfence jtag command that allows you to permanently change the secure JTAG mode.
|
Programming eFuses is an irreversible operation and should only be done at the final stages of product manufacturing. OTP configuration can still be overwritten using the shadow registers unless the JTAG mode is locked. You should only program Secure JTAG after closing the device. See Close the device for more information. |
To permanently program the JTAG configuration by burning the eFuses, execute the following command sequence:
=> trustfence jtag prog <mode>
In this sequence, mode can be one of the following strings:
-
secure, for secure JTAG mode. In this mode, the response key also needs to be programmed into the eFuses as follows:
=> trustfence jtag prog_key <high> <low>
A quick way to generate a random response key on a Linux machine is:
~$ openssl rand -hex 7 | sed 's,^\([[:xdigit:]]\{6\}\)\([[:xdigit:]]\{8\}\),0x00\1 0x\2,g' -
disable-debug, to disable JTAG debugging while allowing boundary scan.
-
disable-jtag, to block all JTAG features.
Lock JTAG mode
Once the desired JTAG interface configuration is programmed, you must lock the JTAG mode configuration so it cannot be overwritten by the OTP shadow registers.
To protect the JTAG mode configuration, use the following command:
=> trustfence jtag lock
To protect the response key from being read or overwritten, use the following command:
=> trustfence jtag lock_key
Configure secure JTAG with IDE
When configuring secure JTAG mode, you must set up your debugger tool to verify the response key sent by the target device and make debugging possible. This example uses the ARM DStream DS-5 Eclipse-based IDE debugger tool.
-
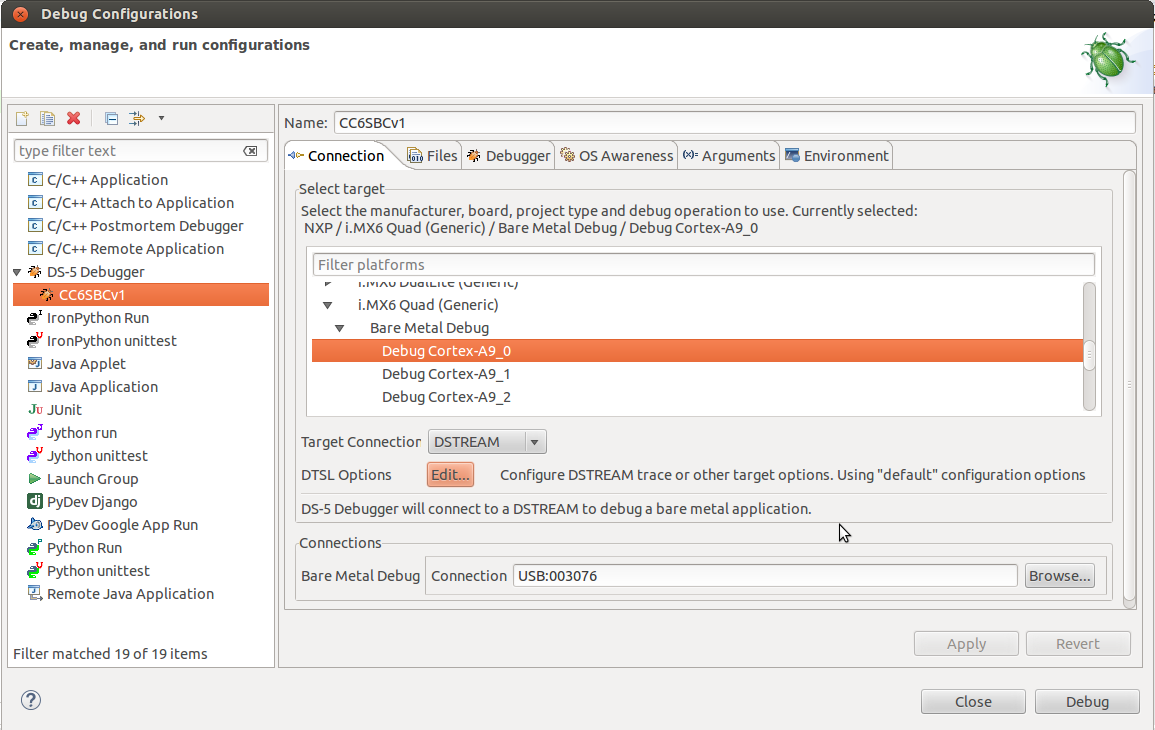
Enter the Eclipse environment into the Run>Debug Configurations>DS-5 Debugger menu.
-
Select the configuration created for your debug session.
-
Click DTSL Options. A new dialog appears.
-
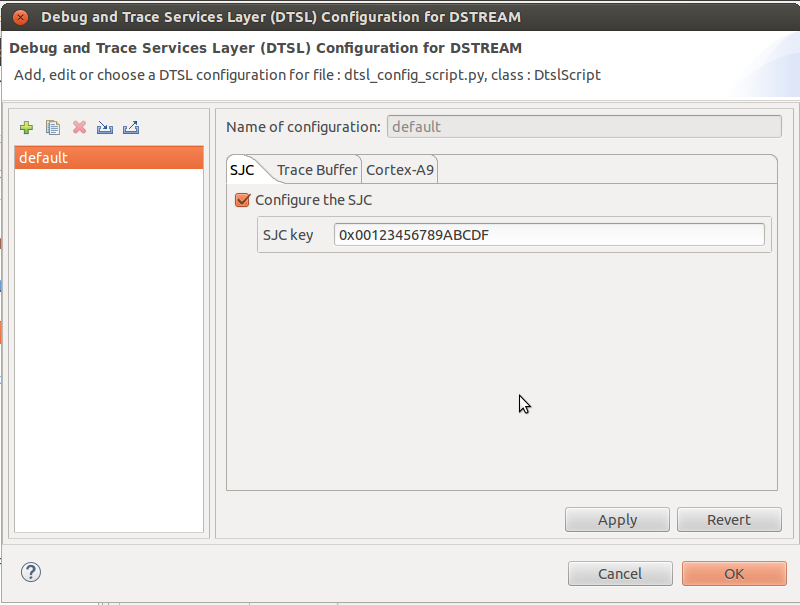
Select the SJC tab and enable the Secure JTAG support by clicking the checkbox.
-
Enter the response key into the SJC key field. This is the same key that has been set up on the target eFuses with the trustfence jtag prog_key command.
The debugger is now ready to connect to the target again. In the case of a response key mismatch, the debugger will not be able to connect to the target.
