A signed image provides a mechanism to verify the integrity and authenticity of the image itself. The procedure is similar to the one used in any digital signature with asymmetric encryption.
The following sections explain both the signature and the authentication processes for firmware images. Some concepts have been simplified; see Glossary of cryptography terms for more detailed information and references about cryptography concepts and the secure boot process.
Public Key Infrastructure tree (PKI tree)
In order to sign images, you need a Public Key Infrastructure (PKI) tree. This is a set of certificates and private keys that Digi Embedded Yocto uses to sign the firmware images. Digi Embedded Yocto automatically generates a secure PKI tree with 4096-bit length keys, if required.
As an alternative, you can manually create the PKI tree using your own CA certificates and add your company information to the generated certificates. This is not required, as the certificates are only used on the internal authentication. See Manually create a Public Key Infrastructure tree (PKI tree) for more information on using your own certificates.
The PKI tree contains several RSA public and private keys, including the SRK (Super Root Keys). There are four SRK certificates per PKI tree, but only one (the first one by default) is used in the secure boot process. The rest are only used if a key is compromised and you need to revoke it. See Revoke a key for details.
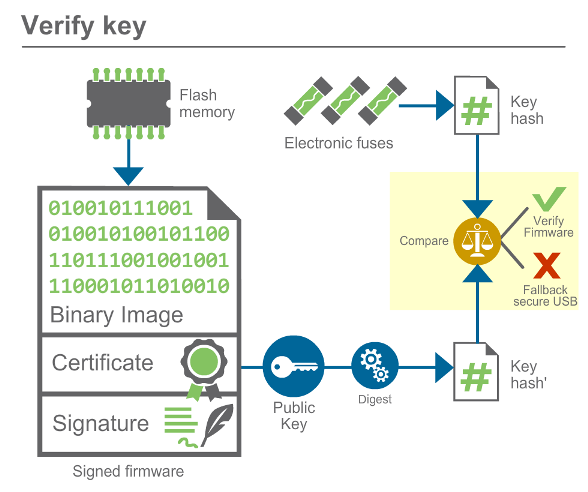
The hash of the public SRK keys is programmed in the device eFuses during manufacturing. This plays an important role in the image authentication process.

Image signature
Using the PKI tree, Digi Embedded Yocto generates the signature of the image by encrypting it with the private key. Note that only the owner of the private key can generate signatures, and by using the private password protecting the key. The certificate is then created using the public key (primary element for validation) and some information about the signer. Both the signature and the certificate are then concatenated to the firmware image to form the final signed image. An overview of this process is depicted below:

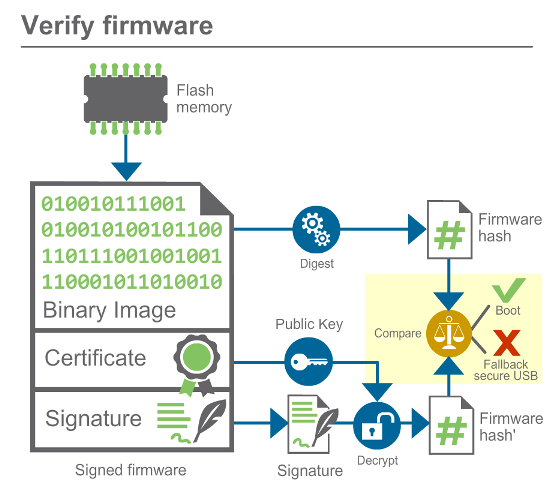
Image validation
The AHAB uses the following procedure to verify the integrity and authenticity of the image:
-
The AHAB validates the public key by comparing its hash against a value stored in the eFuses. If they do not match, the boot is aborted. Otherwise the boot sequence continues.
-
Now that trust in the public key has been established, it is used to decrypt the hash on the certificate and compare it to the hash computed from the image data. If they match, the device boots. If they do not match, the boot is aborted.