

Upgrading the firmware of an embedded device often means updating the full system rather than just substituting files. A full system update does risk leaving the system unable to boot if, for example, power is lost during the update process. A dual boot mechanism—which duplicates system partitions and performs the update over the unused partition—ensures that the device is always able to boot.
Double copy with fallback
The eMMC of a dual-boot system is re-partitioned to have duplicate system partitions: linux and rootfs. The system knows which pair of partitions are the "active" system so a system update is performed over the "inactive" partitions.
The following image shows the partition setup and update procedure.
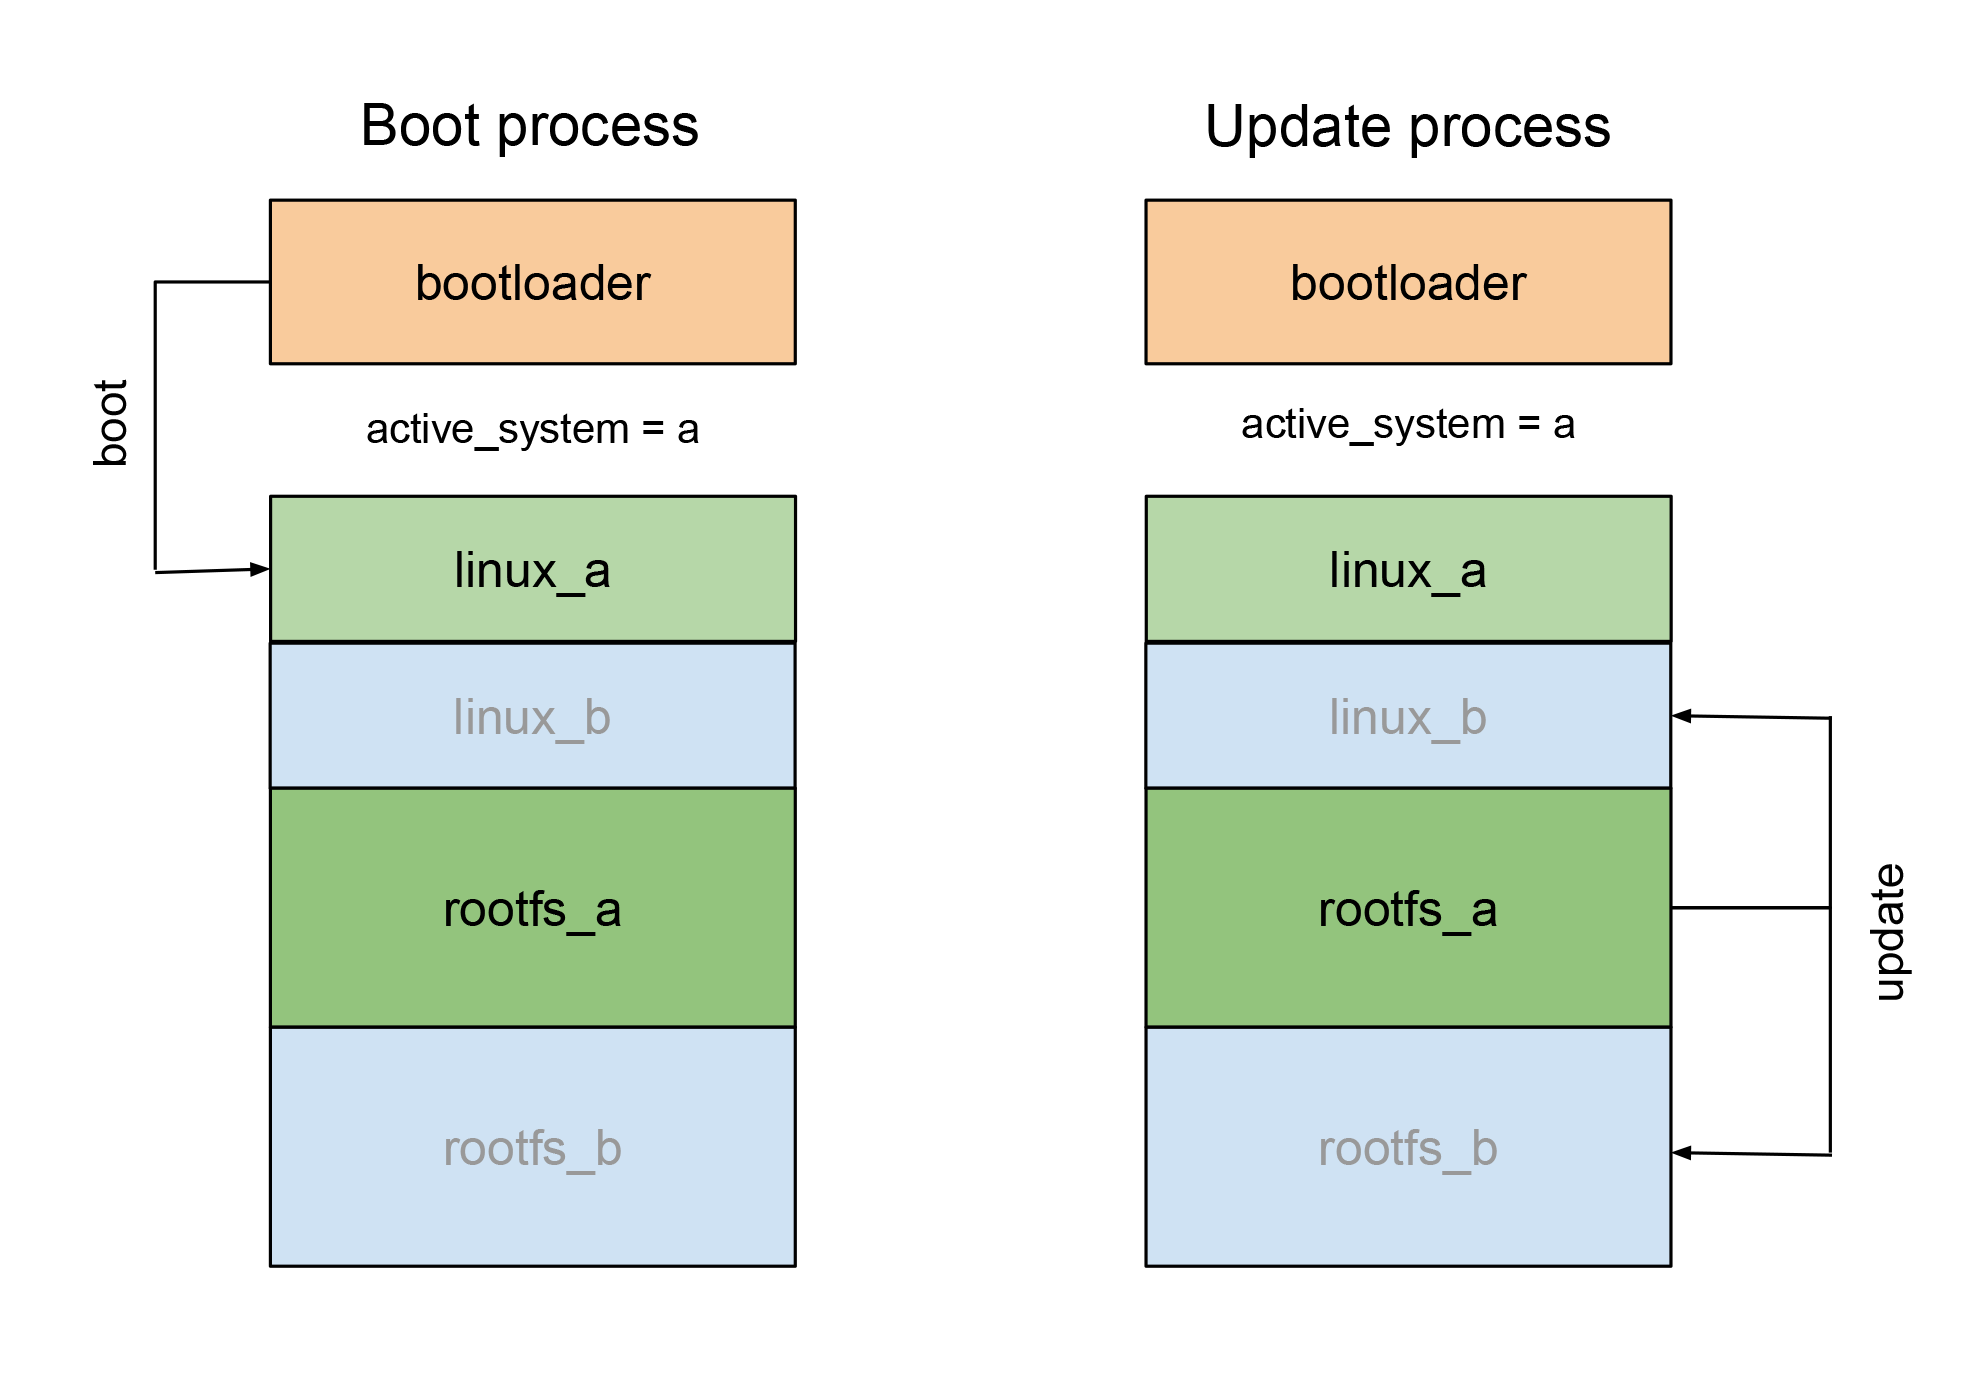
Using a dual boot mechanism, an update is always safe even in case of power off. There is no need for a recovery kernel because having two copies guarantees that it is possible to update the inactive boot partition. When you have successfully installed the new system image, the bootloader loads that new image. Once the boot succeeds, the updated image is considered to be the active system.
Build images prepared for dual boot
Digi Embedded Yocto default images do not include dual boot support by default.
To build an image with dual boot support, edit your project’s conf/bblayers.conf configuration file and add the meta-digi-dualboot layer by adding the following line:
<DEY-INSTALLDIR>/sources/meta-digi-dualbootwhere <DEY-INSTALLDIR> is your Digi Embedded Yocto install folder.
The images you build will now include dual boot support. The meta-digi-dualboot layer modifies different scripts and software update (SWU) images to work with dual system partitions.
Prepare your target for dual boot
There are two ways to prepare your target for dual boot:
-
Automatic mode: use the firmware install scripts (recommended).
-
Manual mode: do all operations manually.
Automatic mode
This method uses the default partition table defined in U-Boot and does the first deployment of all system firmware on A and B partitions.
-
Enable U-Boot environment variable
dualboot:=> setenv dualboot yes => saveenv -
Run one of the firmware install scripts, such as:
-
Program firmware using UUU:
=> fastboot 0Then run the install script on your host PC. See Program firmware using UUU for reference.
-
Program firmware using microSD card:
Insert a microSD card with the firmware and SD install script and run:
=> run install_linux_fw_sdSee Program firmware using microSD card for reference.
-
After the first firmware deployment on both system partitions (A and B), boot the device. The system is now ready for dual boot.
Check Perform subsequent firmware update for information on updating the firmware on a dual boot device.
Manual mode
This method uses manual operations to create the partition table and do the first deployment of firmware on both system partitions.
Create the partition table
-
Enable U-Boot environment variable
dualboot:=> setenv dualboot yes => saveenv -
Modify your partition table for dual boot. The only requirement is to have four partitions with the names: linux_a, rootfs_a, linux_b, rootfs_b.
You can create your custom partition table or run the following script in U-Boot to create a predefined partition for dual boot:
=> run partition_mmc_linux -
Check the new partition table:
=> mmc part
Perform first firmware deployment
Perform the first deployment of firmware using U-Boot to update the partitions of both systems A and B.
See Program firmware from U-Boot for instructions on updating partitions from U-Boot. For example, to update via TFTP:
=> update linux_a tftp <boot-file>.boot.vfat
=> update rootfs_a tftp <rootfs-file>.rootfs.ext4
=> update linux_b tftp <boot-file>.boot.vfat
=> update rootfs_b tftp <rootfs-file>.rootfs.ext4
After the first firmware deployment on both system partitions (A and B), boot the device. The system is now ready for dual boot.
Check Perform subsequent firmware update for information on updating the firmware on a dual boot device.
Perform subsequent firmware update
To make use of the dual boot system, you must perform the subsequent updates from Linux, either locally or remotely using Remote Manager.
Update using a local file
-
Create a software update
*.swufile using the instructions in Build a software update package. -
Copy the software update
*.swufile to an external storage device such as USB disk or microSD card. Optionally, you can save it to your device’s eMMC if you have enough free space. -
Run
firmware-update-dual.shscript with the*.swufile as parameter:# firmware-update-dual.sh </your-path/your-filename>.swu
The mechanism updates the firmware on the inactive system partitions. If the update process is successful, the target reboots into the new system image.
If the target boots successfully, the new image becomes the current active system.
If the target fails to boot the new system, the dual boot mechanism increments a boot attempt counter and waits for the user (or a watchdog) to reboot the device.
If the target fails to boot the number of times established in U-Boot variable bootlimit (default is 3), the dual boot mechanism switches back to boot the previously active system.
Update using Digi Remote Manager
Refer to Update the firmware with Remote Manager for information on updating the system via Remote Manager.
The meta-digi-dualboot layer modifies the firmware_download_path field of the /etc/cc.conf configuration file to /home/root as the path for saving the .swu file transferred by Remote Manager.
Consider whether you want to change this path to an external media if the size of the *swu image doesn’t fit into the partition.
|
Enable a watchdog
The dual boot mechanism doesn’t enable a watchdog by default. To guarantee that an update doesn’t result in a blocked system (especially if updating remotely), Digi recommends you enable a watchdog timer that can reset the device in case of a boot failure.
See Watchdog for information about enabling and using the watchdog.
In a typical use case, a user space application or service starts the watchdog. However, if the system hangs before reaching this point, the watchdog is not able to reset the device.
In this case, you can add panic=10 to the kernel arguments to force a restart 10 seconds (or any number of seconds you choose) after a kernel panic.
To add this parameter to the kernel arguments, run this on U-Boot:
=> setenv extra_bootargs panic=10
=> saveenv
Disable dual boot
To switch from a dual boot system to a standard system:
-
Disable U-Boot environment variable
dualboot:=> setenv dualboot no => saveenv -
Modify your partition table for standard boot.
You can create your custom partition table or run the following script in U-Boot to create a predefined partition for standard boot:
=> run partition_mmc_linux -
Remove meta-digi-dualboot layer from your project’s
conf/bblayers.conf. -
Rebuild your image.
Perform on-the-fly updates
A dual boot partition layout lacks the storage space to download a firmware file on the target. To update images on systems that don’t have enough storage space, use the Digi Remote Manager on-the-fly feature. With on-the-fly mode enabled, the update process downloads the software update file (swu) in chunks and writes them directly to the partition.
Enable on-the-fly updates for Digi Remote Manager
Cloud Connector is a service that communicates with Remote Manager, Digi’s platform for managing devices remotely.
The on-the-fly update feature is not enabled by default in Digi Cloud Connector.
To enable on-the-fly, modify the /etc/cc.conf Cloud Connector configuration file on the target:
on_the_fly = trueYou can now install new firmware onto the target with the Cloud Connector application.
| On-the-fly support does not work with compressed root file system images (*.gz). |
