

This topic explains how to boot Digi Embedded Yocto images without updating the firmware on the internal eMMC. This is helpful during the development phase, as it preserves the original firmware on the SOM.
Open a serial connection
You must open a serial connection to communicate with your device.
-
Open a serial connection using any terminal program such as Tera Term, Minicom, Coolterm, or HyperTerminal. This documentation demonstrates using Minicom to work with the device command line.
Use the following settings:
Parameter Value Port
Serial port where the device is connected
Baud rate
115200
Data bits
8
Parity
None
Stop bits
1
Flow control
None
-
Reset the device by pressing the reset button on the board. Then immediately press any key in the serial terminal to stop the auto-boot process. The U-Boot bootloader prompt displays:
U-Boot dub-2017.03-r11.1 (Sep 29 2021 - 14:56:25 +0000)

CPU:   Freescale i.MX6QP rev1.1 at 792MHz
CPU:   Industrial temperature grade (-40C to 105C) at 38C
Reset cause: POR
I2C:   ready
DRAM:  2 GiB
MMC:   FSL_SDHC: 0, FSL_SDHC: 1
In:    serial
Out:   serial
Err:   serial
Model: Digi International ConnectCore 6 QuadPlus Single Board Computer.
ConnectCore 6 Plus SOM variant 0x02: Industrial QuadPlus-core 1GHz, 8GB eMMC, 2GB DDR3, -40/+85C, Wireless, Bluetooth, Kinetis
Board: ConnectCore 6 Plus SBC, version 3, ID 160
Boot device: MMC4
PMIC:  DA9063, Device: 0x61, Variant: 0x63, Customer: 0x00, Config: 0x90
flash target is MMC:0
Net:   FEC [PRIME]
Fastboot: Normal
Hit any key to stop autoboot:  0
=>
Boot the system from network
This shows how to transfer the images to the target via TFTP or NFS, and mount an NFS root file system.
| This requires that you set up your PC workstation as explained in Set up native Linux PC. |
1. Prepare the device artifacts
-
Get the Digi Embedded Yocto firmware images to boot from network:
-
The kernel file:
<kernel-file>.bin. -
The device tree:
<device-tree-file>.dtb. -
The compressed root file system:
<rootfs-file>.rootfs.tar.bz2.
-
After building the Digi Embedded Yocto firmware, you can find the image files inside the project directory at:
<project_folder>/tmp/deploy/images/ccimx6qpsbc
-
You can download Digi provided pre-built images from:
-
For ConnectCore 6 Plus SBC: XWayland images
-
-
-
Untar the root file system tarball (
*.rootfs.tar.bz2) in the NFS exported directory of your development workstation. See Set up native Linux PC.$ sudo tar xvfp image.rootfs.tar.bz2 -C /exports/nfsroot-ccimx6qpsbc -
Copy the kernel
*.binfile to the TFTP exported directory of your development workstation.$ sudo cp <kernel-file>.bin /tftpboot -
Copy the device tree
*.dtbfile to the TFTP exported directory of your development workstation.$ sudo cp <device-tree-file>.dtb /tftpbootRead the
board_idandsoc_familyof your platform from U-Boot to find out the appropriate device tree file for your platform. For example:=> printenv board_id board_id=129 => printenv soc_family soc_family=imx6qThe dtb file name of the device device tree for your platform follows the format:
<soc_family>-<platform>-id<board_id>--5.4-r<X.Y>-<platform>-<date>.dtb
2. Configure your device’s network settings
-
Get a dynamic IP for your target:
=> setenv autoload no
=> dhcp
or you can set a static IP:
=> setenv ipaddr 192.168.115.222 -
Configure the IP of the development workstation with TFTP and NFS servers installed. See Set up native Linux PC:
=> setenv serverip 192.168.115.1
3. Boot from network
Boot from TFTP+NFS
-
Set the directory with the rootfs to mount. This directory is the one exported via NFS in your development workstation. See Set up an NFS server.
=> setenv rootpath /exports/nfsroot-ccimx6qpsbc -
Specify the device tree (
.dtb) file name. This is the name of the.dtbfile you copied to the TFTP exported directory of your development workstation.=> setenv fdt_file <device-tree-file>.dtb -
Establish the kernel file (
.bin) name. This is the name of the.binfile you copied to the TFTP exported directory of your development workstation.=> setenv zimage <kernel-file>.bin -
Save the changes.
=> saveenv -
Boot from TFTP.
=> dboot linux tftpYou can make these changes persistent by writing the following command:
=> setenv bootcmd 'dboot linux tftp'
=> saveenv
The target now loads the kernel and device tree from the TFTP server and the root file system from the NFS server.
Boot entirely from NFS
To avoid using TFTP for kernel and device tree files and boot everything from NFS, copy the kernel .bin and device tree .dtb files to the NFS-exported directory of your development workstation (instead of to the TFTP directory).
See Set up an NFS server.
=> dboot linux nfsBoot from microSD card
U-Boot can start a complete Digi Embedded Yocto system from a microSD card. To boot a system from a microSD card, follow these steps:
1. Create a bootable microSD card from a Digi Embedded Yocto image
Requirements:
-
Root/Administrator permissions in your development computer
-
A microSD card with a minimum capacity of 2 GB
| The following procedure will destroy existing data in the microSD card. |
To create a bootable microSD card from an existing Digi Embedded Yocto image:
-
Download the bootable Digi Embedded Yocto image from this URL: https://ftp1.digi.com/support/digiembeddedyocto/3.2/r3/images/ccimx6qpsbc/xwayland/.
-
Extract the
.sdcard.gzfile from the zip you downloaded into a folder of your choice. -
Decompress the file using the following command:
$ gzip -d -f <path/filename.sdcard.gz> -
Insert the microSD card into your computer and check the node Linux assigns to it (
/dev/[sdcard]) usingdmesg:$ dmesg [1413652.901270] sd 41:0:0:0: [sdc] 7744512 512-byte logical blocks: (3.96 GB/3.69 GiB) [1413652.903140] sd 41:0:0:0: [sdc] No Caching mode page present [1413652.903144] sd 41:0:0:0: [sdc] Assuming drive cache: write through [1413652.905638] sd 41:0:0:0: [sdc] No Caching mode page present [1413652.905642] sd 41:0:0:0: [sdc] Assuming drive cache: write through [1413652.915154] sdc: sdc1Do not mount any partitions the card might contain (or unmount any partition if automatically mounted) as you will be writing to the entire block device.
Using an incorrect device node in the next step might destroy all data on your computer hard drive. -
Raw write the image file to the microSD card with this command:
$ sudo dd if=<path/filename.sdcard> of=/dev/<sdcard> bs=64K && syncIn this example:
-
You must substitute
<path/filename.sdcard>with the path and filename to the SD card image. -
You must substitute <sdcard> with the device node Linux assigned to your microSD card.
-
The microSD card is now ready.
Substitute the bootloader
|
The .sdcard image contains the bootloader of the default variant of the ConnectCore 6 Plus. Attempting to boot it on a non-default variant will result in unexpected behavior. You can substitute the bootloader on the image with the one corresponding to your variant by raw writing it to the microSD card at a specific offset after the .sdcard image has been written: |
2. Boot Digi Embedded Yocto from the microSD card
-
Power off the device.
-
Insert the microSD card into the microSD card holder (bottom side of the board).
-
Change the boot source configuration to boot from the microSD card. To do so, set the boot mode micro-switches as follows:
-
BOOT.1 OFF
-
BOOT.2 ON
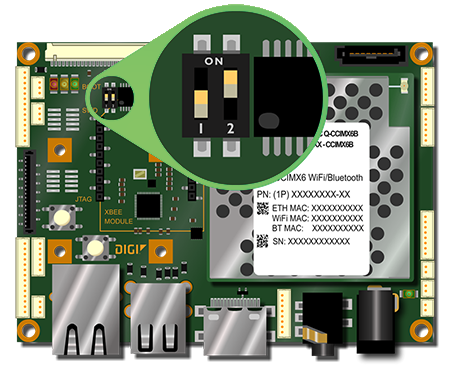
-
-
Power on the device. Digi Embedded Yocto boots from the microSD card.
