

The STMicroelectronics STM32MP13 CPU has twelve GPIO ports:
-
8 GPIO ports (named A to G) with 16 I/Os
-
1 GPIO port (named H) with 15 I/Os
-
1 GPIO port (named I) with 8 I/Os
GPIO naming
STM32MP13 GPIO signals are named on the schematics and hardware reference manual in the form Pxn where:
-
P stands for "port"
-
x is the GPIO port
-
n is the GPIO number within the port
For instance, PA12 refers to GPIOA 12.
GPIOs on the ConnectCore MP13
-
On the ConnectCore MP13 system-on-module:
-
Many of the STM32MP13 GPIOs are available on the system-on-module, multiplexed with other functions.
-
-
On the ConnectCore MP13 Development Kit:
-
The GPIO connector allows direct access to the following STM32MP13 GPIOs:
-
GPIOA 8
-
GPIOB 2
-
GPIOB 12
-
GPIOE 6
-
GPIOG 1
-
GPIOG 3
-
GPIOG 5
-
GPIOH 6
-
GPIOH 10
-
-
GPIOG 0 is connected to ULED
-
GPIOA 13 is connected to User button and LED 1
-
GPIOA 14 is connected to User button and LED 2
-
See Hardware reference manuals for information about GPIO pins and their multiplexed functionality.
GPIOs on the SOM and carrier board are used for many purposes, such as:
-
Power enable line for transceivers
-
Reset line for controllers
-
LCD backlight control
-
Interrupt line
-
User LED
-
User button
Kernel configuration
Support for STM32MP13 GPIOs is automatically provided through CONFIG_PINCTRL_STM32MP157, automatically enabled for this CPU.
Kernel driver
The driver for the STM32MP13 GPIO is located at:
| File | Description |
|---|---|
STM32MP13 Pinctrl driver to control GPIOs |
|
STM32MP157 Pinctrl driver |
Device tree bindings and customization
The STM32MP13 GPIO device tree binding is documented at Documentation/devicetree/bindings/pinctrl/st,stm32-pinctrl.yaml.
One GPIO controller is defined for each STM32MP13 GPIO port in the common STM32MP13 device tree file:
pinctrl: pin-controller@50002000 {
	#address-cells = <1>;
	#size-cells = <1>;
	compatible = "st,stm32mp157-pinctrl";
	ranges = <0 0x50002000 0xa400>;
	interrupt-parent = <&exti>;
	st,syscfg = <&exti 0x60 0xff>;
	hwlocks = <&hsem 0 1>;
	pins-are-numbered;

	gpioa: gpio@50002000 {
		gpio-controller;
		#gpio-cells = <2>;
		interrupt-controller;
		#interrupt-cells = <2>;
		reg = <0x0 0x400>;
		clocks = <&rcc GPIOA>;
		st,bank-name = "GPIOA";
		status = "disabled";
	};
...
};
The ConnectCore MP13 device tree include file and the carrier board device tree files use the STM32MP13 GPIOs.
For example, on the ConnectCore MP13 Development Kit, Port G GPIO 0 is used to reset the PHY of Ethernet interface:
ð1 {
status = "okay";
pinctrl-0 = <&{pfm_slug}_eth1_rgmii_pins>;
pinctrl-1 = <&{pfm_slug}_eth1_rgmii_sleep_pins>;
pinctrl-names = "default", "sleep";
phy-mode = "rgmii-id";
max-speed = <1000>;
phy-handle = <&phy0_eth1>;
phy-supply = <®_3v3_eth_pwr>;
mdio0 {
#address-cells = <1>;
#size-cells = <0>;
compatible = "snps,dwmac-mdio";
phy0: ethernet-phy@0 {
reg = <0>;
compatible = "ethernet-phy-id0141.0dd0"; /* PHY ID for Marvell 88E1512 */
reset-gpios = <&gpiog 0 (GPIO_ACTIVE_LOW | GPIO_PULL_UP)>;
reset-assert-us = <1000>;
reset-deassert-us = <2000>;
};
};
};IOMUX configuration
For GPIOs that are managed by other drivers, you must define the port, GPIO number, and polarity.
&spi4 {
        pinctrl-names = "default", "sleep";
        pinctrl-0 = <&spi4_pins_b>;
        pinctrl-1 = <&spi4_sleep_pins_b>;
        cs-gpios = <&gpioe 11 GPIO_ACTIVE_HIGH>;
        status = "okay";
};
Using the GPIOs
The package libgpiod (added by packagegroup-dey-core) provides a set of tools (such as gpioset, gpioget, etc.) to control the GPIOs from user space.
| You can still control the GPIOs from the sysfs, but this ABI is not recommended. See https://www.kernel.org/doc/html/latest/admin-guide/gpio/sysfs.html. |
Detect GPIO ports
Use gpiodetect to list the GPIO ports detected by the kernel:
# gpiodetect
gpiochip0 [GPIOA] (16 lines)
gpiochip1 [GPIOB] (16 lines)
gpiochip2 [GPIOC] (16 lines)
gpiochip3 [GPIOD] (16 lines)
gpiochip4 [GPIOE] (16 lines)
gpiochip5 [GPIOF] (16 lines)
gpiochip6 [GPIOG] (16 lines)
gpiochip7 [GPIOH] (15 lines)
gpiochip8 [GPIOI] (8 lines)
where:
-
Ports
GPIOAtoGPIOIare the STM32MP13 GPIO ports.
Information about a GPIO port
Use gpioinfo to list the lines of a given port:
# gpioinfo GPIOA
gpiochip0 - 16 lines:
        line   0:        "PA0"       kernel   input  active-high [used]
        line   1:        "PA1"       unused   input  active-high
        line   2:        "PA2"       kernel   input  active-high [used]
        line   3:        "PA3"       kernel   input  active-high [used]
        line   4:        "PA4"       kernel   input  active-high [used]
        line   5:        "PA5"       kernel   input  active-high [used]
        line   6:        "PA6"       kernel   input  active-high [used]
        line   7:        "PA7"       kernel   input  active-high [used]
        line   8:        "PA8"       unused   input  active-high
        line   9:        "PA9"       kernel   input  active-high [used]
        line  10:       "PA10"       kernel   input  active-high [used]
        line  11:       "PA11"       unused   input  active-high
        line  12:       "PA12"       unused   input  active-high
        line  13:       "PA13"   "GPIOA 13"   input  active-high [used]
        line  14:       "PA14"       unused  output  active-high
        line  15:       "PA15"       unused   input  active-high
Set an output high/low
Use gpioset to set a STM32MP13 GPIO as output, such as GPIOG 0 (ULED).
Use =1 to set it high, or =0 to set it low:
# gpioset GPIOG 0=1
# gpioset GPIOG 0=0
Read an input
Use gpioget to read the value of a STM32MP13 GPIO input, such as GPIOG 0:
# gpioget GPIOG 0
0
Use a GPIO as interrupt
Use gpiomon to wait for an event on a given GPIO, such as PortA GPIO14 (User 2 button):
# gpiomon --num-events 1 --rising-edge GPIOA 14See the README of libgpiod for more information on these tools.
|
The STM32MP13 SoC has a limitation in the number of GPIOs that can be used as interrupt lines. The Extended Interrupt and Event Controller (EXTI) can only handle up to 16 GPIO lines working as interrupt (EXTI0..EXTI15). The multiplexers work as shown in the following figure: 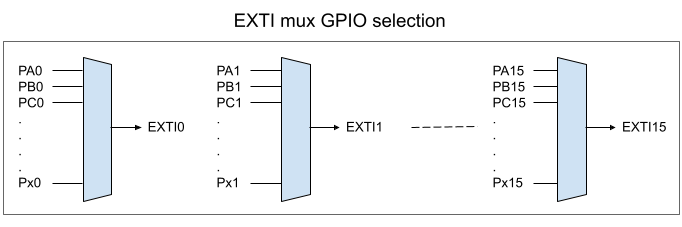
This means that if pin 1 of a given port (for instance, PB1) has been selected to work as interrupt, pin 1 of any other GPIO port cannot simultaneously work as interrupt. You must keep this in mind when designing your hardware to avoid using the same GPIO numbers as interrupt lines of two or more peripherals. On the ConnectCore MP13 GPIO, PF8 is already configured as an interrupt, so other GPIOs with index 8 must not be used as interrupts. |
Sample application
An example application called apix-gpio-example is included in the dey-examples-digiapix recipe (part of dey-examples package) of the meta-digi layer.
This application shows how to manage GPIO lines using the Digi APIx library on the ConnectCore MP13 platform.
|
By default, the Get Started with ConnectCore Cloud Services demo application seizes the user button.
To use the example, stop the |
Go to GitHub to see the application instructions and source code.
See GPIO API for more information about the GPIO APIx.
