

Perform a rescue boot
If the bootloader has been erased from the storage media (or written with an invalid image) and the target does not boot, you can boot the target from the USB device port.
Boot in USB debug mode
Requirements
-
Linux host computer.
-
Root/administrator permissions on your development computer
For the ConnectCore 6UL SBC Express:
-
One micro USB cable for the USB device port
-
Another micro USB cable for console/power
For the ConnectCore 6UL SBC Pro:
-
One micro USB cable
-
One USB serial console cable
Instructions
-
Download the U-Boot bootloader binary image file from https://ftp1.digi.com/support/digiembeddedyocto/3.2/r3/images/ccimx6ulstarter/fb/.
See U-Boot files by variant to verify which U-Boot binary you need. -
Download the latest Universal Update Utility (UUU) tool, a software tool from NXP.
-
Place the uuu executable in a directory in your PATH, such as
/usr/bin. -
Install
udevrules to allow any user to runuuuto access the USB port:$ sudo sh -c "uuu -udev >> /etc/udev/rules.d/99-uuu.rules" $ sudo udevadm control --reload-rules -
Connect one micro USB cable to the USB device port of the board (bottom side, under the USB host connectors) and the other end to the development computer.
-
Connect the other micro USB cable to the CONSOLE/POWER connector.
-
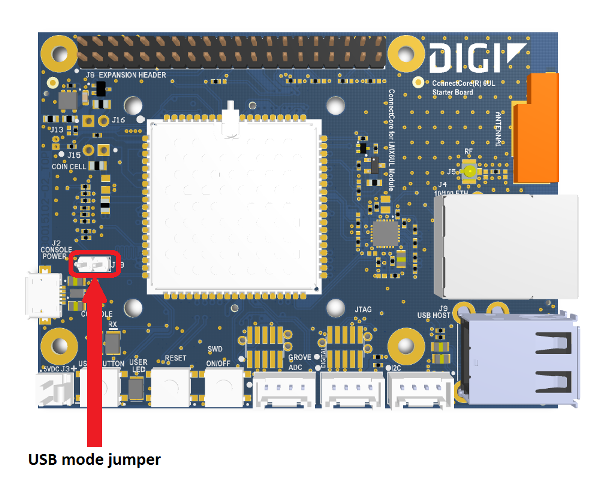
Close the BOOT MODE jumper (J19) near the CONSOLE/POWER micro USB connector.
-
Open a serial terminal at 115200/8/n/1.
-
Power up the board.
-
On the host computer, run the uuu tool with the U-Boot file to boot as parameter. For example:
$ uuu </path/to/u-boot-file>
When TrustFence support is enabled, Digi Embedded Yocto builds a special signed U-Boot file u-boot-dtb-usb-signed-ccimx6ulstarter.imx.
Use this file to recover a closed device from USB.
|
The serial terminal shows the device starting U-Boot.
-
Download the U-Boot bootloader binary image file from https://ftp1.digi.com/support/digiembeddedyocto/3.2/r3/images/ccimx6ulsbc/x11/.
See U-Boot files by variant to verify which U-Boot binary you need. -
Download the latest Universal Update Utility (UUU) tool, a software tool from NXP.
-
Place the uuu executable in a directory in your PATH, such as
/usr/bin. -
Install
udevrules to allow any user to runuuuto access the USB port:$ sudo sh -c "uuu -udev >> /etc/udev/rules.d/99-uuu.rules" $ sudo udevadm control --reload-rules -
Connect the USB serial cable to the CONSOLE connector on the board and to your host computer.
-
Connect the micro USB cable to the USB device port of the board (bottom side, under the USB host connectors).
-
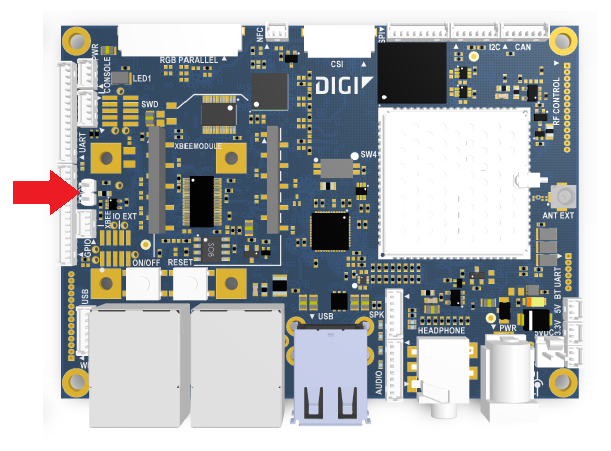
Close the BOOT jumper near the CONSOLE connector.
-
Open a serial terminal at 115200/8/n/1.
-
Power up the board.
-
On the host computer, run the uuu tool with the U-Boot file to boot as parameter. For example:
$ uuu </path/to/u-boot-file>When TrustFence support is enabled, Digi Embedded Yocto builds a special signed U-Boot file u-boot-dtb-usb-signed-ccimx6ulsbc.imx. Use this file to recover a closed device from USB.
The serial terminal shows the device starting U-Boot.
Reprogram U-Boot in the NAND
Once U-Boot is running, you can use it to update the bootloader in the NAND:
Re-program bootloader from Ethernet (TFTP)
-
Place the U-Boot binary inside your host computer TFTP exported folder.
-
On the target, configure your network settings (IP of the device, IP of the host/server):
=> setenv ipaddr <your-ip> => setenv serverip <server-ip> -
Connect an Ethernet cable to the Ethernet port.
-
Run the following command to update U-Boot into the NAND:
=> update uboot tftp <u-boot-filename>.imx -
Change the boot source configuration to boot from the internal NAND.
To do so remove BOOT MODE jumper.
-
Power-cycle the board. The target now boots from the NAND.
Re-program bootloader from microSD card
-
Place the U-Boot binary inside a FAT-formatted microSD card.
-
Insert the microSD card in the board.
-
Run the following command to update U-Boot into the NAND:
=> update uboot mmc 0 fat <u-boot-filename>.imx -
Change the boot source configuration to boot from the internal NAND.
To do so remove BOOT MODE jumper.
-
Power-cycle the board. The target now boots from the NAND.
