

This topic contains guidelines for using the target platform as a network bridge between two networks.
Requirements
To make a target platform act as a network bridge between two networks:
-
The target platform must have at least two network interfaces (either wired or wireless).
-
The Linux kernel image of the target platform must support network bridging. By default, the Linux kernel compiled with Digi Embedded Yocto already supports bridging.
Methods
There are two methods for connecting a pair of networks:
-
Bridging: The platform device acts like a tunnel that connects the two networks (or two network segments), forming one big subnet that allows devices to connect to each other without the need for routers.
-
IP forwarding: The platform device translates the address of a packet to a new destination according to a routing table.
The following instructions explain the bridging method.
Access point bridging
This chapter illustrates how to configure a target platform to act as a network bridge. Consider the following scenario:
-
A target platform embedded device acts as the bridge.
-
The target is connected through one wired Ethernet interface to a wired LAN that has access to the Internet.
-
There are three Wi-Fi devices to connect by bridge.
-
There is no Wi-Fi AP, so the Wi-Fi devices cannot access the LAN.
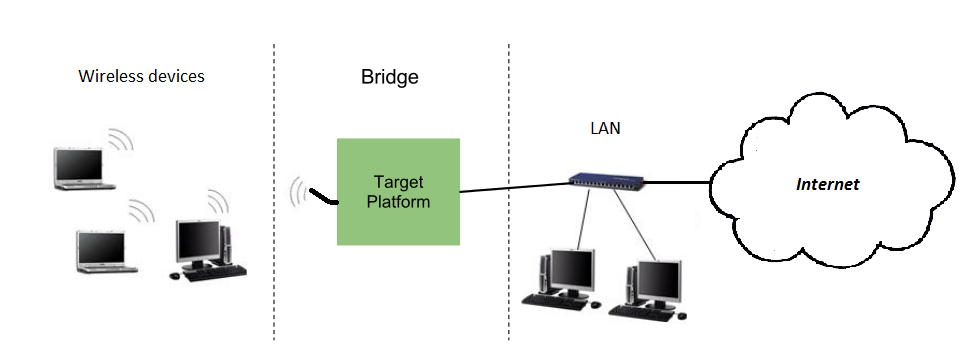
By configuring the platform as a bridge, you can connect the three Wi-Fi devices to the LAN and gain access to the Internet.
| A network bridge can be established between two network interfaces of any kind: two wired Ethernets, a wired Ethernet and a USB-Ethernet gadget, a USB-Ethernet gadget and a Wi-Fi interface, and so on. |
This topic demonstrates how to establish a network bridge between a wired Ethernet (eth0) and a Wi-Fi interface in AP mode (wlan1), including how to configure the Wi-Fi interface. You can follow similar steps to create the bridge between arbitrary network interfaces as long as you configure each interface properly.
Digi programs one MAC address for the Wi-Fi interface during manufacturing of the SOM.
This MAC address is stored in the Wi-Fi chip OTP bits, and read from there at the initialization process.
A copy of this MAC address is saved in U-Boot environment variable wlanaddr.
This is the MAC address used for the wlan0 interface.
|
Network bridging support on the kernel
Network bridging support on the kernel requires the following options:
Networking support -->
    Networking options -->
        [*]  802.1d Ethernet Bridging (CONFIG_BRIDGE)
        [*]  IGMP MLD snooping (CONFIG_BRIDGE_IGMP_SNOOPING)
| These options are enabled by default on Digi Embedded Yocto kernel configuration. |
Configure NetworkManager
For the bridge to work, you must prevent the Network Manager daemon from managing the network interfaces involved in the bridge.
Add the relevant network interfaces (in the example eth0 and wlan1) to the list of unmanaged-devices in /etc/NetworkManager/NetworkManager.conf.
[main]
plugins=ifupdown,keyfile
no-auto-default=type:ethernet
rc-manager=file

[ifupdown]
managed=false

[keyfile]
unmanaged-devices=interface-name:p2p*;interface-name:wlan1;interface-name:eth0

[device]
wifi.scan-rand-mac-address=no
Restart the Network Manager daemon to use the new configuration:
# systemctl restart NetworkManager.serviceWired network interface
Make sure the wired network interface is connected to the network and bring it up:
# ifconfig eth0 upWireless network interface
Bring the Wi-Fi interface down to reconfigure it:
# ifdown wlan1Configuration as SoftAP
Configure the Wi-Fi interface as SoftAP.
Edit the file /etc/network/interfaces and type the following for the Wi-Fi interface:
auto wlan1
iface wlan1 inet manual
        post-up systemctl start hostapd@wlan1.service
        pre-down systemctl stop hostapd@wlan1.service
This configuration:
-
Sets the Wi-Fi interface as manual so that it doesn’t get an IP when it is brought up.
-
Calls the systemd service hostapd@wlan1.service that runs the hostapd daemon.
Configure the connection settings of your wireless interface at file /etc/hostapd_<iface>.conf on your target’s root file system.
The following example shows a configuration that uses WPA-PSK/AES authentication with SSID my-bridge-ap:
ctrl_interface=/var/run/hostapd
ctrl_interface_group=0
interface=wlan1
driver=nl80211

# WPA2-AES encryption
ssid=my-brigde-ap
auth_algs=1
wpa=2
wpa_key_mgmt=WPA-PSK
wpa_pairwise=CCMP
wpa_passphrase=password-wpa2aes

# IEEE 802.11ac
hw_mode=a
channel=36
ieee80211ac=1
ieee80211n=1
Start the Wi-Fi interface as SoftAP
Bring the interface up with the new SoftAP configuration:
# ifup wlan1Bridge interface
Create the bridge interface br0:
# brctl addbr br0Remove the IP addresses of the two network interfaces that the bridge will join (in this example eth0 and wlan1).
# ifconfig eth0 0.0.0.0
# ifconfig wlan1 0.0.0.0
Add each network interface to the br0 bridge:
# brctl addif br0 eth0
# brctl addif br0 wlan1
Verify the bridge lists the two interfaces:
# brctl show
bridge name    bridge id              STP enabled   interfaces
br0            8000.0004f3280000      no            eth0
wlan1|
If the interfaces are not correctly listed as associated to the bridge, delete the bridge and recreate it. To remove the bridge and restart the procedure, do the following: |
Assign a static or dynamic IP address to the bridge.
This step is optional but recommended if you want to reach the bridge (the target platform) in the network.
# ifconfig br0 192.168.1.5 netmask 255.255.0.0Bring the bridge up:
# ifconfig br0 upConfiguration is complete. Your Wi-Fi devices should now be able to connect to the target platform (acting as SoftAP), and reach any device in the LAN network, or the Internet (if the LAN has access to it).
Create the bridge interface automatically at boot time
To automatically create the bridge interface at startup, edit /etc/network/interface and add the following lines at the end of the file:
auto br0
iface br0 inet static
	bridge_ports eth0 wlan1
	address 192.168.1.5
netmask 255.255.0.0| The bridge must appear as the last item in the file to make sure the involved interfaces exist when the bridge is created. |
