

Flattened Image Tree (FIT) overview
The Linux kernel boot process involves a number of artifacts that must be placed in memory and booted together. This typically includes:
-
the kernel image
-
a device tree
-
optionally, device tree overlays
-
optionally, a ramdisk rootfs
The Flattened Image Tree (FIT) provides a flexible and extensible format to put all these artifacts in a single file.
The FIT format supports multiple configurations so you can use the same FIT image to boot multiple boards that have a common component (e.g., kernel) but use other artifacts specific to each board (e.g., device tree or overlays). A FIT file also includes hashes to verify the integrity of every artifact. To learn more about the FIT format, see Flattened Image Tree (FIT) Format.
FIT image signing
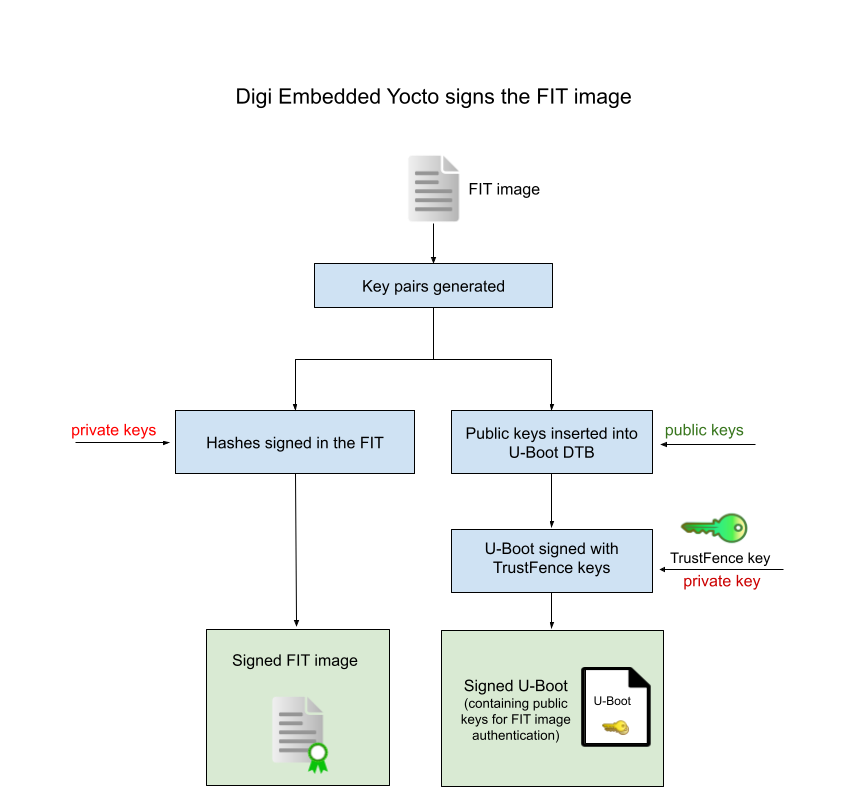
The signature feature allows you to use a private key to sign the hashes of the FIT artifacts. This way, any image or configuration inside the FIT can later be authenticated using the public key.
The public key must reside in a trusted place for FIT image artifacts to be authenticated. Digi Embedded Yocto places the public key in the U-Boot bootloader device tree because that is authenticated against the keys programmed in the OTP bits.
As explained in Set up secure boot, the bootloader must be signed and authenticated. If authentication fails, the target does not boot at all. If it succeeds, the bootloader runs and has the public keys available to authenticate the artifacts in the FIT image. This guarantees the chain of trust.
The following diagram explains the process of signing and authenticating the FIT image:

To instruct Digi Embedded Yocto to generate the keys and sign the FIT image, enable TrustFence in your project’s conf/local.conf:
# Required to include trustfence support.
INHERIT += "trustfence"
For more information on U-Boot FIT signature verification, see U-Boot FIT Signature Verification.
Build your project image
Build your Digi Embedded Yocto project image recipe, for instance:
$ bitbake dey-image-webkitThis process:
-
Generates the FIT sign keys (if they don’t exist).
-
Generates a FIT image with the kernel, base device tree, device tree overlays, and U-Boot boot script.
-
Signs the FIT image hashes with the private keys.
-
Inserts the FIT public keys inside the U-Boot device tree.
-
Signs the FIP image (containing U-Boot + OP-TEE) with TrustFence keys.
-
Generates a file
*.boot.ubifsthat contains the FIT image.
Deploy images to the target
Program the bootloader
| The first time you program a signed FIT image, you must first program the bootloader partition with the U-Boot that contains the FIT public keys. This step is not necessary on subsequent FIT image updates. |
To update partition fip-a (for example from TFTP) with file fip-ccmp15-dvk-optee_Signed.bin:
=> update fip-a tftp fip-ccmp15-dvk-optee_Signed.binReset the target to boot with the new U-Boot.
Some environment variables such as the default boot command bootcmd may have changed to deal with FIT images.
Digi recommends you reset the U-Boot environment to default after this first update.
=> env default -a
=> saveenv
Program the FIT image
The FIT image itself is contained inside your project’s image file, for instance dey-image-webkit-ccmp15-dvk.boot.ubifs.
To program it (for example from TFTP):
=> update linux tftp dey-image-webkit-ccmp15-dvk.boot.ubifs| The FIT image is the only file that’s stored in the linux partition, as it includes all the required files to boot the system. |
Boot the FIT image
The default U-Boot is prepared to boot a regular Linux kernel with zImage format.
This is determined by variable dboot_kernel_var.
Change this variable to instruct U-Boot to boot a FIT image instead:
=> setenv dboot_kernel_var fitimage
=> saveenv
As part of the Digi Embedded Yocto project, the U-Boot recipe includes a U-Boot boot script to boot the ConnectCore MP15 Development Kit. This script determines the variant of the ConnectCore MP15 SoM and the version of the carrier board and selects a number of device tree overlays to apply on top of the base device tree (wireless, Bluetooth, etc.) before booting the kernel. This boot script is embedded and signed in the FIT image and is run by default when you start the device.
Power the device on and let it run, or run the boot command.
Loading file 'fitImage-ccmp15-dvk.bin' to addr 0xc2000000...
Done
## Executing script at c2000000
sha256,rsa2048:fitimg+ sha256+ Booting from system A
Skip re-loading of FIT image
Explanation of output:
-
The FIT image is loaded into RAM memory and the boot script is authenticated against the public key.
-
Authentication succeeds and the boot script prints the message:
"Booting from system A". -
The boot script calls the
dbootcommand to boot the system. While this command typically loads the image into RAM, in this case the FIT image is not reloaded because it was already loaded to run the boot script.
Next, U-Boot successfully authenticates the default configuration:
## Loading kernel from FIT Image at c2000000 ...
   Using 'conf-ccmp157-dvk.dtb' configuration
   Verifying Hash Integrity ... sha256,rsa2048:fitcfg+ OK
Trying 'kernel-1' kernel subimage
Description: Linux kernel
Created: 2023-11-09 14:38:10 UTC
Type: Kernel Image
Compression: uncompressed
Data Start: 0xc20000e8
Data Size: 6840888 Bytes = 6.5 MiB
Architecture: ARM
OS: Linux
Load Address: 0xc0800000
Entry Point: 0xc0800000
Hash algo: sha256
Hash value: 9c146479659fb34f23c1f4cd2975f8c8be175b2efd2db385ab7f753cd276e6ba
Sign algo: sha256,rsa2048:fitimg
Sign value: a86ebef17395f6e1df4b67c6e421fd36d27ef1b4217f19d14492cb4b2e17d0992e377b36c6873f850c780ce408b88f04d04aca35c1acaf68488cfdcbc6c2c711d04c
Timestamp: 2023-11-09 14:38:10 UTC
Verifying Hash Integrity ... sha256,rsa2048:fitimg+ sha256+ OKExplanation of output:
-
The first item in the default configuration is the Linux kernel.
-
U-Boot also authenticates the kernel image successfully.
-
Similar messages appear for the base device tree and the selected overlays that the boot script populated as a list in U-Boot environment variable
overlays. -
After all the artifacts have been authenticated, the Linux system boots.
Advanced options
Use custom FIT sign keys
The FIT signature key pairs are created automatically by the Digi Embedded Yocto build system. You can also provide your own key pairs:
-
Customize the location of the keys using variable
TRUSTFENCE_SIGN_KEY_PATH:conf/local.conf# Use a custom path to the signature keys and certificates. TRUSTFENCE_SIGN_KEYS_PATH = "/mnt/secure/PKI_tree"If not defined, Digi Embedded Yocto creates a folder called
trustfence/inside your project to hold all keys. -
If it doesn’t already exist, create a subdirectory
fitto hold the key pairs.$ mkdir <your-trustfence-sign-keys-path>/fit -
Optionally, edit your project config file
conf/local.confand set the following variables to give your keys custom names. (If not provided, the default filenames arefitcfgandfitimg.)conf/local.confTRUSTFENCE_FIT_CFG_SIGN_KEYNAME = "my-fitcfg" TRUSTFENCE_FIT_IMG_SIGN_KEYNAME = "my-fitimg" -
Generate an RSA private key to sign the FIT image nodes and another one to sign the configuration nodes:
$ openssl genrsa -F4 -out <your-trustfence-sign-keys-path>/fit/<your-fitcfg-name>.key 2048 $ openssl genrsa -F4 -out <your-trustfence-sign-keys-path>/fit/<your-fitimg-name>.key 2048 -
Generate public certificates out of the private keys:
$ openssl req -batch -new -x509 -key <your-trustfence-sign-keys-path>/fit/<your-fitcfg-name>.key -out <your-trustfence-sign-keys-path>/fit/<your-fitcfg-name>.crt
$ openssl req -batch -new -x509 -key <your-trustfence-sign-keys-path>/fit/<your-fitimg-name>.key -out <your-trustfence-sign-keys-path>/fit/<your-fitimg-name>.crt
Manually run a boot script inside the FIT image
To manually run a boot script artifact inside the FIT:
-
Load the FIT image into memory. For instance, to read it from the NAND:
=> ubifsmount ubi0:linux_a => ubifsload $loadaddr $fitimage -
Run the
sourcecommand, with the RAM address where the FIT image is, followed by a colon and the name of the boot script, noting that Yocto appends prefixbootscr-to the name of the boot script:=> source $loadaddr:bootscr-boot.txt
Manually boot a configuration inside the FIT image
As explained in the overview, a FIT image contains images (standalone artifacts) and configurations. A configuration is a set of one or more images. The FIT image that Digi Embedded Yocto builds contains a default configuration that comprises the Linux kernel and the base device tree. There are additional configurations, one per device tree overlay.
To manually boot a configuration:
-
Set the variable
overlayswith a comma-separated list of the device tree overlays that you want to use:=> setenv overlays overlay1.dtb,overlay2.dtb,overlay3.dtb -
Run the
dbootcommand:=> dboot linux nand
Disable FIT signing
You may want to disable image signing to separate the generation of the image from the signing process. For instance, you may want to avoid managing security keys on development machines and instead only sign images on a separate, more secure computer.
To generate FIT images without signature, add the following to your project’s conf/local.conf:
TRUSTFENCE_SIGN = "0"Rebuild your project after making this change.
