

When creating customized Android firmware, you must typically launch a specific Android application after system boots. Android has two mechanisms for this:
-
Start an application after Android boot:
-
Valid for a standard Android system with multiple applications.
-
No need to modify and compile Android sources.
-
-
Replace the default Android Home application:
-
Recommended if your system consists only of this application.
-
May require you to modify and compile Android sources.
-
Start an application after Android boot
When an Android system boots, it sends out a boot complete event. Android applications can listen and capture this event to take specific actions, such as automatically starting an activity or service.
You can use this mechanism to create an application with the required permissions to listen for the boot complete event and automatically start an activity or service every time Android starts up. To do so, follow these steps:
-
Declare the permission in AndroidManifest.xml. Add the android.permission.RECEIVE_BOOT_COMPLETED permission to your application’s manifest file just before the application declaration node:
AndroidManifest.xml<uses-permission android:name="android.permission.RECEIVE_BOOT_COMPLETED" /> -
Define the Activity that will be auto-started in the AndroidManifest.xml. Place this declaration inside the application node:
AndroidManifest.xml<activity android:name=".MyActivity" android:label="@string/app_name"> <intent-filter> <action android:name="android.intent.action.MAIN" /> <category android:name="android.intent.category.LAUNCHER" /> </intent-filter> </activity> -
Register the Receiver listening for the boot complete event in the AndroidManifest.xml. Place this declaration inside the application node:
AndroidManifest.xml<receiver android:name=".StartMyActivityAtBootReceiver" android:label="StartMyServiceAtBootReceiver"> <intent-filter> <action android:name="android.intent.action.BOOT_COMPLETED" /> </intent-filter> </receiver> -
Create the receiver class to listen for the boot complete event. This class must extend BroadcastReceiver abstract class. Its onReceive() method is called when the device boot is complete. For example, create a Java class called StartMyActivityAtBootReceiver.java and place it in the same package as the activity class to auto-start:
StartMyActivityAtBootReceiverpublic class StartMyActivityAtBootReceiver extends BroadcastReceiver { @Override public void onReceive(Context context, Intent intent) { if (Intent.ACTION_BOOT_COMPLETED.equals(intent.getAction())) { Intent activityIntent = new Intent(context, MyActivity.class); activityIntent.setFlags(Intent.FLAG_ACTIVITY_NEW_TASK); context.startActivity(activityIntent); } } }When this class receives an intent, it checks if it is the ACTION_BOOT_COMPLETE. If so, it creates a new activity intent and fills it with the activity class to be started. Finally, it executes the startActivity() method using the Android context and the activity intent.
| Due to security reasons, Android does not auto-start any application until you manually launch it at least once. After that, the applications will automatically start on each Android boot. |
Replace the default Android Home application
The home screen you see on your Android device after boot is a standard application that reacts to a home event. When Android finishes booting and is ready to start the home activity, the home event is sent and qualifying applications identify themselves as bootable candidates.
The system sends out the android.intent.category.HOME and android.intent.category.DEFAULT intents when it is done initializing.
Android looks for application manifests with these intent filters when it starts up. If there is more than one, Android lists all of them and allows you to select the one to launch.
To designate your application as a home application, follow these steps:
-
Add the intent filters to AndroidManifest.xml. Copy these two lines into the intent filter of your application main activity:
<category android:name="android.intent.category.HOME" />
<category android:name="android.intent.category.DEFAULT" />
Your main activity definition should look similar to the following:
AndroidManifest.xml<activity android:name=".MyActivity" android:label="@string/app_name"> <intent-filter> <action android:name="android.intent.action.MAIN" /> <category android:name="android.intent.category.HOME" /> <category android:name="android.intent.category.DEFAULT" /> <category android:name="android.intent.category.LAUNCHER" /> </intent-filter> </activity> -
Install your application in the device. On the next startup, Android displays a dialog box that allows you to choose between the default Android launcher and the application you just modified:
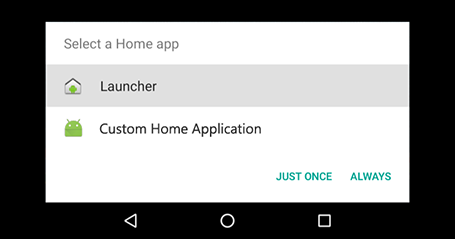
You can set your selection as the default home application for the future.
Replace default Home application with a custom application in sources
The Replace the default Android Home application procedure is only valid for already-deployed Android systems. If you want to deploy an Android system with a custom home application already designated, you must make additional changes to the Android BSP sources:
-
Create a custom home application and include it in the Android BSP sources. You can directly include the application source code or a pre-compiled version of it.
Verify that your custom Android home application includes the android.intent.category.HOME and android.intent.category.DEFAULT intent filters in the application manifest file. -
Force your application to override the default launcher applications. Add the following entry in your application’s Android.mk file just before the include $(BUILD_PACKAGE) line:
LOCAL_OVERRIDES_PACKAGES := Home Launcher2 Launcher3Your application’s Android.mk file should look similar to the following:
Android.mkLOCAL_PATH := $(call my-dir) include $(CLEAR_VARS) LOCAL_MODULE_TAGS := optional LOCAL_STATIC_JAVA_LIBRARIES := android-common android-support-v13 LOCAL_SRC_FILES := $(call all-java-files-under, src) $(call all-renderscript-files-under, src) LOCAL_SDK_VERSION := current LOCAL_PACKAGE_NAME := MyApplication LOCAL_CERTIFICATE := shared LOCAL_PRIVILEGED_MODULE := true LOCAL_OVERRIDES_PACKAGES := Home Launcher2 Launcher3 include $(BUILD_PACKAGE) -
Include your application in the Android firmware build. Add your application’s module name "MyApplication" (as defined in the LOCAL_PACKAGE_NAME of your Application’s Android.mk file) to the list of packages of the firmware at device/digi/imx8q/ccimx8xsbcpro/ccimx8xsbcpro.mk:
ccimx8xsbcpro.mk[...] PRODUCT_PACKAGES += MyApplication [...] -
Build the Android firmware. Issue this command sequence in the root folder of the Android sources.
-
Clean the artifacts from the previous build:
$ make installclean
-
Build the Android firmware:
$ make -j<Number_Of_Jobs>
<Number_Of_Jobs> is the number of cores you want to use for the build process.
The resulting firmware will boot your custom Android home application by default.
-