

Once you have generated the images, you can use them to update your Android system from U-Boot.
This process is recommended to:
-
Test and evaluate changes and/or new features during the development phase (see Build your development images).
-
Flash final release images already signed with your own private keys in the manufacturing process (see Generate release custom images).
| If your device is not booting U-Boot see Recover your device. |
Update firmware from TFTP
U-Boot bootloader allows you to update the firmware of your device over Ethernet. U-Boot uses the TFTP protocol to get the firmware images from a TFTP server running in your computer and program them into the eMMC of the device.
| This update process requires a TFTP server running in your computer with a configured exposed folder. The devices look for the firmware files in this folder when performing the update. These instructions do not include setting up a TFTP server in your computer. We assume you have already installed and configured a TFTP server. |
Once you have the TFTP server running in your computer, you can start the update process:
-
Get the firmware images:
-
<u-boot-filename>.imx for your hardware variant. See [{XREF_yocto_r_uboot-files}].
-
boot.img
-
recovery.img
-
vendor.img
-
system.img
-
After building the development firmware, you can find the image files inside the out/target/product/ccimx8xsbcpro directory. See Build development firmware for more information about building the Android system.
-
Already signed images with your release keys. See Generate release custom images.
-
You can download Digi-provided pre-built images from:
-
-
Copy the Android images (previously downloaded or compiled) in your TFTP server’s exposed folder (typically /tftpboot).
-
Connect the board to your host computer. See Step 2 - Set up the hardware for instructions.
-
Open a serial connection to the serial port to which the device is connected. Use the following settings:
-
Port: Serial port to which your device is attached
-
Baud rate: 115200
-
Data Bits: 8
-
Parity: None
-
Stop Bits: 1
-
Flow control: None
-
-
Reset the device (press the Reset button on the board) and immediately press a key in the serial terminal to stop the auto-boot process. You will be stopped at the U-Boot bootloader prompt:
U-Boot dub-2020.04-r2.2 (Jan 18 2021 - 15:54:04 +0000)

CPU:   NXP i.MX8QXP RevB A35 at 1200 MHz at 25C
DRAM:  2 GiB
MCA:   HW_VER=1  FW_VER=1.01
MMC:   FSL_SDHC: 0, FSL_SDHC: 1
In:    serial
Out:   serial
Err:   serial
Model: Digi International ConnectCore 8X SBC Pro Board.
ConnectCore 8X SOM variant 0x02: 2 GiB LPDDR4, Wi-Fi, Bluetooth, MCA, Crypto-auth
  Board version 3, ID 135
Boot:  MMC0

 BuildInfo:
  - SCFW 56682d58, SECO-FW 0e4b9cee, IMX-MKIMAGE 8da5cd23, ATF c949a88
  - U-Boot dub-2020.04-r2.2

flash target is MMC:0
Net:   eth0: ethernet@5b040000 [PRIME], eth1: ethernet@5b050000
Fastboot: Normal
Normal Boot
Hit any key to stop autoboot:  0
{pu}
-
On the target, configure the network settings of the device by doing one of the following:
-
Get a dynamic IP address from a DHCP server by running the following commands:
=> setenv autoload no
=> dhcp
-
Configure a static IP address, where a.b.c.d is the IP address of your device:
=> setenv ipaddr a.b.c.d
-
-
Configure the IP address of the machine where the TFTP server is running and save the configuration as follows, where w.x.y.z is your machine IP address where the TFTP server is running:
=> setenv serverip w.x.y.z => env save -
Update the U-Boot image (optional):
-
Execute the following command to update the U-Boot image into the eMMC:
=> update uboot tftp <u-boot-filename>.imx -
Reset the board to boot into the recently updated U-Boot, and press any key to stop the autoboot process.
-
Reset the U-Boot environment to default values (this will not reset protected variables like the MAC address). To do so, issue this command:
=> env default -a
-
Configure the network and TFTP settings on your device again and save the configuration.
=> setenv ipaddr a.b.c.d
=> setenv serverip w.x.y.z
=> env save
-
-
Configure the partition of the eMMC for holding Android images by running these commands:
=> setenv mmcdev 0
=> run partition_mmc_android
-
Update the boot image by executing this command:
=> update boot tftp boot.img
-
Update the vendor image by issuing this command:
=> update vendor tftp vendor.img
-
Update the Android file system image by issuing this command:
=> update system tftp system.img
-
Update the recovery image by executing this command:
=> update recovery tftp recovery.img
-
You can format the data and cache partitions or directly boot the new firmware:
-
To clean the data and cache partitions, enter these commands in U-Boot:
=> setenv boot_recovery yes
=> setenv recovery_command recovery --wipe_data
=> saveenv
=> reset
The above process will boot your device into recovery mode, will format the cache and data partitions and will reboot your device.
-
If data and cache partitions are already formatted or you want to preserve their contents, boot the device with the firmware you have just programmed:
=> boot
The first Android boot takes several minutes due to system deployment.
-
Update firmware from microSD
If you do not have a TFTP server, you can still program Android in your device using a microSD card. The microSD card must be FAT formatted.
| Your microSD card must have at least 2 GB of capacity. |
To program Android from the microSD card:
-
Get the firmware images:
-
<u-boot-filename>.imx for your hardware variant. See [{XREF_yocto_r_uboot-files}].
-
boot.img
-
recovery.img
-
vendor.img
-
system.img
-
After building the development firmware, you can find the image files inside the out/target/product/ccimx8xsbcpro directory. See Build development firmware for more information about building the Android system.
-
Already signed images with your release keys. See Generate release custom images.
-
You can download Digi-provided pre-built images from:
-
-
Place the images in the root of the FAT formatted microSD card.
-
Power off the device.
-
Insert the microSD card in the microSD socket of the device.
-
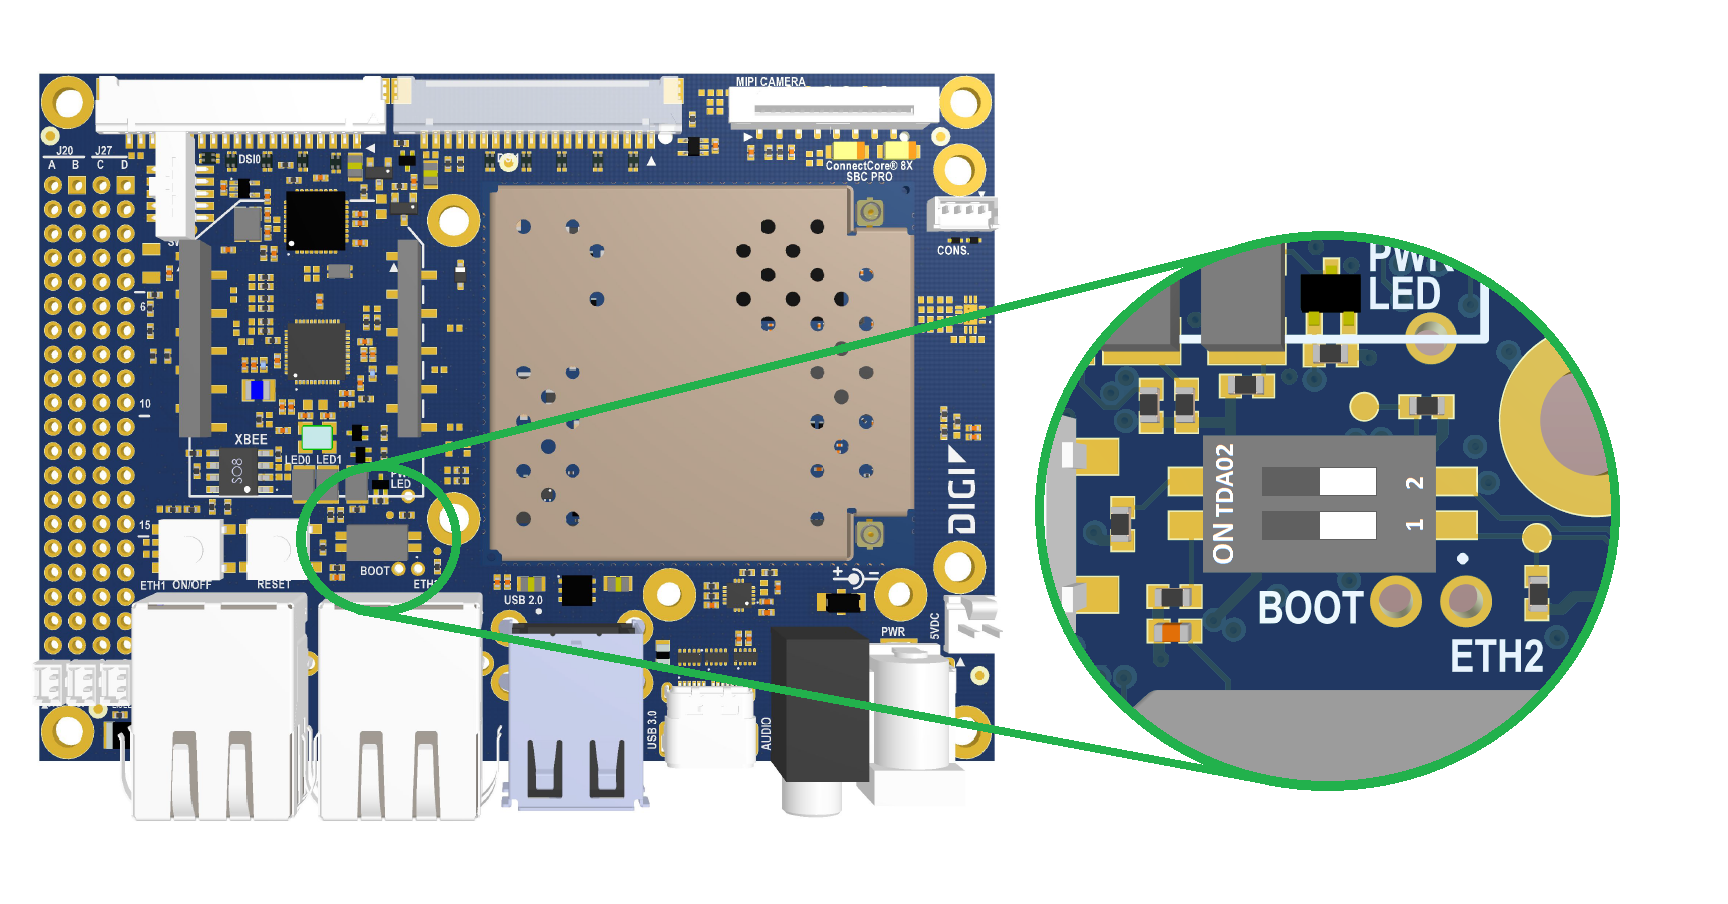
Change the boot mode configuration to boot from the internal eMMC. To do so, set the boot mode micro-switches as follows:
-
BOOT.1 OFF
-
BOOT.2 OFF
-
-
Connect the board to your host computer. See Step 2 - Set up the hardware for instructions.
-
Open a serial connection to the serial port to which the device is connected. Use the following settings:
-
Port: Serial port to which your device is attached
-
Baud rate: 115200
-
Data Bits: 8
-
Parity: None
-
Stop Bits: 1
-
Flow control: None
-
-
Reset the device (press the Reset button on the board) and immediately press a key in the serial terminal to stop the auto-boot process. You will be stopped at the U-Boot bootloader prompt:
U-Boot dub-2020.04-r2.2 (Jan 18 2021 - 15:54:04 +0000)

CPU:   NXP i.MX8QXP RevB A35 at 1200 MHz at 25C
DRAM:  2 GiB
MCA:   HW_VER=1  FW_VER=1.01
MMC:   FSL_SDHC: 0, FSL_SDHC: 1
In:    serial
Out:   serial
Err:   serial
Model: Digi International ConnectCore 8X SBC Pro Board.
ConnectCore 8X SOM variant 0x02: 2 GiB LPDDR4, Wi-Fi, Bluetooth, MCA, Crypto-auth
  Board version 3, ID 135
Boot:  MMC0

 BuildInfo:
  - SCFW 56682d58, SECO-FW 0e4b9cee, IMX-MKIMAGE 8da5cd23, ATF c949a88
  - U-Boot dub-2020.04-r2.2

flash target is MMC:0
Net:   eth0: ethernet@5b040000 [PRIME], eth1: ethernet@5b050000
Fastboot: Normal
Normal Boot
Hit any key to stop autoboot:  0
{pu}
-
Update the U-Boot image (optional):
-
Run the following command to update U-Boot into the eMMC:
=> update uboot mmc 1 fat <u-boot-filename>.imx -
Reset the board to boot into the recently updated U-Boot, and press any key to stop the autoboot process.
-
Reset the U-Boot environment to default values (this will not reset protected variables like the MAC address). To do so, issue this command:
=> env default -a
-
Save the U-Boot environment to apply the default configuration.
=> env save
-
-
Configure the partition table of the eMMC to hold Android images by executing these commands:
=> setenv mmcdev 0
=> run partition_mmc_android
-
Update the boot image by executing this command:
=> update boot mmc {sdcard-index} fat boot.img -
Update the vendor image by issuing this command:
=> update vendor mmc {sdcard-index} fat vendor.img -
Update the Android file system image by issuing this command:
=> update system mmc {sdcard-index} fat system.img -
Update the recovery image by executing this command:
=> update recovery mmc {sdcard-index} fat recovery.img -
You can format the data and cache partitions or directly boot the new firmware:
-
To clean the data and cache partitions, enter these commands in U-Boot:
=> setenv boot_recovery yes
=> setenv recovery_command recovery --wipe_data
=> saveenv
=> reset
The above process will boot your device into recovery mode, will format the cache and data partitions and will reboot your device.
-
If data and cache partitions are already formatted or you want to preserve their contents, boot the device with the firmware you have just programmed:
=> boot
The first Android boot takes several minutes due to system deployment.
-