Overview
The Telit LM940 has been observed to go into a rare, inoperable state during up and down power sequencing. This issue has been corrected in Telit firmware xx4 or later. Digi recommends that all customers who are using the following SKUs (which include the Telit LM940 radio) update their products immediately to the latest version:
- Digi WR54-A106
- Digi WR54-A206
- Digi WR54-A112
- Digi WR64-A121
- Digi TX54-A106
- Digi TX54-A206
- Digi TX54-A112
- Digi TX64-A121
Digi WR54/WR64 Firmware
Digi recommends that customers running the xOS firmware, especially on the above WR54/WR64 SKUs upgrade to the latest 4.8.9.5 firmware, as there are additional enhancements surrounding the cellular radio powering sequence to further mitigate this issue. The latest firmware for these products can be found below:
Digi WR54
Digi WR64
Digi WR54/WR64 Module Update Instructions
- Obtain the file digi-lm940-update_xos.py from Digi International from here.
- Log into Digi Remote Manager (Digi RM).
- If not done already, add the WR54/WR64 to your Digi RM account.
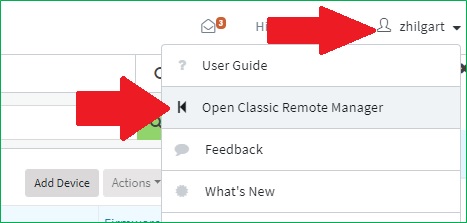
- Open the Classic View interface by clicking on your username in the upper-right hand corner, and then clicking on Open Classic Remote Manager, as shown below:
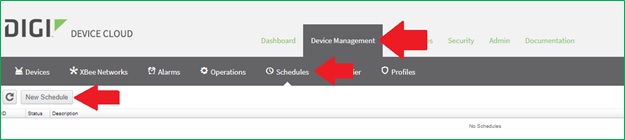
- Navigate to Device Management > Schedules, and then click on New Schedule to create the task, as shown below:
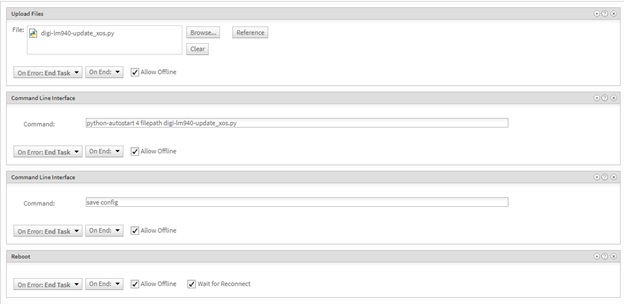
- To build the task (use the following image in reference to steps b-e below steps):
- Provide a Description at the top of the screen for the task. This description will show up on the Operations tab as the running task name.
- Click on Upload Files and browse to the downloaded digi-lm940-update_xos.py file.
- NOTE: Do not click on Upload Python Files. This is for legacy equipment only.
- Click on Command Line Interface, and enter the command:
python-autostart 4 filepath digi-lm940-update_xos.py
- NOTE: If the optional arguments are needed with the Python script (for example, to run the process over a Cellular connection), another “Command Line Interface” option will need to be added for the arguments. An example command for using cellular is below:
-
python-autostart 4 args --cellular_ok
- Click on Command Line Interface, and enter the command: save config
- Click on Reboot to add a reboot to the task.
- To be able to run this task more than once, click on Save As at the bottom of the screen to provide the task a name.
- Once the task is built in step 6 above, click on Schedule>> to run the task against individual or groups of devices, or against the Tags set on devices by clicking on Run Now.
- The status of the Task can be viewed under the Operations tab.
- The status of the upgrade can be views as data streams for the device. These can be seen by navigating to Data Services > Data Streams.
- Type in lm940_update into the search bar to find the data stream, click on the data stream, and click on Raw Data in the bottom-left corner:
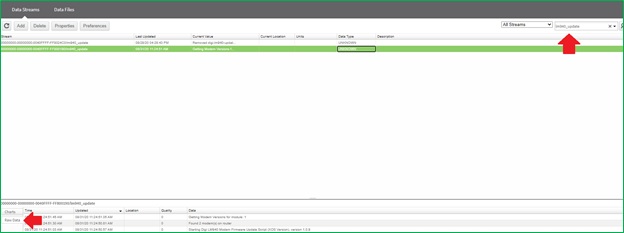
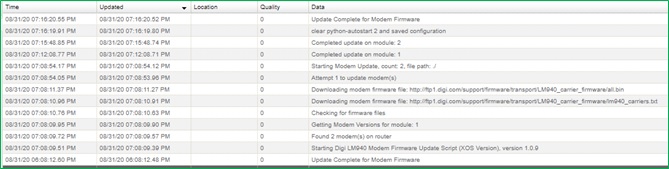
- The data streams should look like the below example if everything worked correctly:
Python Script Options
The Python script also has options that are not listed in the common use case above. All options are listed below, and can be seen at the CLI using the --help flag:
usage: digi-lm940-update_xos.py [-h] [--force_update] [--cellular_ok]
                                [--firmware_path FIRMWARE_PATH] [--debug]
                                [--version]

Digi LM940 Modem Firmware Update Script (XOS Version), version 1.0.5

optional arguments:
  -h, --help            show this help message and exit
  --force_update, -u    force Modem Update, even if running current version
                        (default: False)
  --cellular_ok, -c     allow download on Cellular connection, will disable
                        connection during update (default: False)
  --firmware_path FIRMWARE_PATH, -f FIRMWARE_PATH
                        web location of firmware file, carrier file must be
                        present in same location (default: <digi ftp>
  --debug, -d           show debug level logging (default: False)
  --version             show program's version number and exit
Digi TX54/TX64 Firmware
Digi recommends that customers running DAL firmware on TX54/TX64 devices upgrade to firmware version 20.8.22.32 or later. The latest firmware for these products can be found below:
TX54
TX64
Digi TX54/TX64 Module Update Instructions
WebUI
- Log into the WebUI of the Digi TX54/TX64 device using a web browser.
- Navigate to Status > Modems.
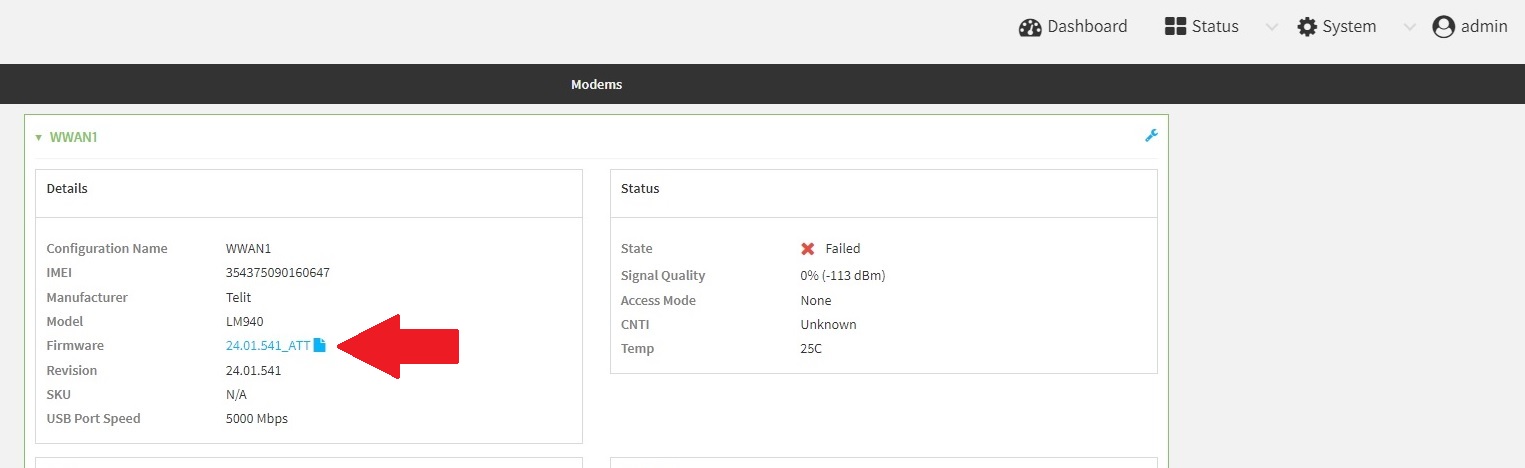
- Locate the Firmware section under Details, and see if the firmware ends in xx4 or later. If the device needs an upgrade, click on the firwmare version in blue text. The example below ends in xx1:
- Next, click on the
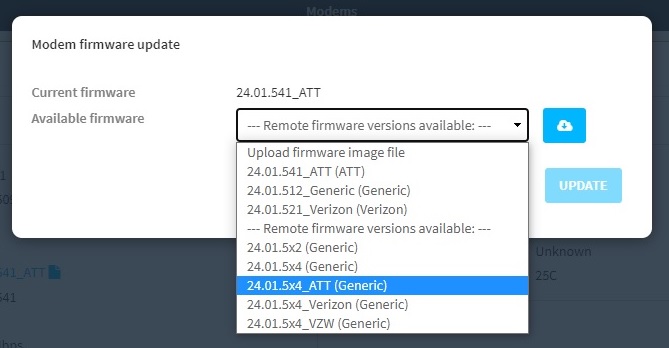
 symbol to search for available firmware versions, and after the device retrieves the list of available firmware, chose the desired version ending in xx4 or later. AT&T is being selected in the below example:
- Click the Update button, and wait for the process to complete. The process may take 15 minutes or more on slower connections due to slower download speeds.
- NOTE: The cellular radio will disconnect from the cellular network when the update is in progress.
CLI
- Connect to the Command Line Interface (CLI) of the Digi TX54/TX64 device using SSH.
- Choose the option for Shell access. If the Shell option is not present or if you are automatically taken to the Admin CLI, Shell access must be enabled. Please see the User's Guide for information on enabling the Shell.
- For Dual-Cellular radio models only, first issue the following command to determine the name of the interface:
- modem names
- The example output below lists the modem interface names of wwan1 and wwan2 for the Cellular 1 and 2 radios respectively:
# modem names
wwan1 wwan2
- Once at the Shell, issue the following command to see if there is an update available for xx4 or later firmware:
- For Single-Cellular radio models:
- modem fw ota-check
- For Dual-Cellular radio models:
- modem name=wwan1 fw ota-check
- modem name=wwan2 fw ota-check
- Next, if an update is needed, issue the following command:
- For Single-Cellular radio models:
- modem fw ota-update
- For Dual-Cellular radio models:
- modem name=wwan1 fw ota-update
- modem name=wwan2 fw ota-update
- Wait for the process to complete. The process may take 15 minutes or more on slower connections due to slower download speeds.
- NOTE: The cellular radio will disconnect from the cellular network when the update is in progress.
Last updated:
Jun 24, 2024