Push Button Example: XBee Wi-Fi

Table of Contents

  1. Introduction
  2. Assemble the Parts
  3. Configure the Radio
  4. Wire up the Circuit
  5. View it!
  6. Use it!


1) Introduction

A button or "momentary switch" is perfect for projects that require user input, or any place you need to detect a change in device state. This example uses a simple tactile switch however the very same circuit can be used with a pressure mat to detect someone walking into a room, or with a microswitch to monitor when a door opens or with a passive infrared sensor to respond to motion. In this tutorial, we’ll walk you through wiring up a simple button to your XBee Wi-Fi so that its current state can be seen in a online application from anywhere in the world.

2) Assemble the Parts

XBee_wi-fi_kit3xbee-wifi-switch-parts

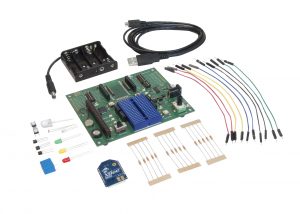
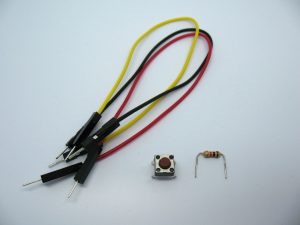
To hook up the push button example you'll need:

*...or a powered XBee Wi-Fi with breadboard and jumper wires.

3) Configure the Radio

You'll configure the radio using your free Device Cloud account. (Note that radios can also be configured using XCTU.)

NOTE: If your radio was recently configured by the XBee Wi-Fi Cloud Kit then the sampling rate and pin settings are already set. You can safely skip these steps.

  • Log in to Device Cloud.
  • Select Devices under the Device Management tab.
    DC-devices-list
  • Select the XBee Wi-Fi that you are configuring, then select Properties or double-click to open the Properties window for that device.
  • Select Configurations, then Input and Output Settings, then confirm that DIO4/SPI_MOSI is set to Digital Input.
    xbee-wifi-switch-devicecloud-config
  • On the same page, confirm that Sample Rate is set to 5000 ms which will take a sample every five seconds.
  • Save your changes!

4) Wire up the Circuit

You will build this sensor circuit using the XBee Development Board.

  • Plug the 10K ohm resistor into the breadboard as shown. It acts as a "pull-down" resistor so that when the switch is open, the XBee's input is pulled all the way low.
    • Connect a black jumper wire from one end of the resistor to GND.
    • Connect one end of a yellow (or any other color) jumper wire to  the other end of this resistor. Connect the other end of this yellow wire to the XBee's DIO4 pin.
  • Plug in the switch across the trough in the middle of the breadboard as shown. One leg should will go into the same junction row where the resistor and the yellow wire meet.
    • Connect a red jumper wire from the other leg of the switch to 3.3V power.
      xbee-wifi-switch-board-cu
  • set the DIP switch for DIO4 on the PCB to OFF to disconnect the soldered-on component.
    xbee-wifi-led-widget-switch
  • Here's what everything should look like:
    xbee-wifi-switch-breadboard-diagram xbee-wifi-switch-schematic xbee-wifi-switch-board

5) View It!

You will use the XBee Wi-Fi Cloud Kit's web application to configure a widget for viewing the push button's state from the web.

  • Log in to the XBee Wi-Fi Cloud Kit web application
    cloudkit-login
  • Use the Add Widget button to create a new display widget
    add-widget
  • Choose On/Off Switch Widget for the widget type.
  • Add a label such as "Push Button"
  • Choose your XBee Wi-Fi device by its ID.
  • Do the next two steps in the order listed:
    1. First, check the Read Only checkbox. We're going to use this widget as an output only.
    2. After the Read Only checkbox is checked, select DIO4 as the Output Stream then check the device configuration to make sure it is configured as a Digital Output.
  • Make sure the Invert Values checkbox is unchecked because in this circuit high output will map normally to ON.
    xbee-wifi-switch-widget-settings
  • Save the changes to see your new Widget:
    xbee-wifi-switch-widget-full

6) Use it!

It's time to push your button! Press down on the physical push button to see the onscreen widget move from OFF to ON. Let go and it should pop back to OFF. Congratulations, your real world actions are now changing the Internet!

Try wiring up different switches to monitor motion in the office, detect if anyone is opening your desk drawers or watch to see if there's a car parked in your spot. While there's plenty of analog sensors for monitoring weight, light, angle, pressure, or proximity, there's almost always a way for a digital switch to fill the same shoes at lower cost and with greater reliability. When in doubt, try a switch!

Tags: Wi-Fi XBee