In our
first post in the MicroPython programming for the edge series, we talked about how to collect sensor readings and make sense of them using the
Digi XBee 3 Cellular LTE-M Kit, as well as Digi's free configuration software,
Digi XCTU, and some simple MicroPython code. Welcome to Part 2 of this series.
The edge intelligence provided in Digis XBee 3 line of embedded RF modules makes sending data to the cloud a snap. For our second project in this hands-on series, we show how to upload temperature readings measured from a Digi XBee 3 Cellular LTE-M module to "data streams" on
Digi Remote Manager® (Digi RM).
Developers can use this data and device management platform for free. The Digi XBee 3 Cellular line supports open communications standards, so it can also share data with Amazons IoT Platform, Microsoft Azure, Adafruit.io, Google Cloud IoT, ThingSpeak, IBM Watson and many others. Look for hands-on tutorials or several of those in future projects.
Readers of our first project will recall that MicroPython is an open-source programming language based on Python 3, modified to fit on small devices and optimized for microcontrollers. By using MicroPython you can rapidly create connections to cloud services right from the edges of your network.
Send Data to Digi Remote Manager
Many IoT systems feed data to online cloud platforms on the Internet. They typically sample some value locally, like temperature, then send the readings to any one of a dizzying number of online application for logging, processing and data visualization. In this project, we will take some temperature measurements using a simple sensor, then send them to Digi Remote Manager as a "data stream" that can be visualized in different ways, accessed via an open API or stored for later use.
We begin with the exact same hardware setup used in the "Sense, Transform and Send a Value" project, including the TMP36 temperature sensor.
Set up the Hardware
If you missed our first post, please visit
Hands-on MicroPython Programming Examples for Edge Computing: Part 1 and work through the following items to prepare for this second project:
- Getting Started: Demonstrates how to set up the hardware and software youll need.
- Hello World Example: Teaches how to upload code to Digi XBee 3.
- Sense, Transform and Send a Value: Shows how to take a temperature reading and send it as a text message.
Once you have set up the Digi XBee 3 hardware, hooked up the TMP36 temperature sensor, connected it to the configuration software, and opened the MicroPython terminal in XCTU, you are ready to begin. Your setup should look similar to this one:
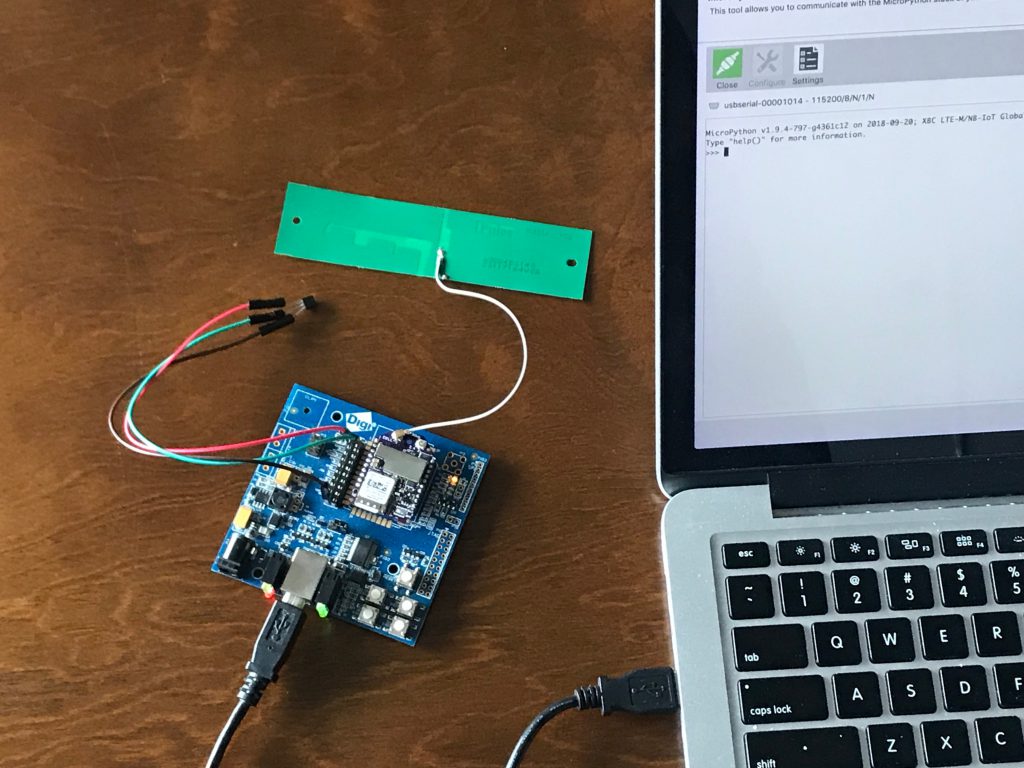
TMP36, Digi XBee 3 Cellular, XBIB connected to MicroPython Terminal in XCTU
About Digi Remote Manager
Digi Remote Manager enables you to configure and manage dynamic device networks, with a range of application development, device management tools and APIs. One of the most important features of Digi Remote Manager is the ability to update devices over-the-air (OTA), anywhere in the field. This is especially important if you are building an application with remote, widely dispersed or hard-to-access modules, or if you are building out a large deployment. Visit
shop.digi.com to get started with Digi Remote Manager.
Digi Remote Manager Account Setup
If you need help setting up or using your account, see the Digi Remote Manager User Guide.
Your Remote Manager account username and password will let your Digi XBee 3 Cellular upload data streams, in this case temperature measurements. It provides a layer of security thats appropriate to this simple example. Many additional layers of security and authentication are available to provide increased protection for production applications, though we wont look at those right now so we can focus on the basics.
Library Uploads
To make our code simpler and more readable, we rely on two
libraries uploaded to the file system inside the Digi XBee 3 Cellular module. These libraries are collections of pre-written code. They provide simple ways to call complex routines without the routines themselves cluttering up your program. For this example we will use the remotemanager library, and the urequests library that remotemanager requires.
- Locate the remotemanager.py and urequests.py libraries on this GitHub page: https://github.com/digidotcom/xbee-micropython/tree/master/lib.
- Right-click on each filename and select Download to create a local copy of each on your computer. (GitHub users could also Clone or Download the entire repository here: https://github.com/digidotcom/xbee-micropython).
- With your Digi XBee 3 and XBIB board added to XCTU, open the Tools menu and select File System Manager.
- Click Open to connect the File System Manager to your Digi XBee 3s file system.
- Navigate the "Local Path" folders in the left-hand column to find the remotemanager.py and urequests.py files you just downloaded.
- Use the "Remote Path" folders in the right-hand column to open the "lib" directory ("/flash/lib").
- Drag the remotemanager.py and urequests.py files from your local directory and drop them in the remote "lib" directory to store them on the XBee 3.
- When you are done, close the File System Manager window.
Currently the MicroPython program pasted at the Ctrl-F prompt in the REPL is the only way to run a program at startup. Once this pasted program is executing, it can import modules from the file system as well as writing files out to it. Launching from a filesystem file is on Digis development roadmap so look for this feature in future firmware.
The module is configured identically to our first
Sense, Transform and Send a Value project. If anything might have changed, mount the Digi XBee 3 Cellular on the XBIB board and connected to your computer over USB, launch the XCTU program.
- Add a radio module, then click on that device in the list to configure it.
- BD Baud Rate should be set to 115200 [7] and AP API Enable set to MicroPython REPL [4].
- Write these settings to the module, using the pencil icon at the top.
Load the Code
Copy the below code to a text editor like Notepad. Be sure to enter your own username and password, replacing "your_username_here" and "your_password_here" before uploading the code. By default, this program sends a temperature reading to Digi Remote Manager data stream once per minute, over 24 hours (1440 samples). You can customize that by changing the wait_time or cycles variables as desired.
Remember, this sample code must be edited before you upload it.
|
1
2
3
4
5
6
7
8
9
10
11
12
13
14
15
16
17
18
19
20
21
22
23
24
25
26
27
28
29
30
31
32
33
34
35
36
37
38
39
40
41
42
43
44
45
46
47
48
49
50
51
52
53
54
55
56
57
58
59
60
61
62
63
64
65
66
67
68
69
70
71
72
73
74
75
76
77
78
79
80
81
82
83
|
# Digi XBee3 Cellular Digi Remote Manager Example
# uses a TMP36 to measure temperature and post it to Digi Remote Manager
# by default repeating once per minute, 1440 times total, stopping after a day
# ENTER YOUR Digi RM username and password, REPLACING "your_username_here" etc. BEFORE UPLOADING THIS CODE!
import RemoteManagerConnection
import ADC
import sleep
import atcmd
cycles # number of repeats
wait_time # seconds between measurements
username #enter your username!
password #enter your password!
# Device Cloud connection info
stream_id temperature
stream_type FLOAT
stream_units degrees F
description "temperature example"
# prepare for connection
credentials password: password}
stream_info "description": description,
"id": stream_id,
"type": stream_type,
"units": stream_units}
ai_desc = {
CONNECTED,
REGISTERING_TO_NETWORK,
CONNECTING_TO_INTERNET,
RECOVERY_NEEDED,
NETWORK_REG_FAILURE,
AIRPLANE_MODE,
USB_DIRECT,
PSM_DORMANT,
BYPASS_MODE_ACTIVE,
MODEM_INITIALIZING,
}
watch_ai():
old_ai -1
0x00:
new_ai AI)
!= old_ai:
UNKNOWN)))
old_ai = new_ai
else:
sleep(0.01)
# Main Program
# create a connection
rm =credentials)
# update data feed info
"")
try:
rm.update_datastream(stream_id, stream_info)
"done")
as e:
status str(e)
\
\
exception:, e)
True:
"checking connection...")
watch_ai()
"connected")
range(cycles):
# read temperature value & print to debug
temp_pin "D0")
temp_raw .read()
% temp_raw)
# convert temperature to proper units
temperatureC 10)
% temperatureC)
temperatureF 32.0);
% temperatureF)
# send data points to Digi RM
"")
try:
status # post data to Device Cloud
"done")
.status_code)
as e:
\
\
exception:, e)
# wait between cycles
sleep(wait_time)
|
Use It
With the Data to Digi Remote Manager example running, a new temperature measurement will be uploaded to a Digi RM data stream each minute. If you left the settings at their default, you will receive 1440 uploads, one minute apart, or 24 hours worth. To monitor the data stream:
- Log in to Digi Remote Manager and select the Data Services tab.
- Click on the Stream named "temperature" to select it.
- Locate the Charts and Raw Data area below. It may be helpful to drag the separator line upwards to enlarge this area.
- Click on Raw Data to see the data points that have been uploaded
- Click on Charts to see line graphs of the temperature data. Daily, weekly, monthly and yearly summary graphs can be generated.
Digi Remote Manager has a complete API for sharing your data with other online systems. Thanks to its RESTful interface, it can accept standard requests (using HTTP GET) from a web browser. Use this link to see your temperature data. Youll be prompted to enter your username and password.
The output will be in XML format, and will look like this:
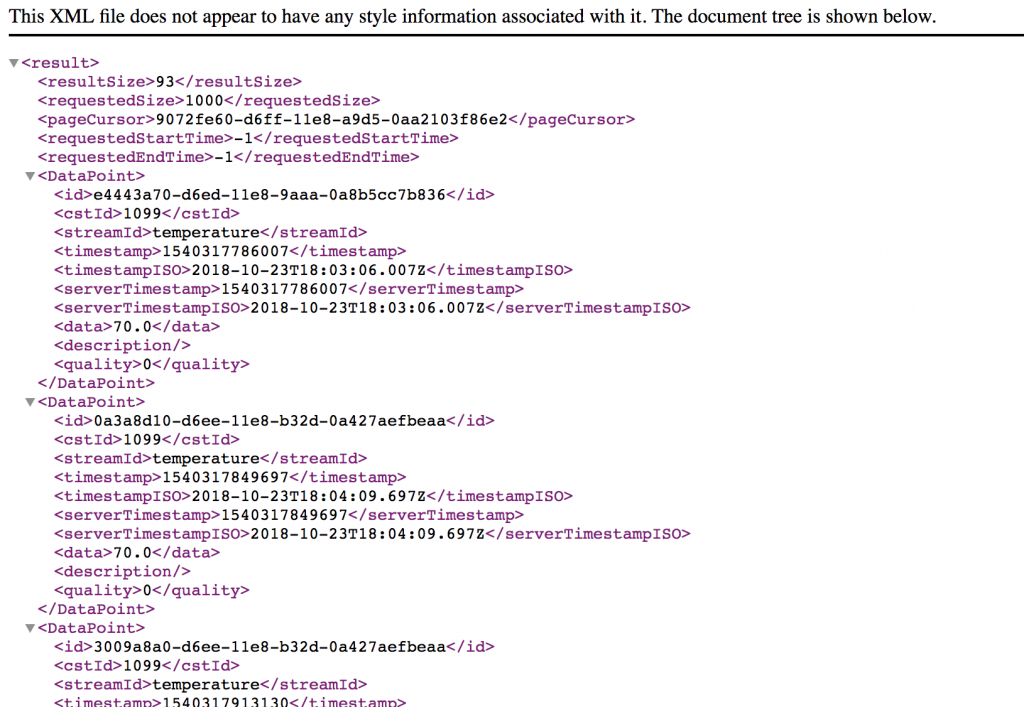
Digi Remote Manager XML Response
Summary
This Digi Remote Manager example demonstrates one way to centralize your IoT systems data uploads. You can now create multiple sensors that all transfer data to a central location online. You created your first Digi RM account, located your data and visualized it. We also covered uploading libraries to Digi XBee 3 cellular using the File System Manager in XCTU. The File System Manager can also manage key files and security certificates that are required by many online IoT platforms. In future posts, we will look at uploading data to other cloud applications, triggering alerts, improving battery life, reducing bandwidth costs and much more.
Your feedback about this series is welcome. Please post any questions or suggestions in the comments below.