Sysinternal's PortMon (now owned by Microsoft) is a Microsoft Windows application used to monitor and analyze a system's serial and parallel port activity. When you select a port to monitor, PortMon sends a request to its device driver to monitor and display everything on that port to aid in troubleshooting system and application problems. If you are instructed to run a PortMon Trace by a Technician, you can
download it here. NOTE: PortMon is available in two versions, one which runs on Windows NT, 2K, XP, and Windows Server 2003 (.NET),
It only runs in 32 bit versions of these operating systems. 1. If you have
PortMon downloaded, you simply need to start it prior to starting your application. 2. When you execute
PortMon, verify that you are connected to your local Machine via the screen"s title bar (see Figure 1).
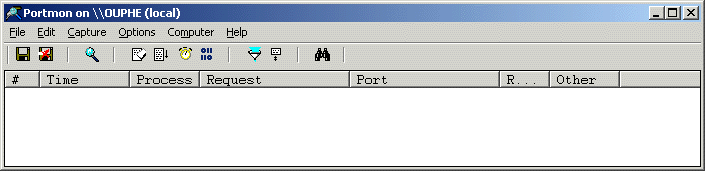
Figure 1 - PortMon is connected to local machine 3. If you are not connected, the screen's title bar will read "
Portmon - Not Connected" (see Figure 2.
.
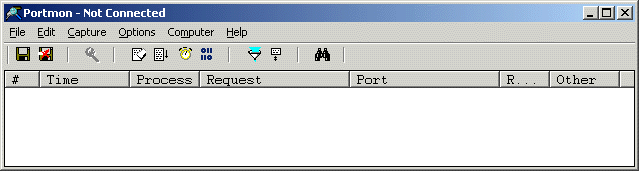
Figure 2 - PortMon is not connected to local machine 4. If
PortMon isn't connected, choose Connect Local from the Computer menu (see Figure 3).
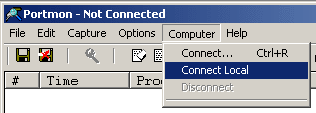
Figure 3 - Tell PortMon to connect to the local machine
Note: If Portmon still says "Not Connected" and the computer is running Windows 7 32-bit, try the following workaround:
A. Close ALL other programs/applications/windows.
B. Open an elevated Command Prompt (right-click / Run as Administrator on the Command Prompt shortcut).
C. “cd” into the folder where the Portmon zip file was extracted.
D. Type “portmon.exe” <Enter>.
5. Next, configure
PortMon to record more useful information. Begin by increasing the number of data bytes
PortMon records to its log file by going to Edit, and selecting Max Output Bytes (see Figure 4).
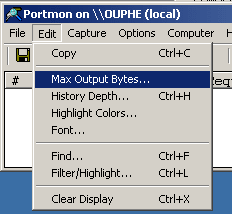
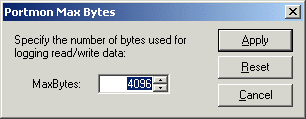
Figure 4 6. Increase the size of the bytes used for logging read/write data to 4096 (see Figure 5).
Figure 5 7. Under the Options Menu, verify that Show Time and Show Hex are both checked, and that Clock Time is NOT checked.
NOTE: The last three options Hide Toolbar, Auto Scroll, and Always On Top do not influence the data recorded to the log file (see Figure 6).
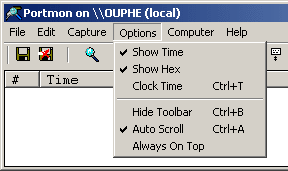
Figure 6 8. Lastly, verify that the ports you want to monitor are selected. From the Capture Menu, select Ports. Any port with a check next to it will be monitored, others will not (see Figure 7).
NOTE: You may not be able to select a port if it is currently in use by another application.
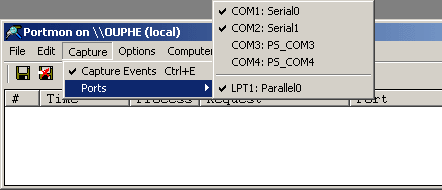
Figure 7 9. The log file generated by
PortMon is often referred to as a
PortMon trace. There are two ways to create a
PortMon trace, although one method only captures about half the data that the other method captures. A. The first method is to open
PortMon, choose Log to File... from the File menu, run your application, and then to turn off logging. B. The second method is to open
PortMon, run your application, and then to choose Save As... from the File menu.
NOTE: The Save As... feature only captures about half the data that the Log to File option so this is the preferred method (see Figure 8).
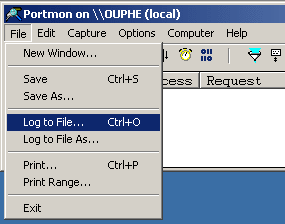
Figure 8 10. After you choose Log to File,
PortMon displays the Log-to-File Settings dialog box. Press the button marked, "...", to select the name and location of the log file (see Figure 9).
NOTE: You can leave Append unchecked and Max Log Size at 0 (which means the log file size is unrestricted).
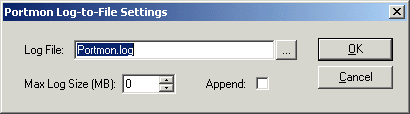
Figure 9 11. Finally, run your application as instructed by the Technician after starting
Portmon.
PortMon automatically displays the serial port activity
as it happens, as well as logs it to the file (see Figure 10)
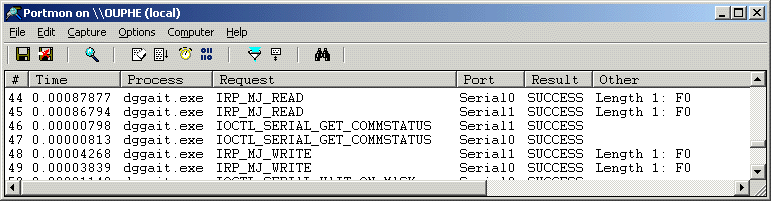
Figure 10 12. When you're done testing, turn off logging by choosing Log to File... from the File menu. The menu item should already be checked, so select it again to turn it off.
PortMon will stop logging to the file at this point, so you can examine the log file in a text editor or you can forward the file
to a Digi Support Engineer for further analysis (see Figure 11).
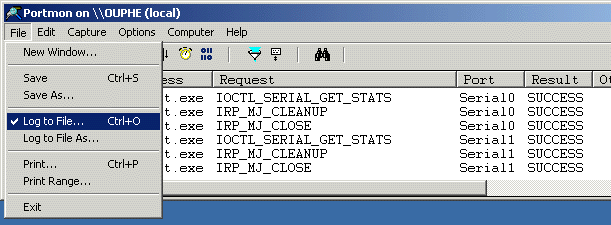
Figure 11