The following is information about creating, deploying, running, and monitoring a container for the Digi Containers service in Digi Remote Manager
Disclaimer: Digi provides a compute environment for customers and partners to deploy their own container-based applications. The Digi technical support team neither develops any custom container applications, nor supports these containers developed by the customer or partner. It is the sole responsibility of customers and/or partners to develop, test, deploy, and support any custom container applications running on Digi devices. Digi does not fix any bugs in the containers deployed onto Digi devices. Also, Digi does not guarantee that these container applications continue to work on newer firmware versions. For support in developing or troubleshooting custom containers, please contact our Professional Services team.
What are Digi Containers?
Digi Containers Service is an add-on service that simplifies and centralizes the process of building, deploying and running custom applications on devices managed with Digi Remote Manager® (Digi RM). With a Digi RM license and Digi Containers, you deploy containerized programs or Python applications at scale and on any device running DAL OS.
Implemented via Lightweight Linux Containers (LXC), Digi Container Service makes the process portable, scalable, secure, fast and efficient. Digi empowers companies to orchestrate and manage a complex series of containers in various structures and configurations across enterprise, industrial, transportation and other use cases.
What’s a LXC Container?
Digi Containers Product Page
Digi Containers Datasheet
Digi® Containers is an add-on service to Digi Remote Manager® (Digi RM), implemented via Lightweight Linux Containers (LXC). Linux Control Groups (cgroups) can define and control the access that various processes have. Cgroups can stop processes that access hardware (such as CPUs, devices, RAM, disk, or I/O), or other processes. This essentially creates a “sandbox” for your process so it can't harm the running system. By combining cgroups and chroot, we create a device with its own root filesystem that can't interfere with or harm the device it is running on. This is called a container.
Because containers are lightweight and portable, they offer both security and flexibility, while enabling you to expand upon the capabilities of your Digi solution to support your needs.
LXC is a set of tools that create and manage the container, which is, essentially, a virtual machine. The only thing in common with the physical device is the running kernel. This means that processes running inside a container run at native speed, as if they are actually running directly on the host device.
For more details on the composition of LXC containers and creating LXC containers, please refer to our Digi Containers whitepaper
Overview of LXC setup on PC
Example container creation
This example (pulled from the DAL OS user guide) creates a simple custom container that contains a python script in the /etc directory.
In this example, we will use a simple container file named test_lxc.tgz. You can download test_lxc.tgz from the Digi website.
At the command line of a Linux host, we will unpack the file, add a simple python script, and create a new container file that includes the python script.
-
At the command line of a Linux host, unpack the test_lxc.tgz file:
|
$ tar -xfv test_lxc.tgz
rootfs/
rootfs/usr/
rootfs/etc/
rootfs/etc/group
rootfs/etc/profile
rootfs/etc/passwd
rootfs/tmp/
$
|
-
Change to the rootfs/etc directory:
-
Create a file named test.py with the following contents:
-
Change directories to leave the container file structure:
-
Change user and group permissions on all files in the container file structure:
|
$ sudo chown -R 165536 rootfs
$ sudo chgrp -R 165536 rootfs
|
-
Tar and zip the directory structure to create a new container file:
|
$ sudo tar -czvf python_lxc.tgz rootfs
|
If using macOS, include the --disable-copyfile option with this command:
|
$ sudo tar --disable-copyfile -czvf python_lxc.tgz rootfs
|
Additional Sample Containers
Below are some additional LXC example containers:
Cross-compiling apps and putting it in the container
If you have a compiled program, such as a C or C++ program, you will need to cross-compile the app to run inside a container, as the majority of Digi routers are either ARM-based or MIPS-based 32-bit CPUs.
Requirements
Setup
Download the appropriate toolchain (e.g. for the Digi EX15, it's the mips-linux-musl toolchain). The toolchain is used to cross-compile the C program so the CPU architecture of the router can execute the program. The toolchains can be downloaded from the following link.
DAL OS toolchains
Then reference the below table to determine which toolchain needs to be installed depending on the Digi product being targeted.
| Toolchain |
Digi Products supported |
|
arm-linux-musleabi
|
Digi Connect IT Mini
Digi Connect IT 4
Digi EX12
Digi IX10
Digi IX14
Digi IX15
Digi IX20/IX20W
Digi IX30 |
|
aarch64-linux-musl
|
Digi AnywhereUSB Plus family
Digi Connect EZ Family
Digi EX50
Digi IX40
Digi TX40 |
|
mips-linux-musl
|
Digi EX15/EX15W
Digi LR54/LR54W
Digi TX54 (all variants) |
|
x86_64-linux-musl
|
Digi Connect IT 16/48
Digi TX64 (all variants) |
Once downloaded, run the following command to install the toolchain on your Linux PC or VM:
|
sudo sudo bash arm-linux-musleabi-tools-20220202.sh
|
If you took the defaults when installing the toolchain, you'll want to symlink the /usr/local/accelerated/arm-linux-gnueabi-tools-20180525/arm-linux-gnueabi/ directory with /usr/local/arm-linux-gnueabi so the compiler can find the libraries in the directory it expects. If not, you'll get errors like the following:
|
/usr/local/accelerated/arm-linux-gnueabi-tools-20180525/bin/../lib/gcc/arm-linux-gnueabi/4.8.3/../../../../arm-linux-gnueabi/bin/ld.real: cannot find /usr/local/arm-linux-gnueabi/lib/uclibc_nonshared.a
/usr/local/accelerated/arm-linux-gnueabi-tools-20180525/bin/../lib/gcc/arm-linux-gnueabi/4.8.3/../../../../arm-linux-gnueabi/bin/ld.real: cannot find /usr/local/arm-linux-gnueabi/lib/libc.so.0
/usr/local/accelerated/arm-linux-gnueabi-tools-20180525/bin/../lib/gcc/arm-linux-gnueabi/4.8.3/../../../../arm-linux-gnueabi/bin/ld.real: cannot find /usr/local/arm-linux-gnueabi/lib/ld-uClibc.so.0
collect2: error: ld returned 1 exit status
|
Once the toolchain is installed, you can use it to cross-compile your application. Below is a sample C program named hello.c
|
#include <stdio.h>
int main()
{
// printf() displays the string inside quotation
printf("Hello, World!");
return 0;
}
|
Which would be cross-compiled with the toolchain like so:
|
$ /usr/local/bin/arm-linux-gnueabi-20180525-gcc hello.c -o hello
$
|
Compiling applications with hardware dependencies
Digi also provides an open-source version of our DAL OS that can be utilized as a full build environment if you application needs hardware-specific dependencies to compile and run correctly. See link below:
GitHub - AcceleratedLinux/accelerated-linux: The Accelerated Linux build system
Packaging up your compiled application into a container
Once compiled, the application can be placed into a container in the same manner as described in the Create the custom container file section above.
Note on system resource limitations
The performance and resources available to the LXC container are dependent upon the type of Digi device and its hardware components. Below is a table detailing the CPU type for each Digi device along with the available memory and flash storage space. Several Digi devices also have USB ports so external storage can be connected to expand the available space a container can utilize.
Digi devices consume about 50MB of memory for normal operations, but that could increase depending on what additional features that are enabled in the configuration settings of the device beyond the default settings (such as VPN tunnels, VLANs, custom scripts, Wi-Fi hotspots, intelliFlow monitoring, etc)
Digi devices reserve a certain amount of disk space (anywhere from 100-150MB depending on the product) for housing its the firmware image partitions
| Device Type |
USB ports |
CPU |
Total RAM |
Total Flash Storage |
Available RAM for Containers |
Available Flash Storage for Containers |
| EX12 |
0 |
900mhz ARM |
256MB |
256MB |
200MB |
144MB |
| EX15 |
0 |
880mhz MIPS |
256MB |
512MB |
200MB |
368MB |
| EX50 |
0 |
Quad-core ARM, 1.8 GHz |
512MB |
512MB |
400MB |
272MB |
| IX10/IX20 |
0 |
792mhz ARM |
256MB |
256MB |
200MB |
118MB |
| IX15 |
0 |
792mhz ARM |
256MB |
512MB |
200MB |
374MB |
| IX30 |
1 |
792mhz ARM |
256MB |
256MB |
200MB |
118MB |
| IX40 |
0 |
1.6 GHz Quad core A53 ARM CPU |
1GB |
8GB |
900MB |
7GB |
| LR54 |
0 |
880 MHz MIPS |
256MB |
256MB |
200MB |
100MB |
| TX40 |
1 |
1.2GHz
x86 |
1GB |
8GB |
900MB |
6GB |
| TX54 |
1 |
880mhz MIPS |
256MB |
512MB |
200MB |
303MB |
| TX64 |
3 |
1.9Ghz x86 |
2GB |
8GB |
1.8GB |
5.1GB |
| TX64-Rail |
2 |
1.9Ghz x86 |
2GB |
8GB |
1.8GB |
5.1GB |
| Connect IT Mini |
1 |
900mhz ARM |
128MB |
128MB |
98MB |
32MB |
| Connect IT 4 |
0 |
900mhz ARM |
128MB |
256MB |
75MB |
141MB |
| Connect IT 16/48 |
2 |
2.1Ghz x86 |
4GB |
8GB |
3.5GB |
4.7GB |
| Connect EZ Mini |
0 |
|
256MB |
4GB |
200MB |
3GB |
| Connect EZ 2/4 |
0 |
|
256MB |
4GB |
200MB |
3GB |
| AnywhereUSB 2 Plus |
2 |
1.4Ghz ARM64 |
2GB |
4GB |
1.8GB |
3GB |
| AnywhereUSB 8/24 Plus |
8/24 |
1.8Ghz ARM64 |
2GB |
4GB |
1.8GB |
3GB |
Deploying and running the container through DigiRM
Prerequisites
-
Must have a premier license/account in DigiRM
-
Must have the Containers service enabled in your DigiRM account. This is done by ordering the Digi Containers license (SKU name: DIGI-RM-PRM-CS). You will need to give them your customer ID for your DigiRM account and order a license for each device you would like to deploy the container(s) onto.
-
DAL OS device running firmware version 22.8.33.50 or newer
-
Add DAL OS device to DigiRM (see instructions in the device’s quick start guide) and assign the DIGI-RM-PRM-CS Digi Containers license to the device through the Management → Subscriptions page in Digi Remote Manager 
-
Have a LXC container created and available on your local PC. If you want a simple test container, you can get the test_lxc.tgz file from the DAL user guides. Give your container file a unique name. This will be used in the setup instructions later.
Walkthrough
-
Create a Configurations template for your device
-
Go to the Configuration page in DigiRM. Click Create
-
Give the new template whatever name and description you want. Select the group, device type, and firmware version for the DAL device you setup in the prerequisites above. Click Continue
-
In the Settings step, click Import from device and select the DAL device you setup in the prerequisites above. Click Save once the settings are imported
-
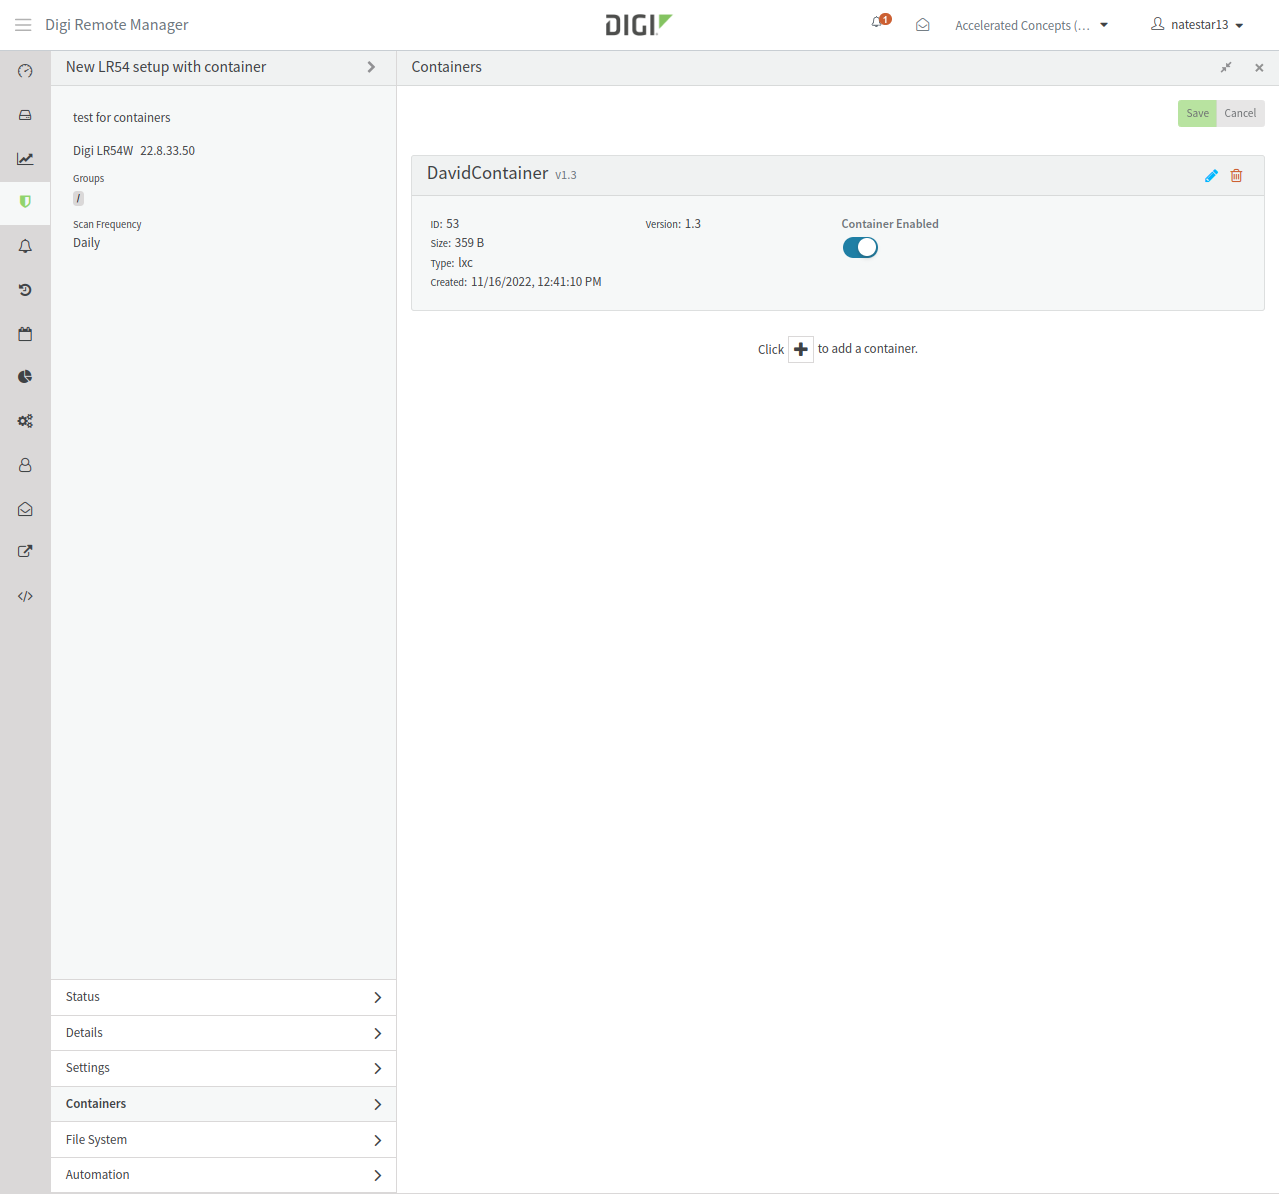
In the Containers tab for the configurations template, add the container to the configuration template
-
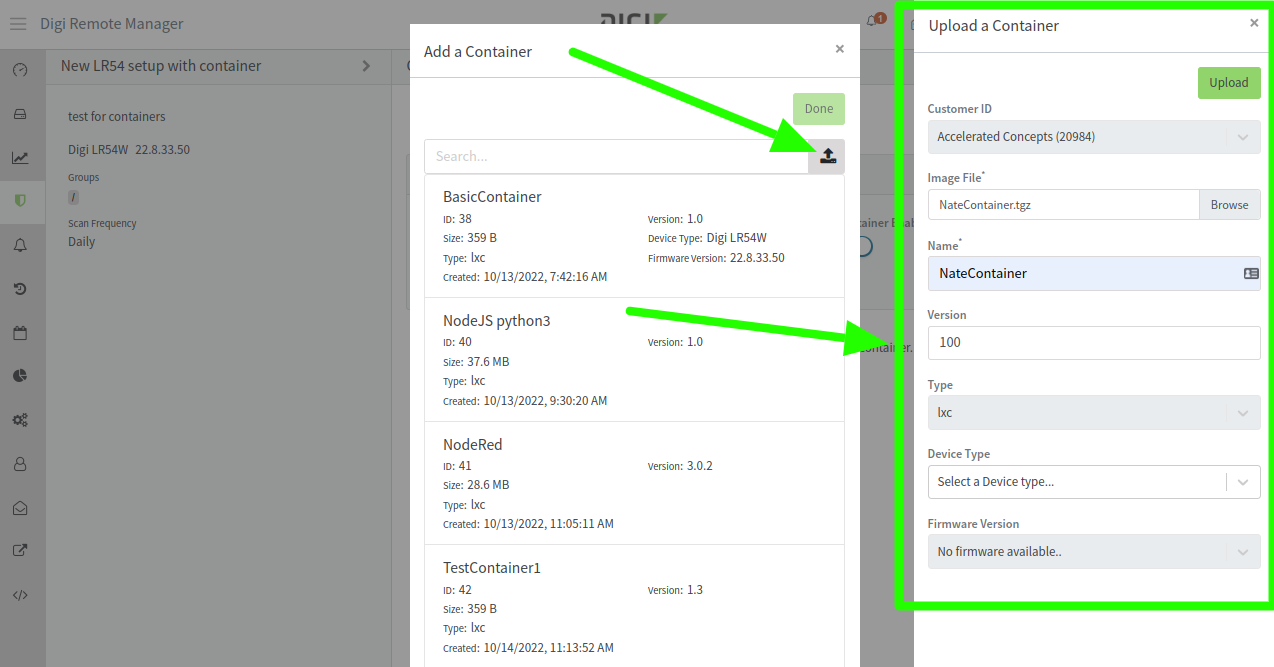
Click the + icon and then click the upload icon in the pop-up window to add a new container
-
Upload the container file you had setup for the prerequisites step above. Set the Name of the container to the same name as the container .tgz file. This is absolutely necessary, otherwise the container config settings and file won’t get setup on the DAL device properly. Below is an example with a container named NateContainer.tgz
-
-
the Version, Device Type, and Firmware Version are all optional. The version is only used by DigiRM and is meant to control different versions of the same container.
-
The Device Type and Firmware Version, if set, will limit that container to only be setup in Configuration templates that match the specified device type and firmware version. Leaving these two values blank will allow you to select this container for any configuration template
-
Click Save
-
-
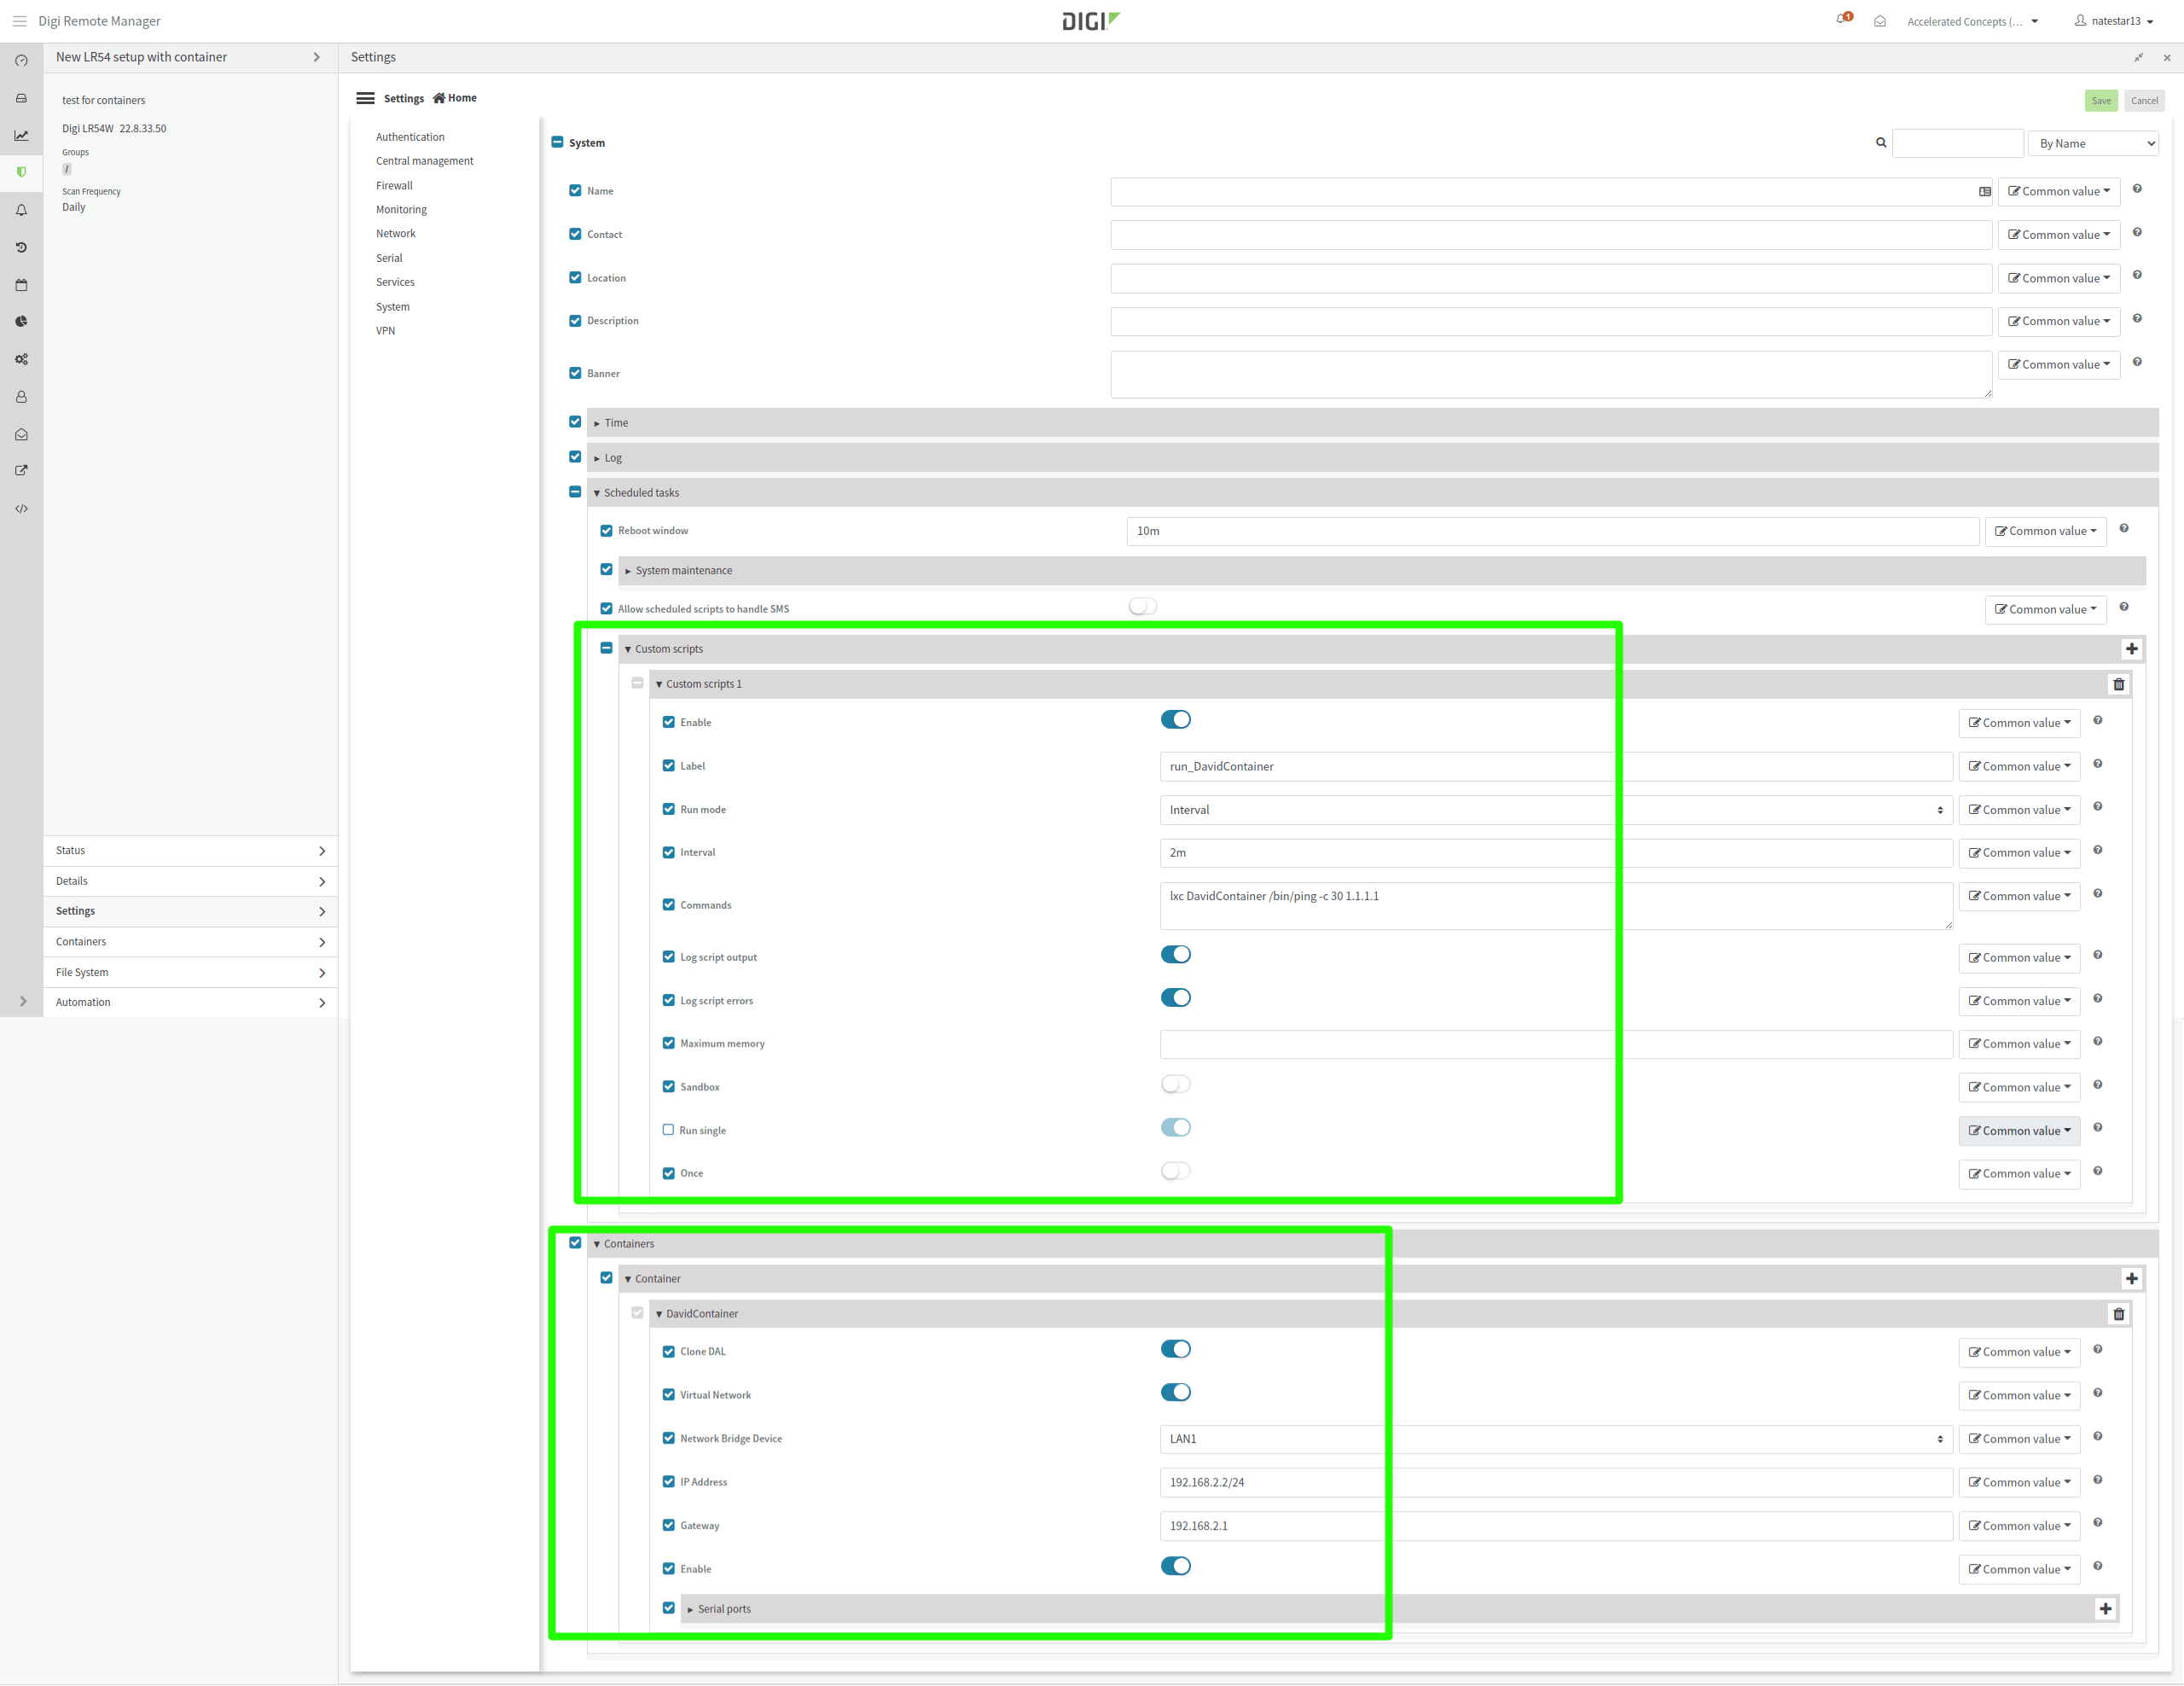
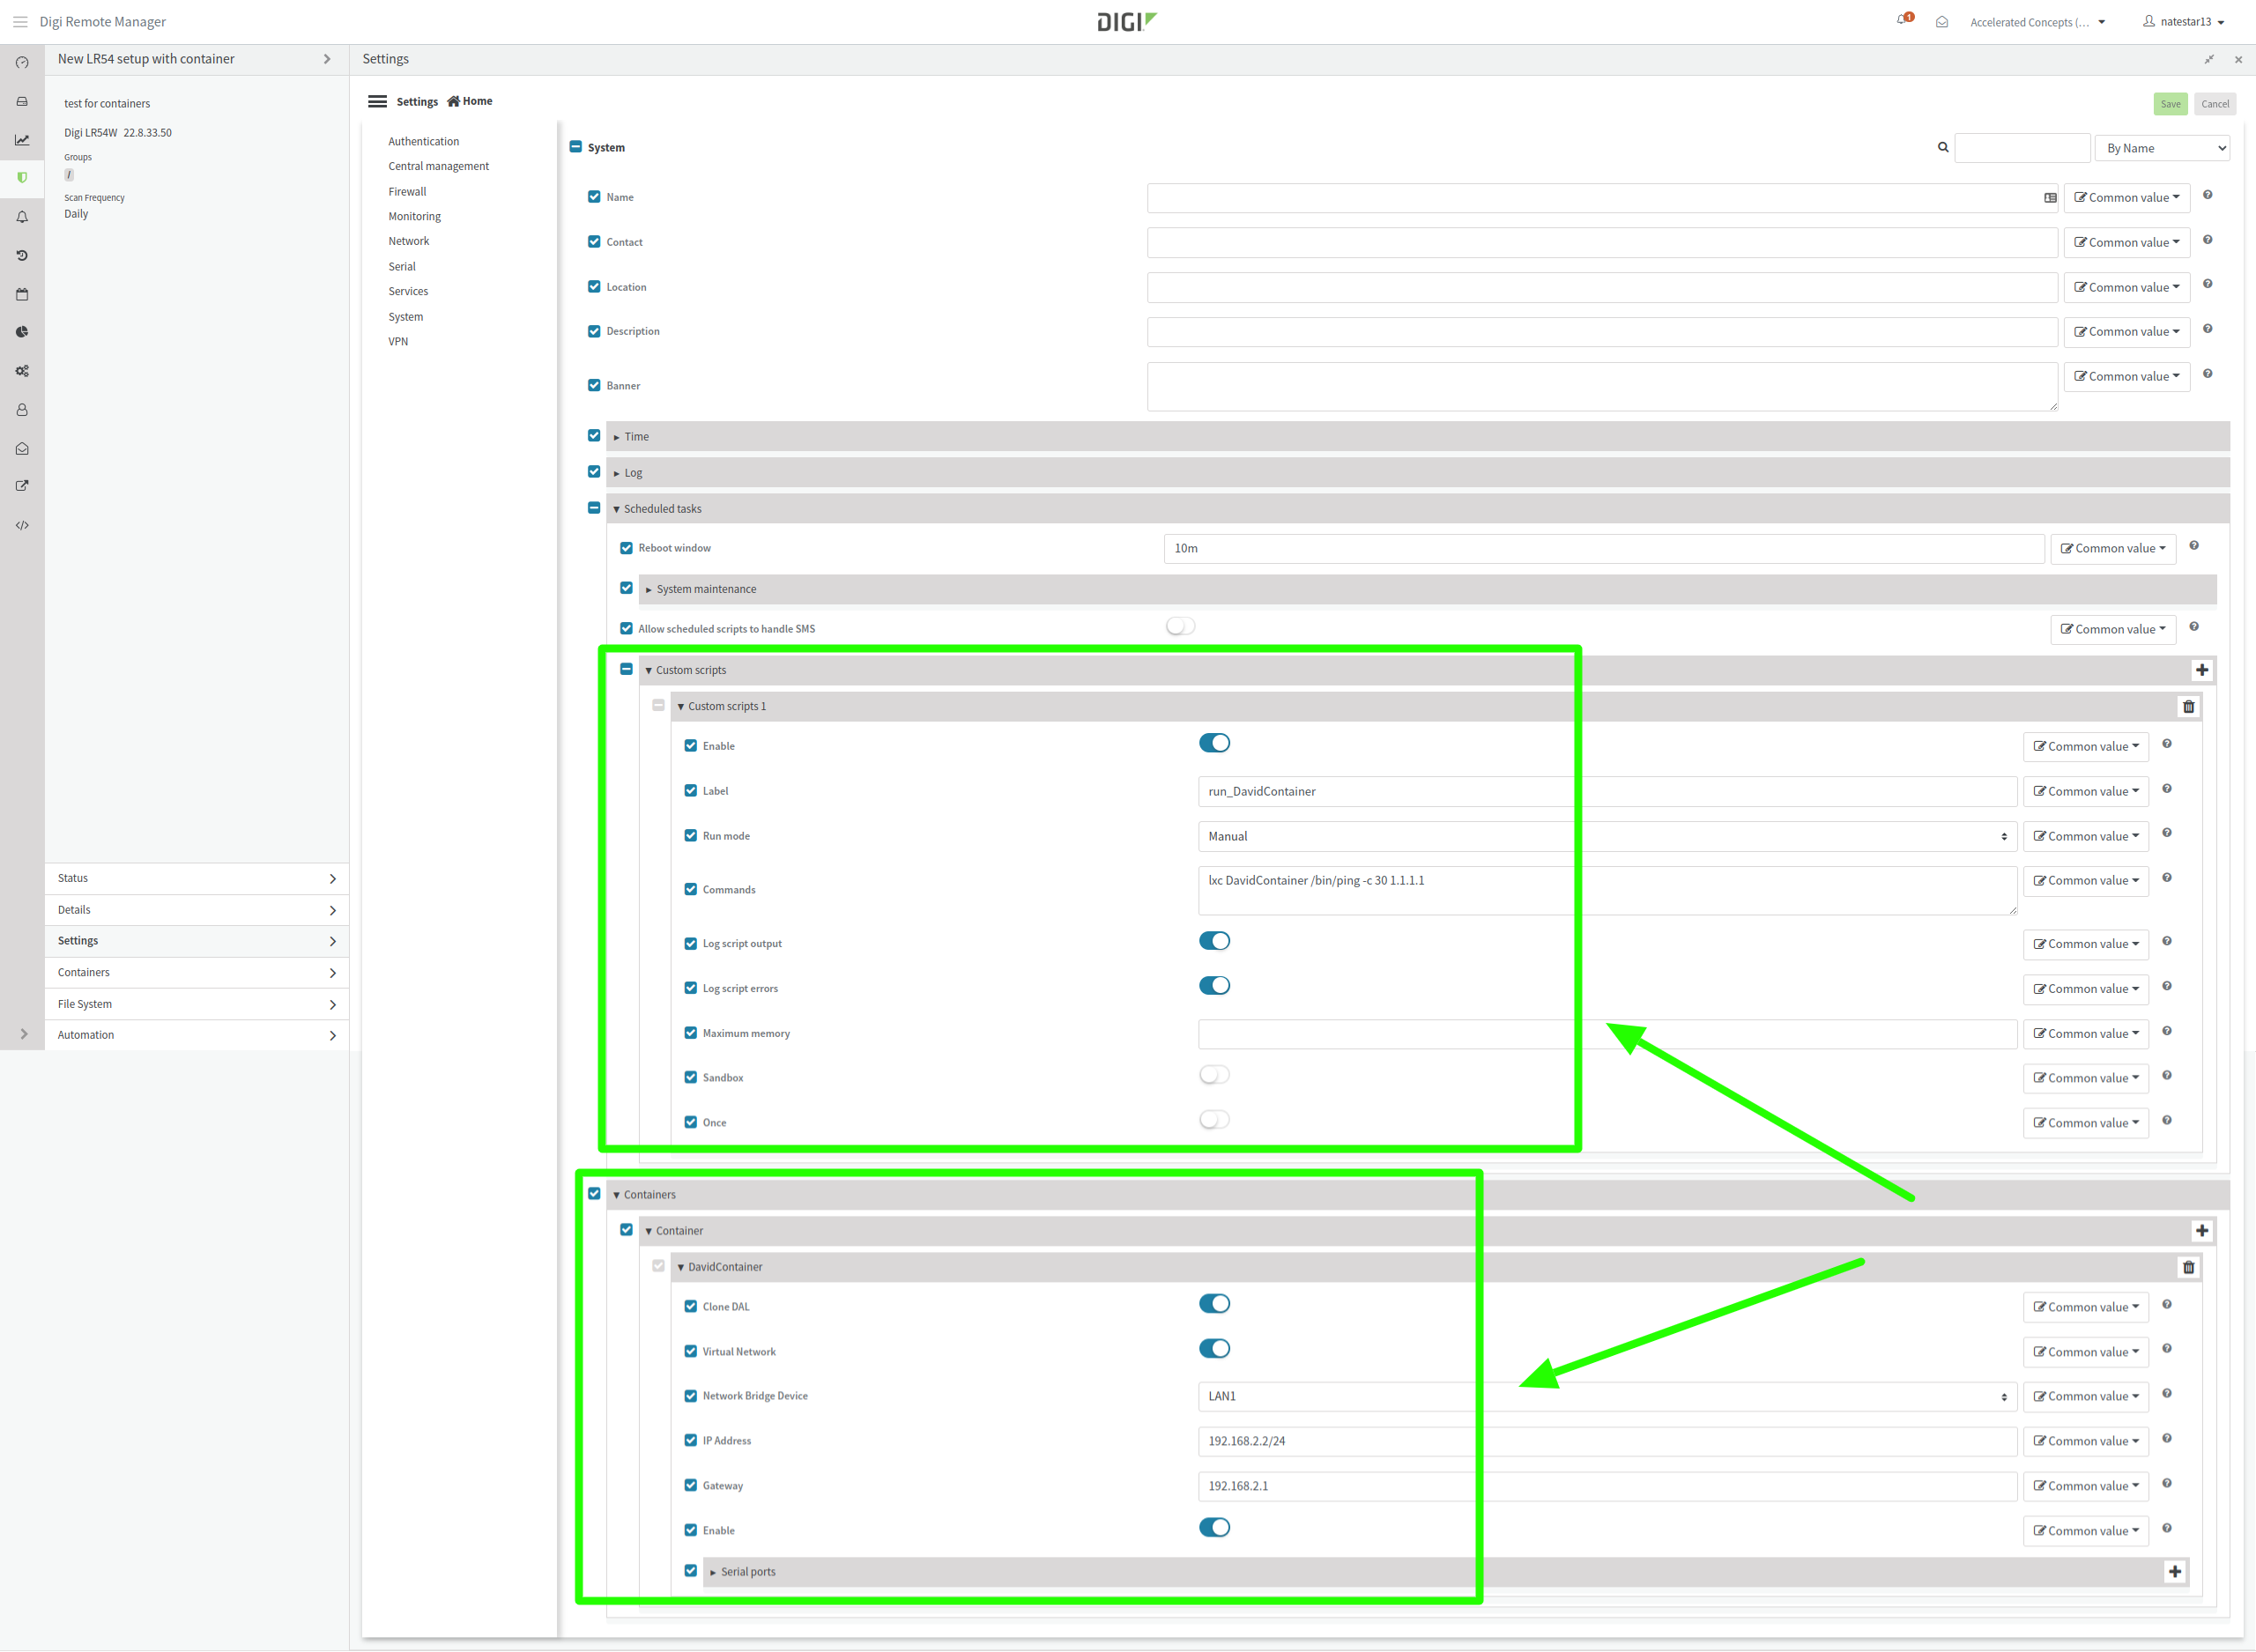
Configure a script in the template to run the container
-
To run the container automatically, go back to the Settings tab for the configurations template, and create a script under System → Scheduled tasks → Custom scripts. If you want this container to always be running (even across reboots or if the container halts for whatever reason), then it is suggested to run the script at a very short interval (e.g. once per minute or so) and enable the Run single option, that way the script only runs if the container isn’t running. The command to run in the script depends on how you want to run the container and what application you want to run inside the container. For example, to run the ping command inside a configured container, the command would be:
lxc [NAME_OF_CONTAINER] /bin/ping -c 30 1.1.1.1
-
-
Click Continue to go through the rest of the Configuration template setup. Under the Automation step, ensure you enable the Enable Scanning and Remediate options so DigiRM will scan the target DAL device and remediate it to match the configuration, container, and firmware settings specified in the configurations template
-
Initiate a config scan/remediation to apply the container and config settings to the DAL device
-
You can always way for DigiRM to automatically scan/remediate the device, but if you want to test out the container sooner:
-
Go back to the Configurations page in DigiRM. Select the newly-created configurations template in step 3. Click the Actions drop-down and select Scan Now
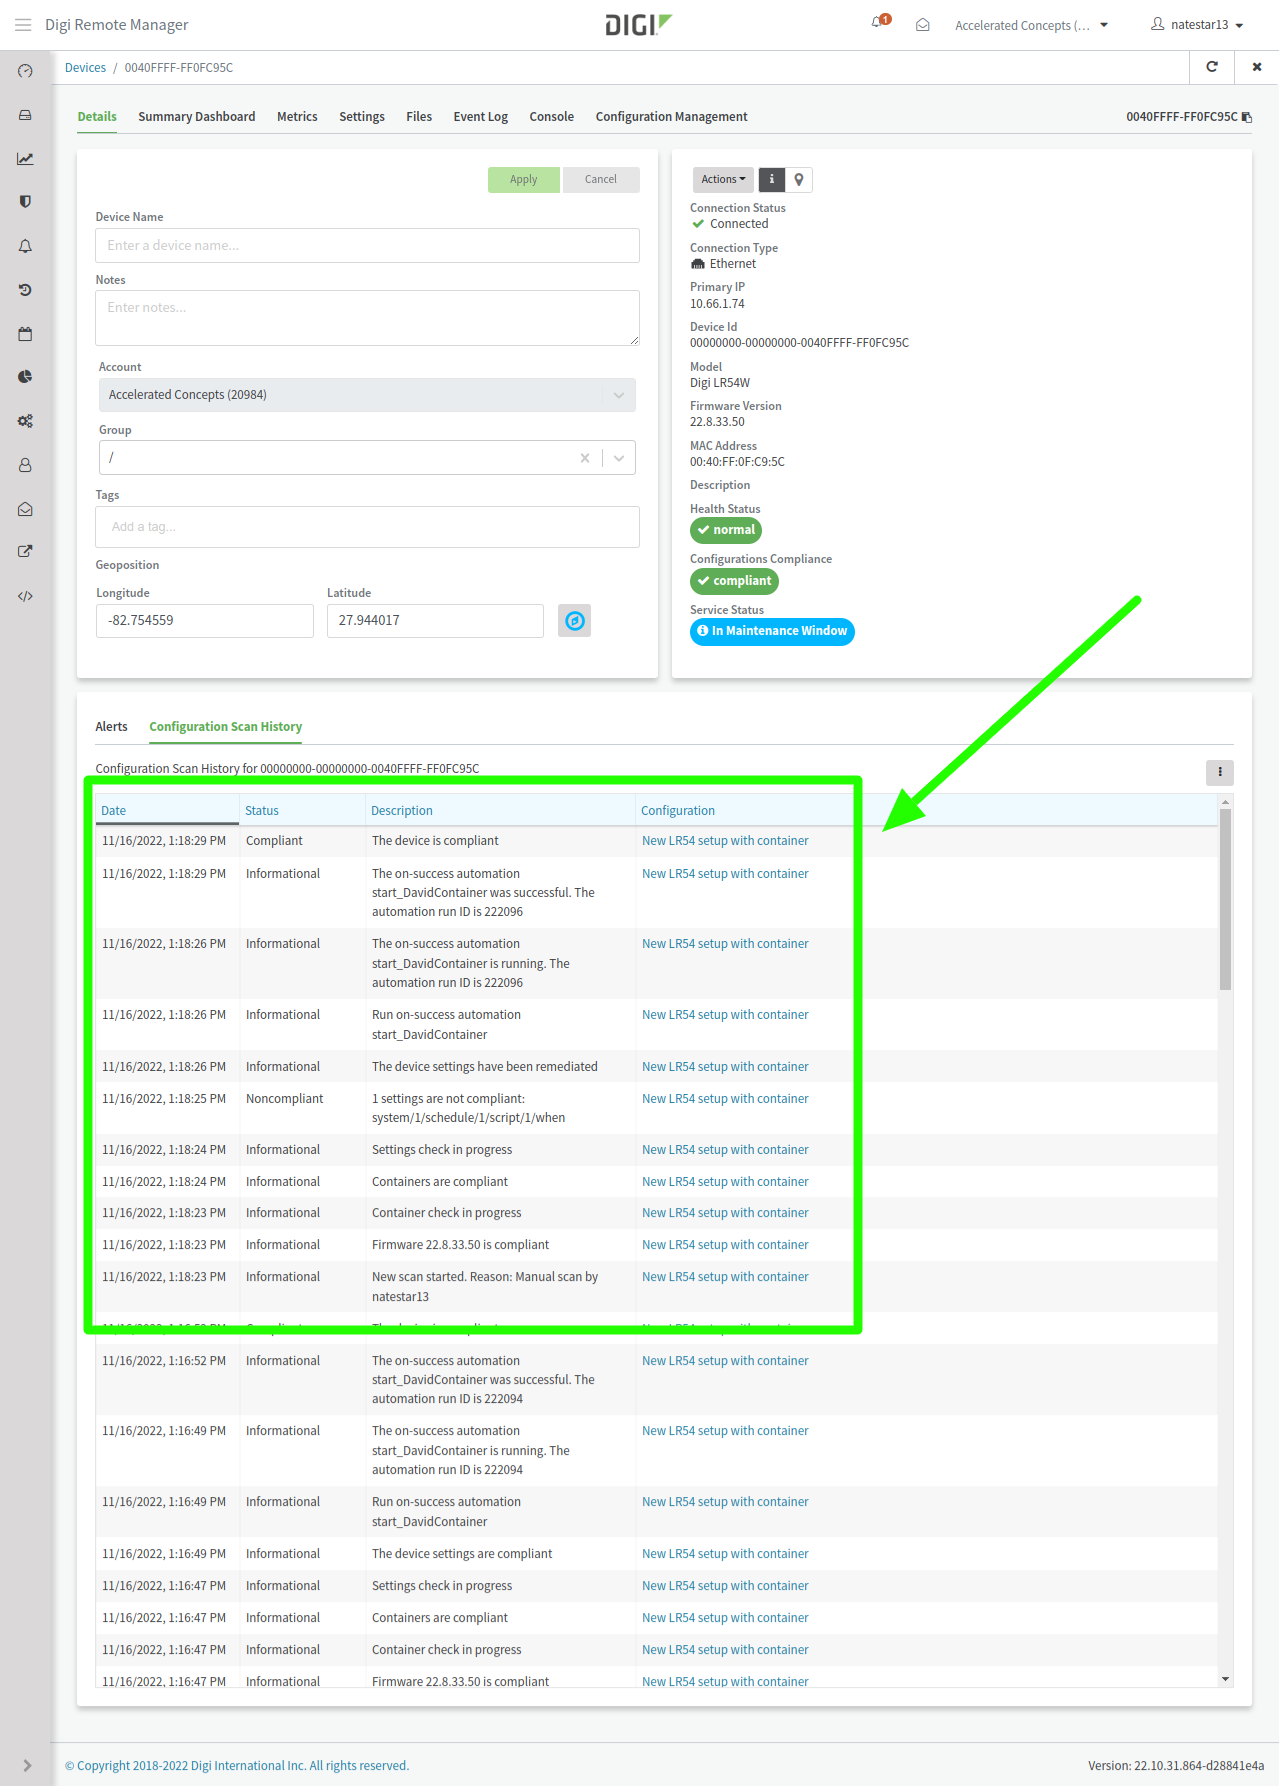
-
Look at the Configuration Scan History tab on the device’s details page in DigiRM to verify the configuration scan and remediation occurred.
-
Verify the container is running as expected
-
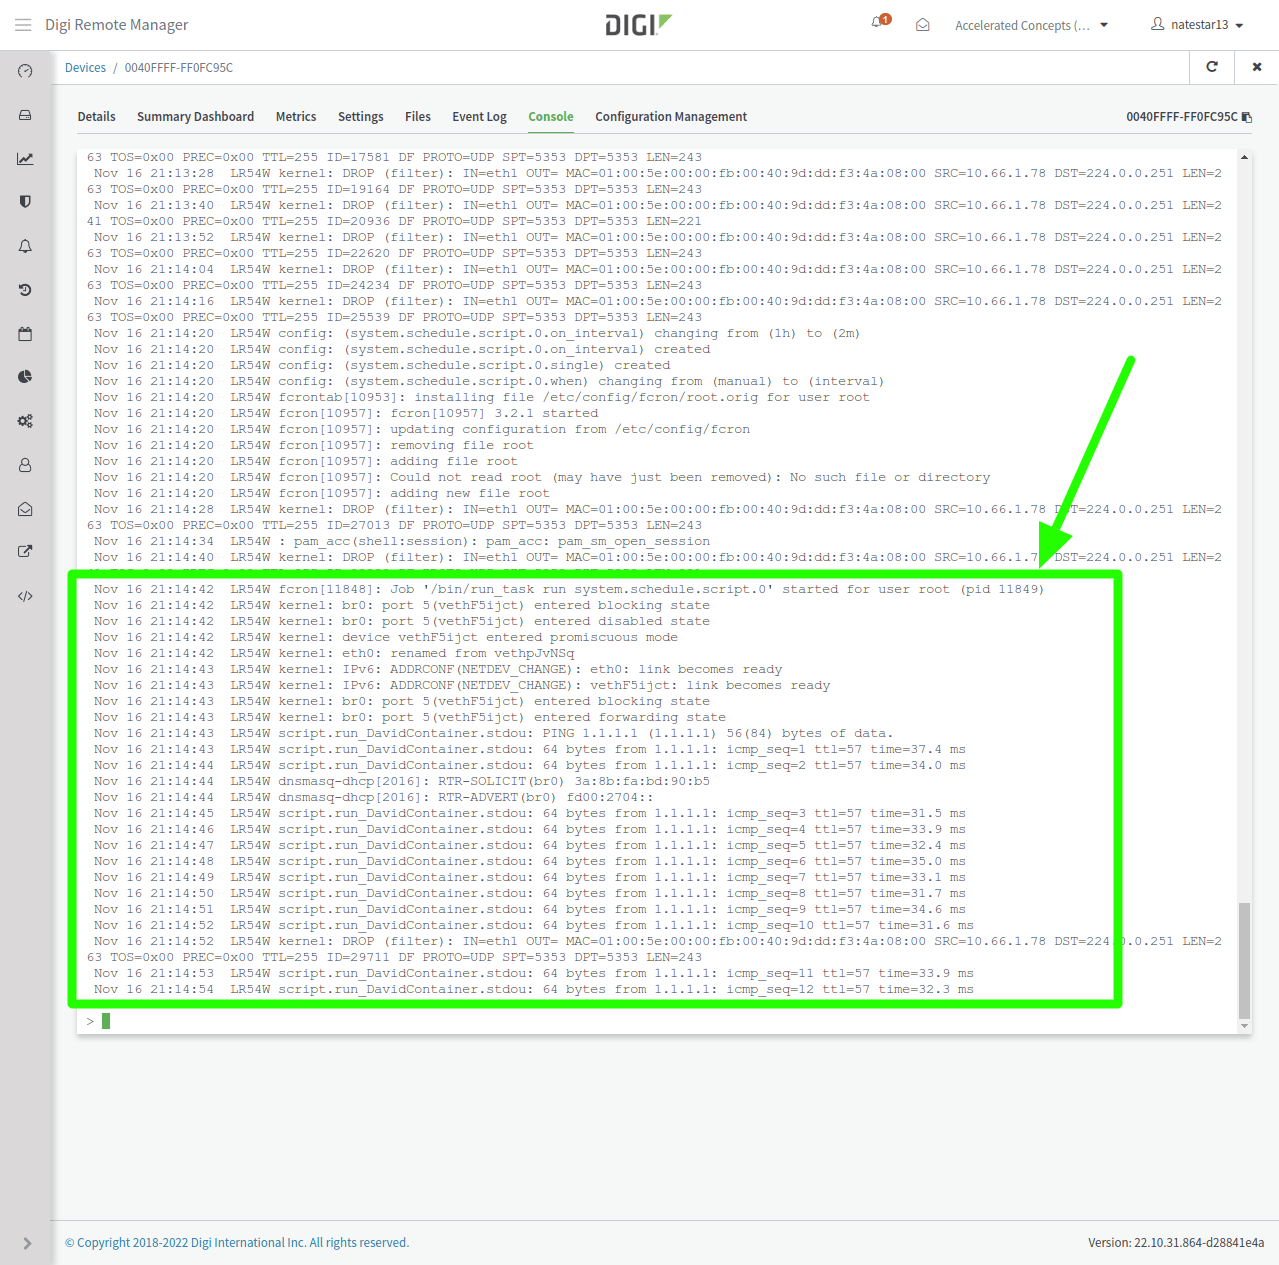
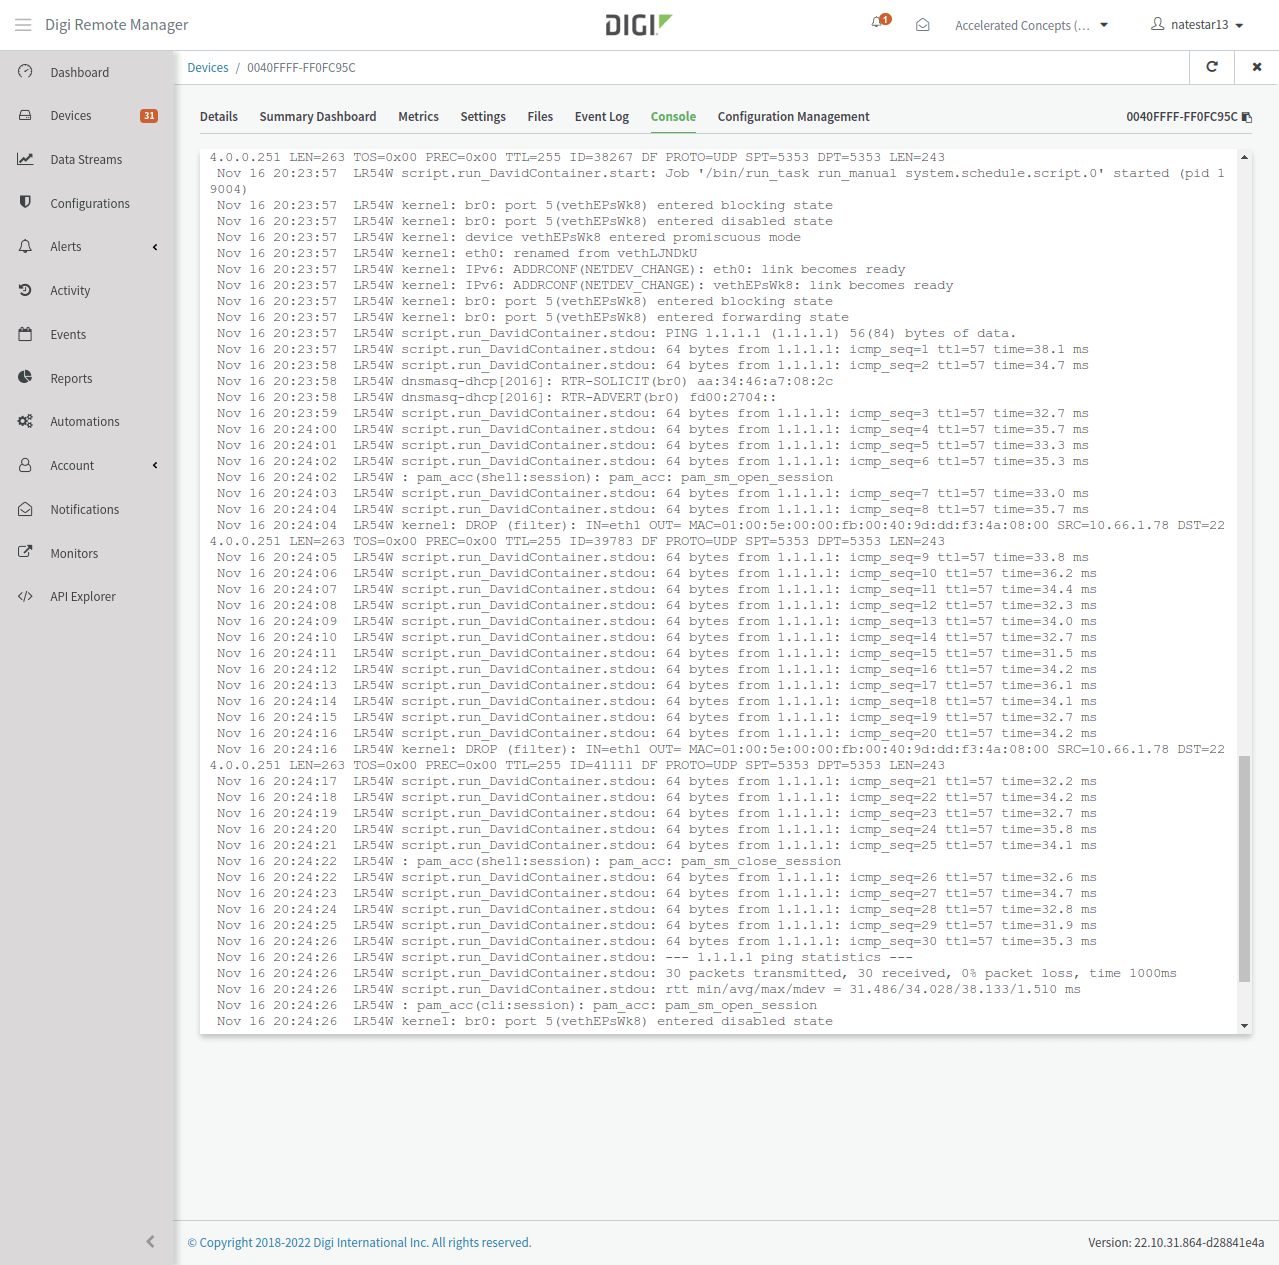
This is dependent on the output/behavior of the applications running inside your container, so only you will know how best to confirm the container is working as expected. Since you setup a custom script to run the container (see step 3 above), any log output from the container will be posted into the system logs, which you can inspect via the Admin CLI, web UI, or DigiRM. Example using the show log CLI command via the Console in DigiRM:
-
Alternate way to run the container via Automations
If you’d instead prefer to have DigiRM start the container on the DAL device, it can do so by setting the script created in step 3 above to “Manual” runmode, and then creating an Automation to run that script using a CLI command like so:
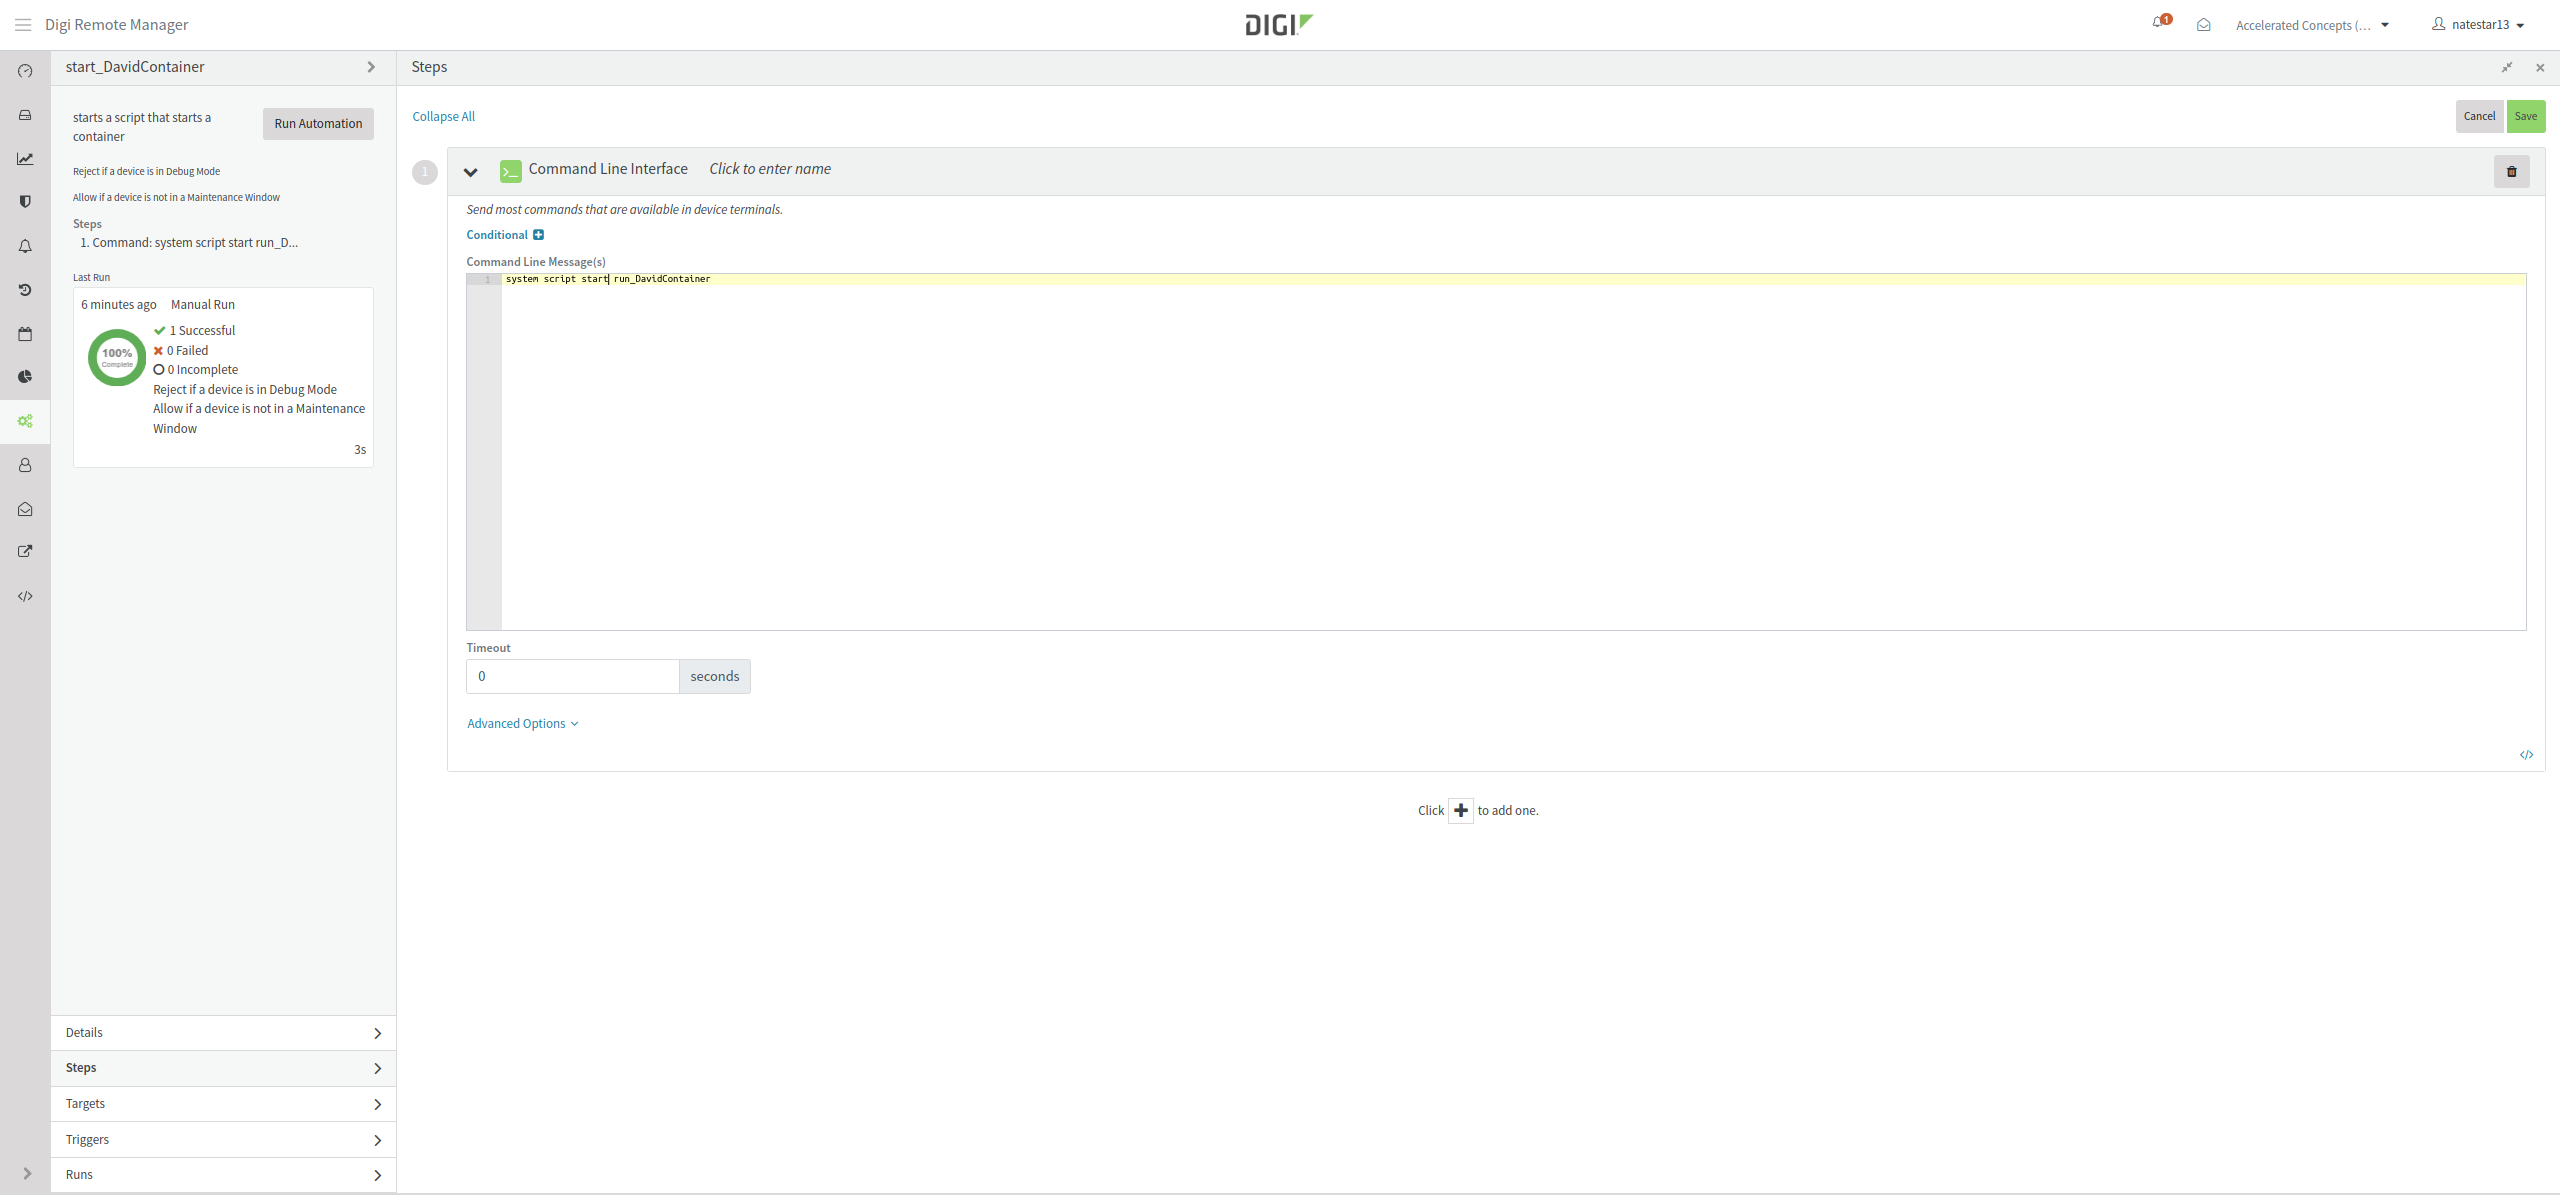
You can then setup the Automation to run in several ways:
-
By adding the Automation to the post-remediation or post-scan actions for a Configurations template:
-
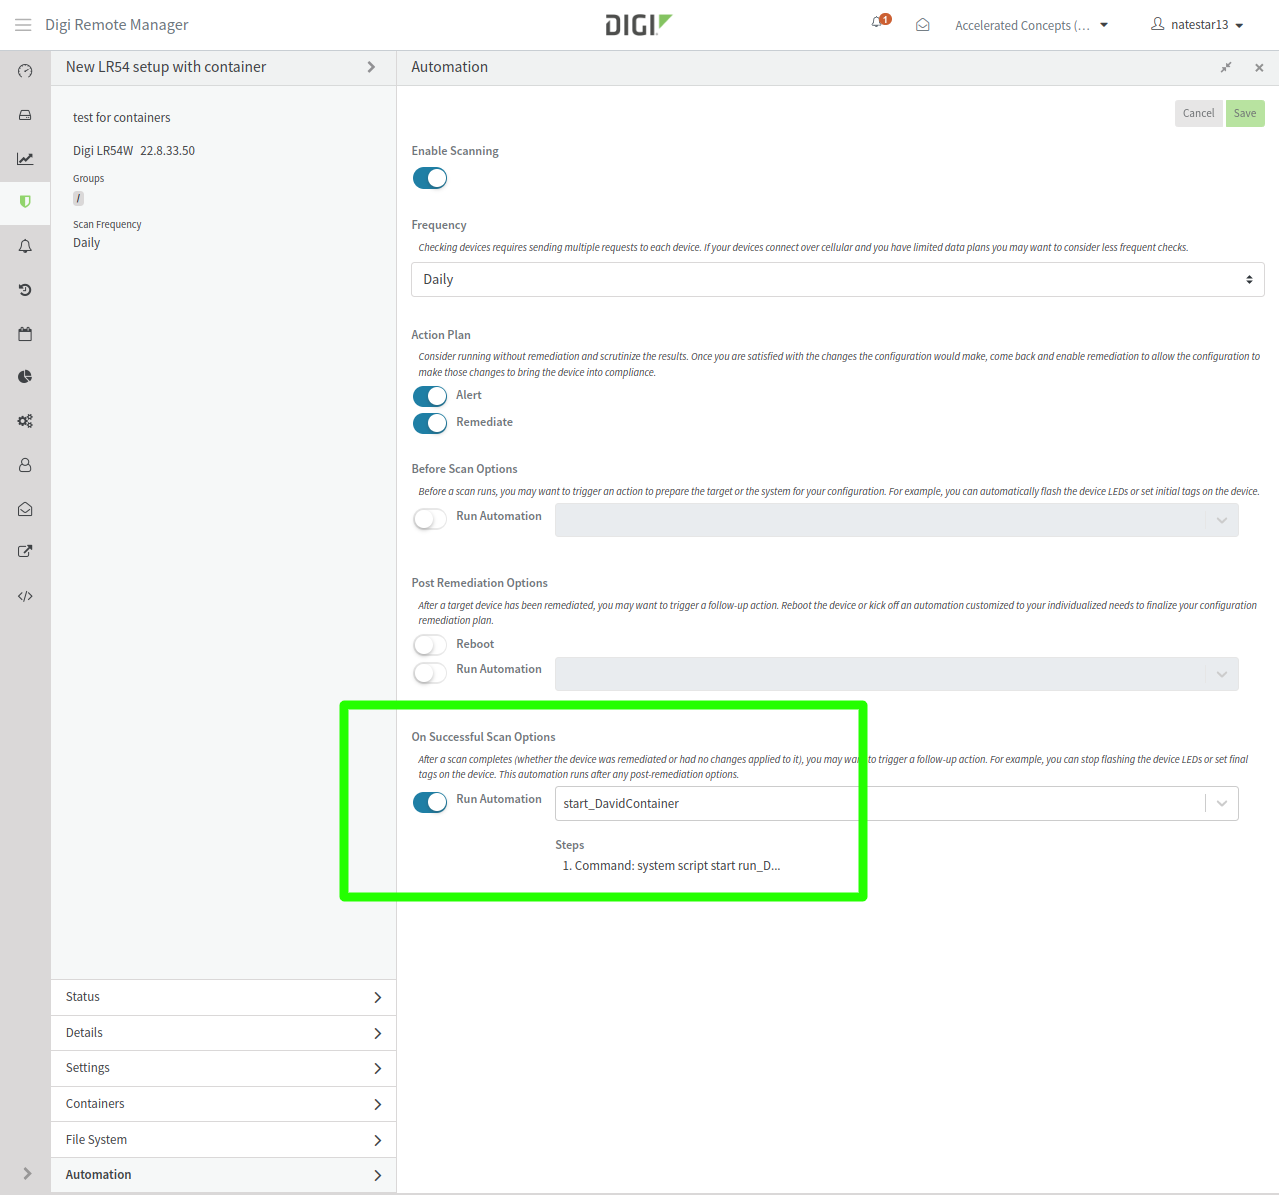
-
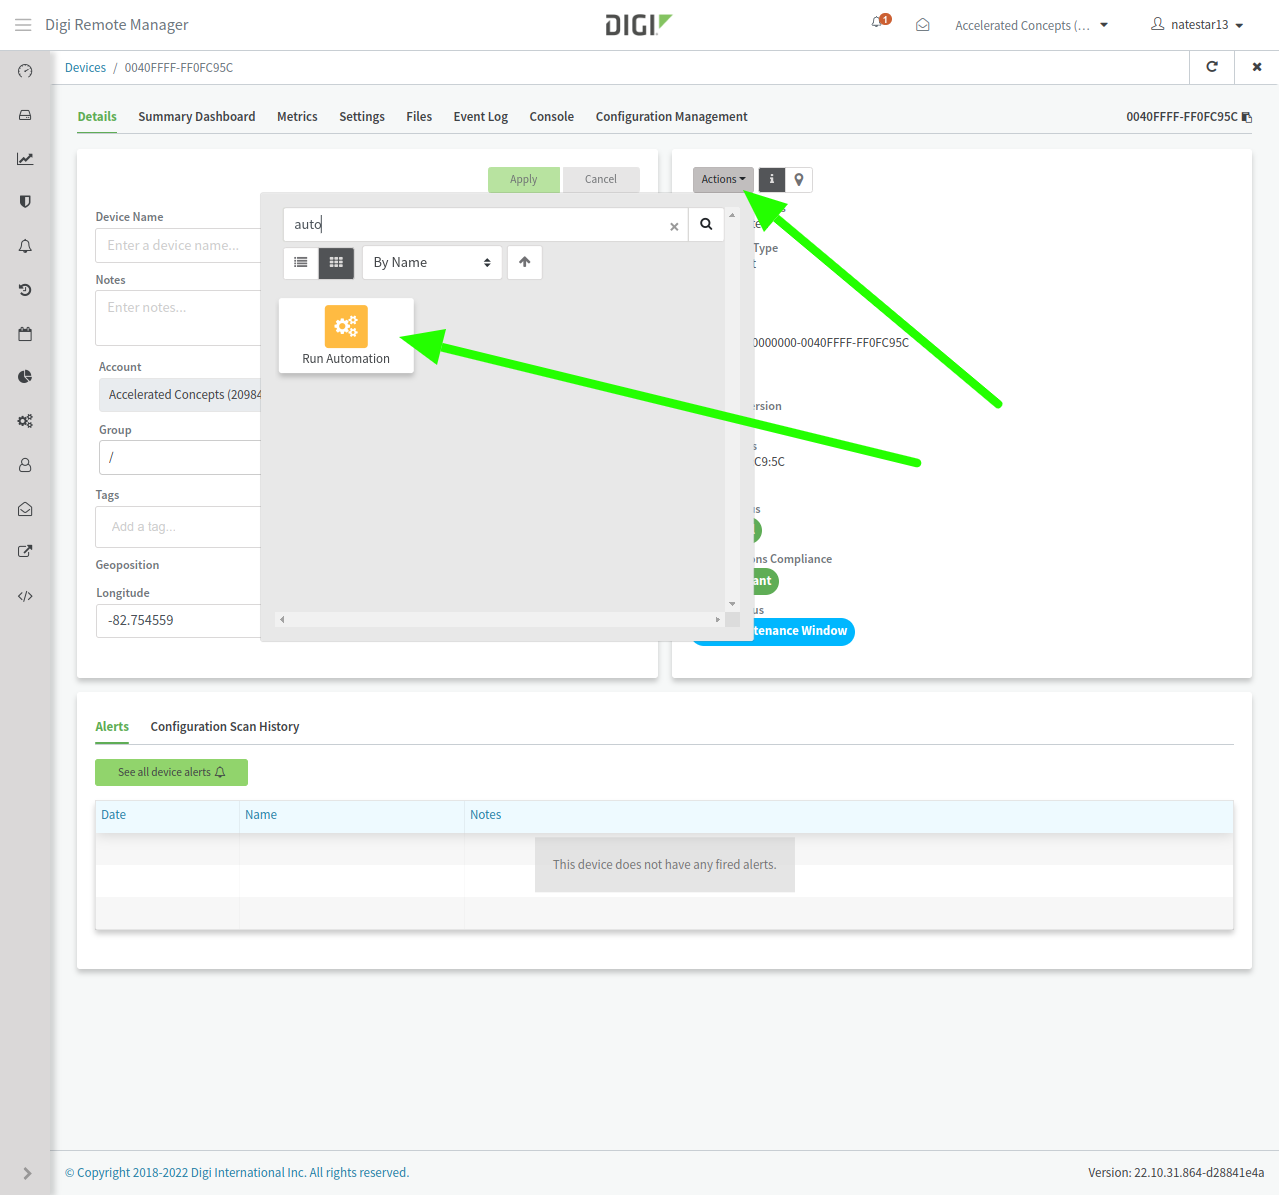
Manually using the Actions drop-down on the device’s details page in DigiRM and selecting Run Automation
-
-
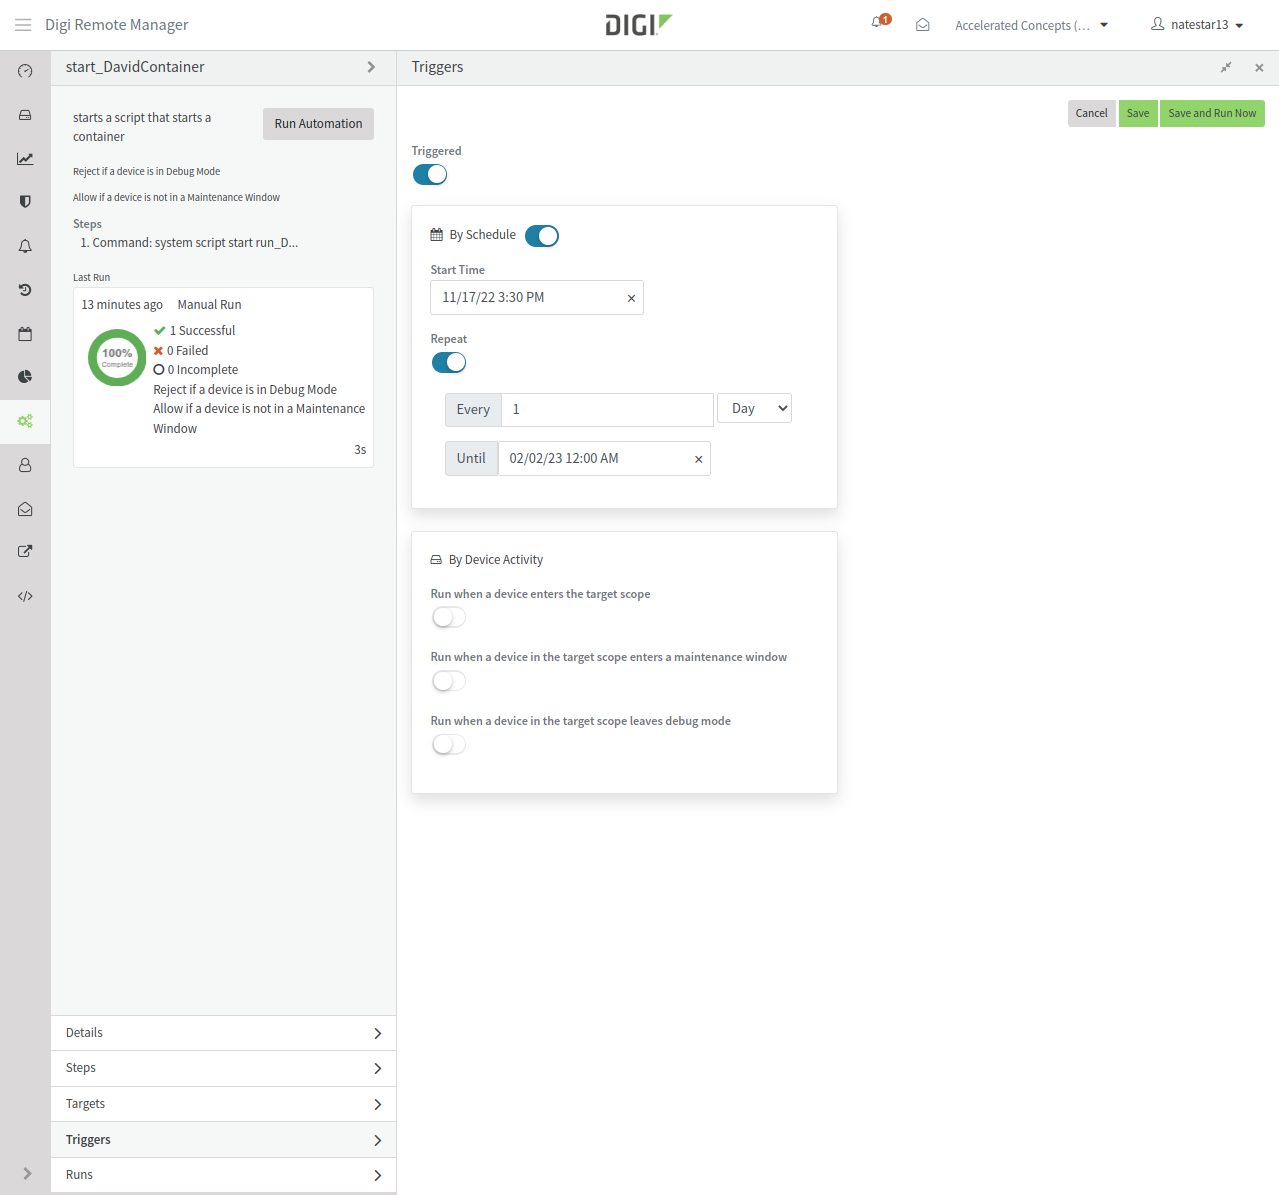
Configuring a trigger under the Triggers tab for the Automation settings
-
You can then view the results of the Automation run to see if it succeeded, and then verify your container is running as expected, similar to step 5 above. Example:
Monitoring the status of your containers
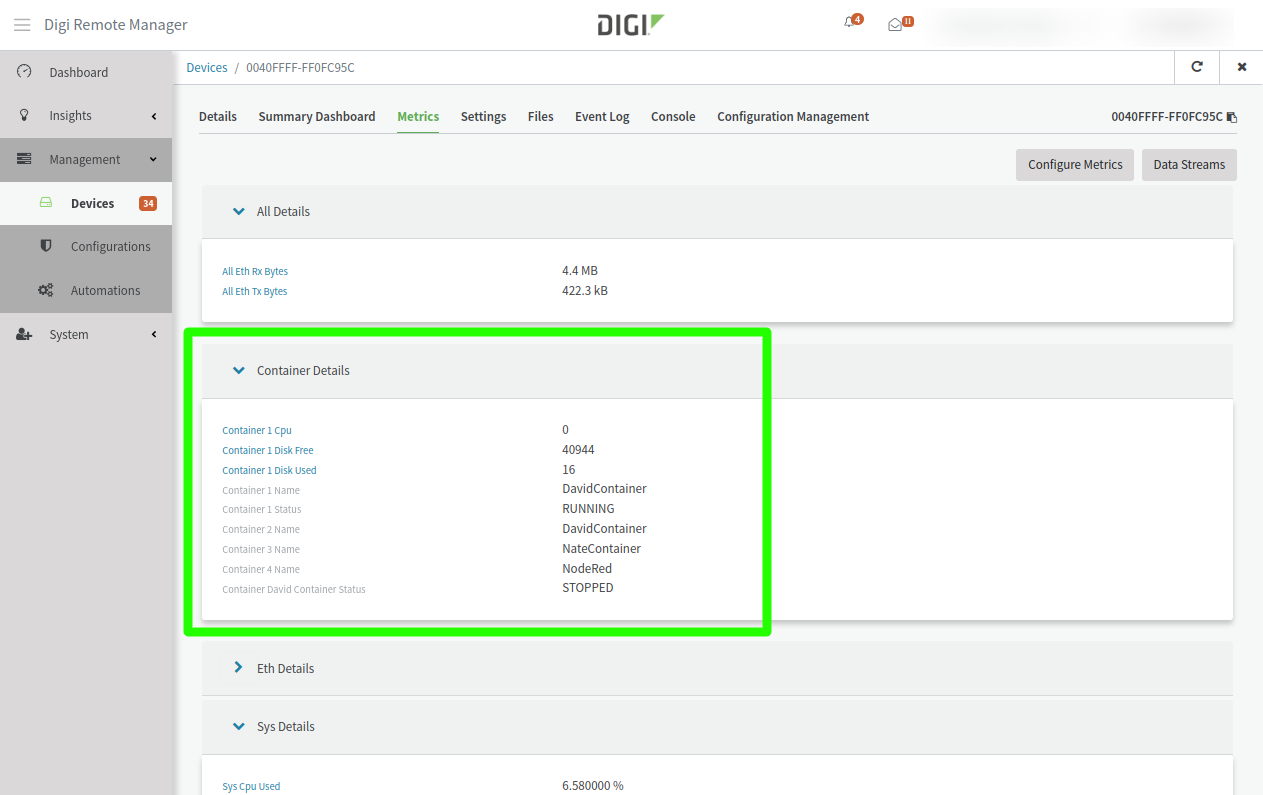
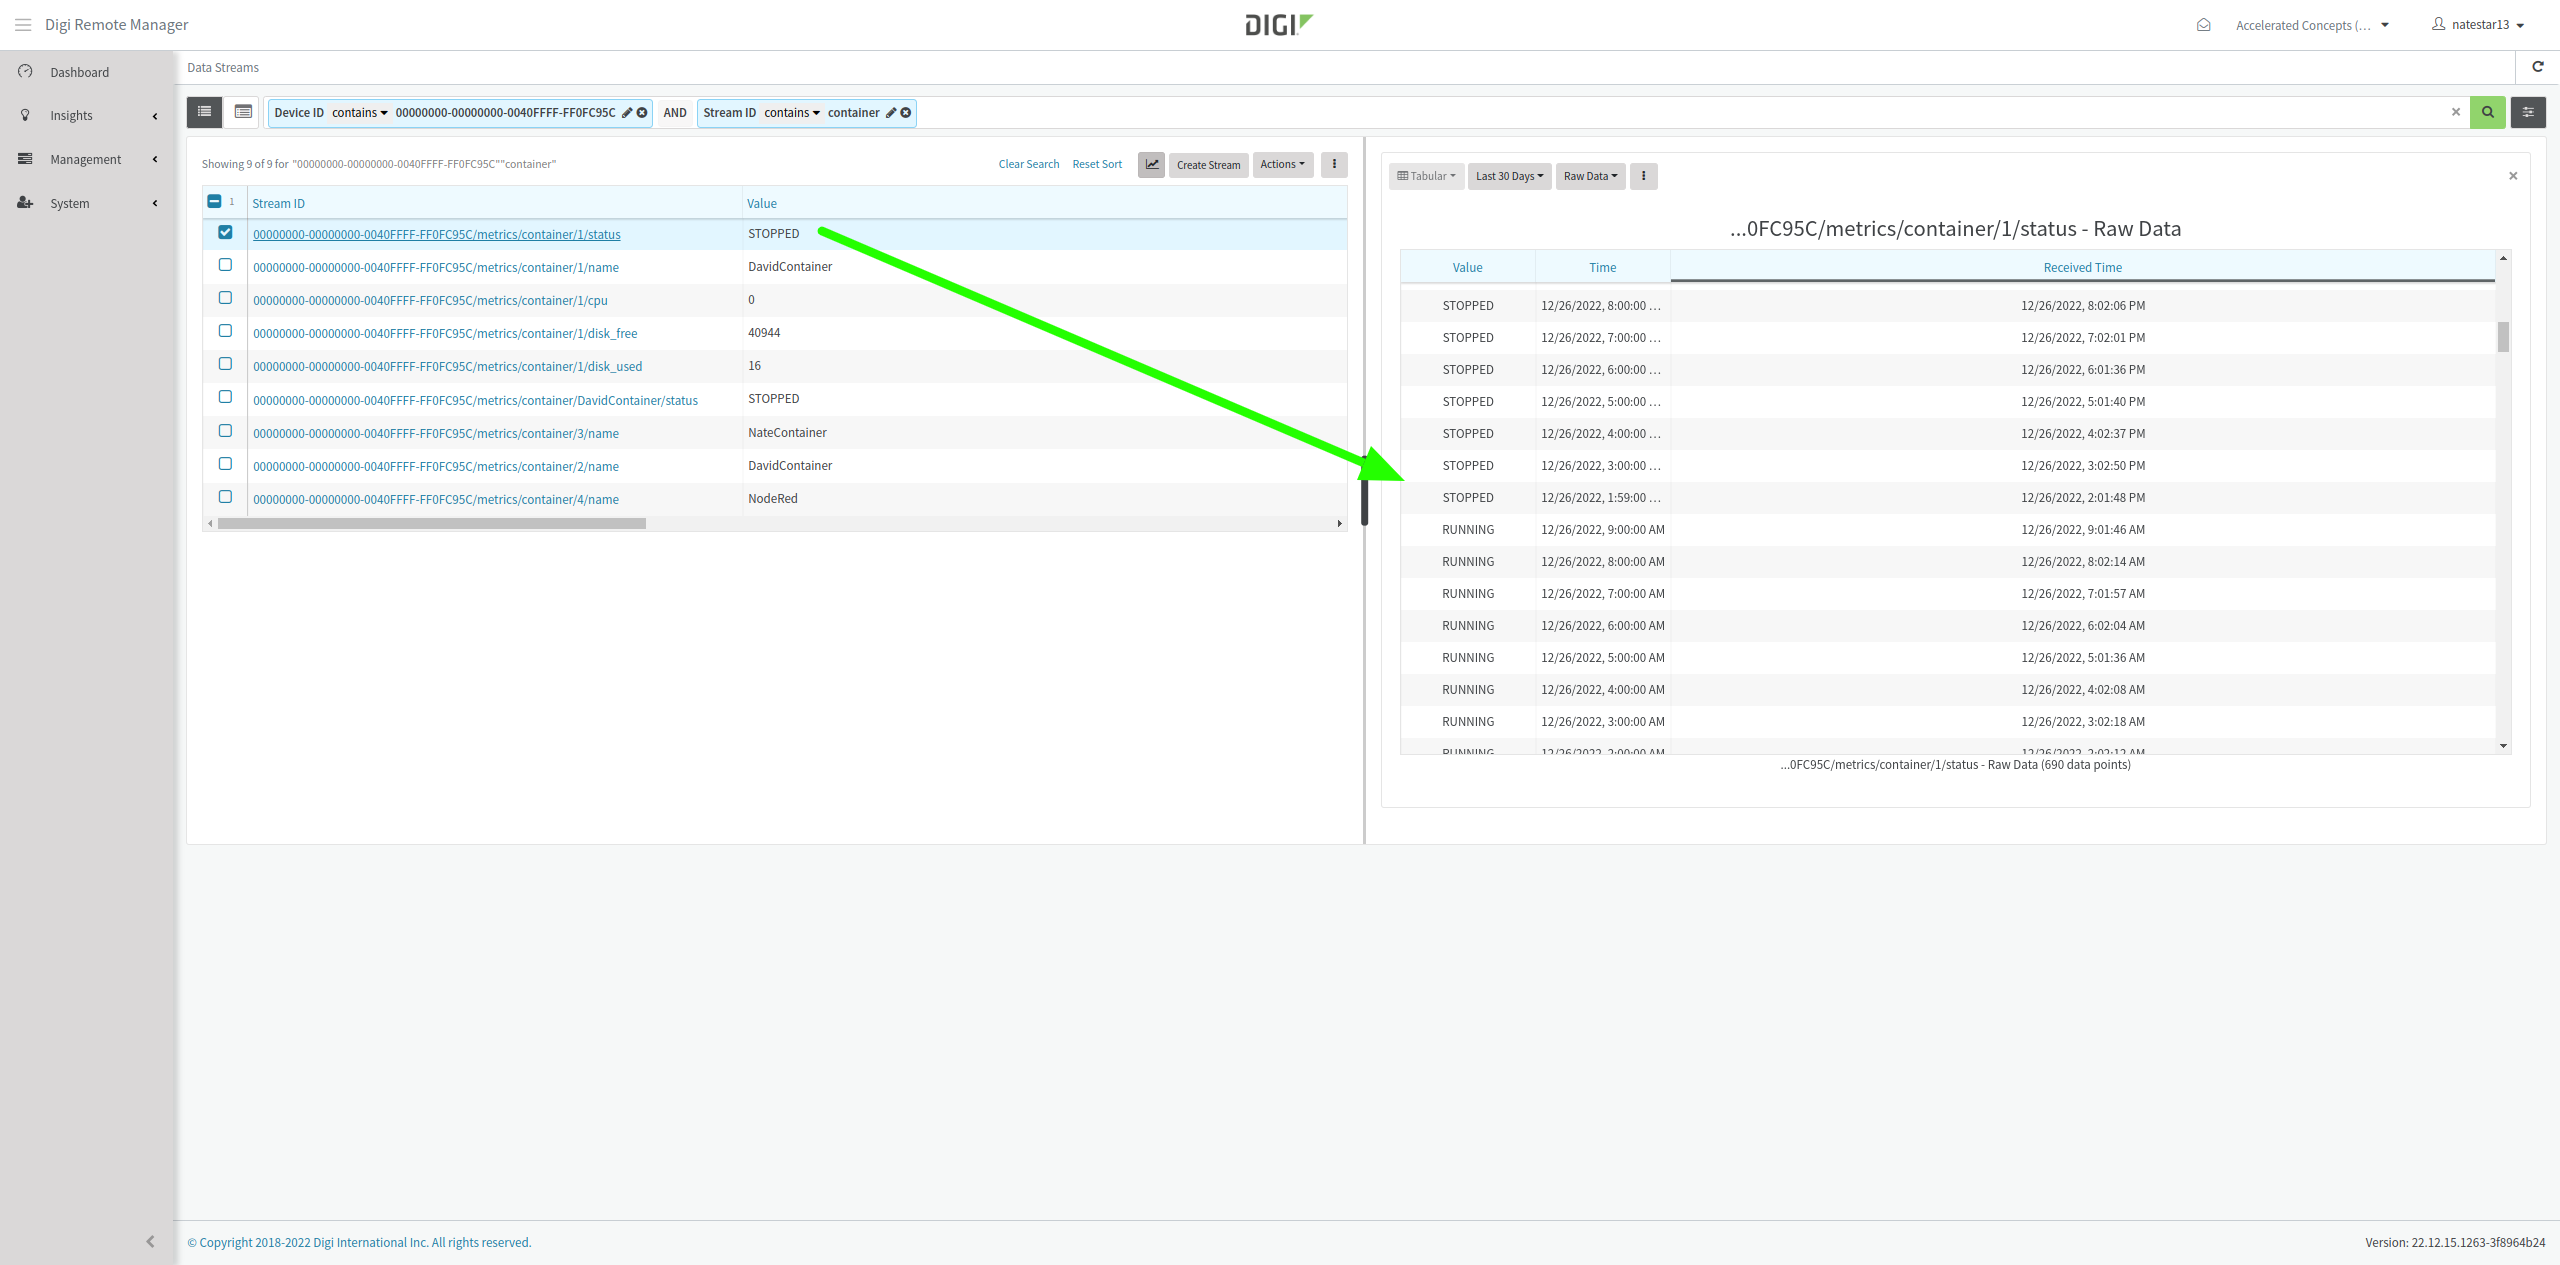
The status and runtime state of each configured container on the device is tracked in Digi Remote Manager as datastream metrics. These metrics can be viewed under the Metrics tab for the device in DigiRM, or under the Data Streams page. On the Data Streams page, each datastream metric can be clicked on to view a history of changes. See example screenshots below:
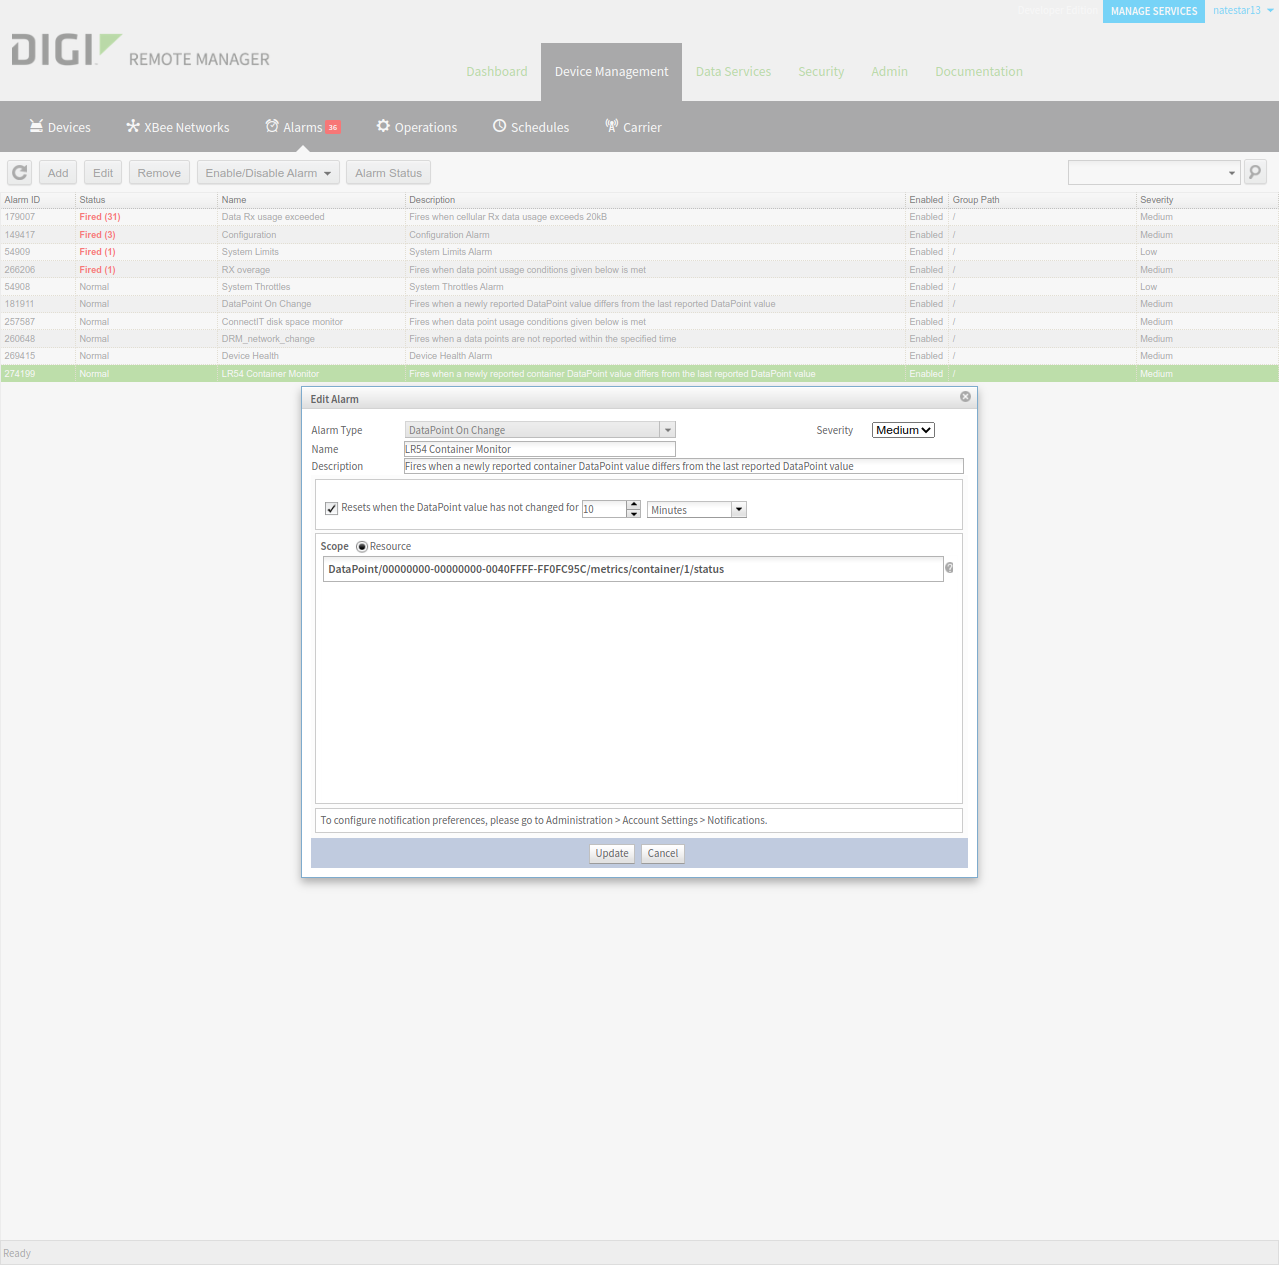
Alerting on changes in container status
Any of the above datastream metrics listed for the container can be monitored and alerted if the state changes or if it changes by a configured amount for a period of time. For more details on setting up alerts in Digi Remote Manager, see this link to the user guide. Below is an example alert definition that would generate an email notification from DigiRM to your user’s email if the container’s status changed (i.e. from running to stopped, or vice-versa).
Last updated:
Sep 30, 2025